Advertisement
Quick Links
We are very proud of the design and quality of
the Ab Coaster®. This product has been
manufactured to the highest standards.
We are available at:
866-219-5335
© 2012 Ab Coaster, LLC. All Rights Reserved.
U.S. Pat. Nos. 7,611,445; 7,585,263; 7,485,079; 7,455,633; D584,367; D565,134
U.S. Trademark Registration Number 3407362
AbC_Black_Manual_V1_120511
AbC_Black_Manual_V1_120511.indd 1
11/29/12 10:54 AM
Advertisement

Related Manuals for AbCoaster PS750


Summary of Contents for AbCoaster PS750
- Page 1 We are very proud of the design and quality of the Ab Coaster®. This product has been manufactured to the highest standards. We are available at: 866-219-5335 © 2012 Ab Coaster, LLC. All Rights Reserved. U.S. Pat. Nos. 7,611,445; 7,585,263; 7,485,079; 7,455,633; D584,367; D565,134 U.S.
- Page 2 AbC_Black_Manual_V1_120511.indd 2 11/29/12 10:54 AM...
- Page 3 CONTENTS 4 Important Safety Information 5 Assembly Instructions 7 Getting On and Off the Ab Coaster® 7 Exercise Instructions 8 Free-Style Motion Seat 9 Resistance Training 9 Digital Counter 9 Moving, Storing & Maintaining the Ab Coaster® 10 Parts List and View 11 Warranty Information AbC_Black_Manual_V1_120511.indd 3 11/29/12 10:54 AM...
- Page 4 Manufacturer’s Limited Warranty – AB COASTER PS750 ® The manufacturer warrants that your Ab Coaster® is free of defects in materials and workmanship and will, at its option, repair or replace any defective Ab Coaster® that is returned to it. Except as described in the following sentence, all parts and components of the Ab Coaster®...
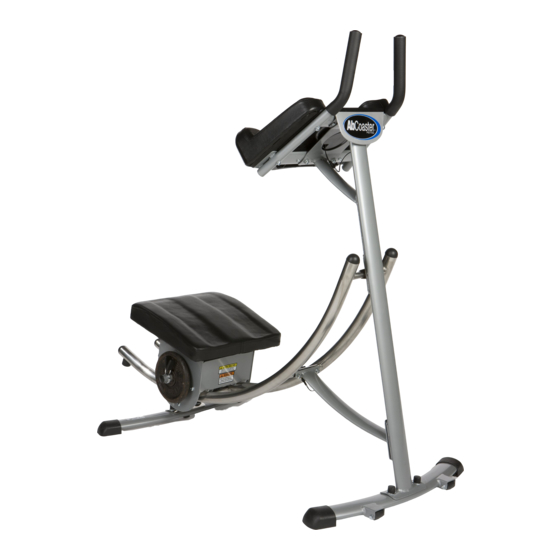
- Page 5 PARTS LIST AND VIEW Part Name Specification QTY (PCS) Part Name Specification QTY (PCS) Part Name Specification QTY (PCS) foot grip match 70*35*1.5 elliptical tubing arm cushion nylon bushing ø70*ø40*20 front leg handlebar frame ø38 nylon sleeve ø38*ø25*19 M10*45 screw M10*45(15mm thread) handlebar grip ø29*ø23*220...
-
Page 6: Safety Labels
SAFETY LABELS CAUTION: PINCH CAUTION: PINCH POINT Make forwar Make sure locking pin is fully engaged before beginning forward and side lift exercises. AbC_Black_Manual_V1_120511.indd 6 11/29/12 10:54 AM... -
Page 7: Important Safety Information
• ONLY USE THE Ab Coaster® ON A FLAT, STABLE SURFACE. DO NOT USE THE Ab Coaster® ON A SMALL AREA RUG THAT MAY TEND TO MOVE WHILE EXERCISING. • DO NOT ATTEMPT TO USE THE Ab Coaster® PS750 WITHOUT RESTING YOUR ARMS ON THE ARM REST AND HOLDING ONTO THE HANDLES. - Page 8 CAUTION: Do not add more than 20 lbs. of weight in total to the posts (4 plates of 5 lbs. each). Before adding any weight, ensure that you are able to perform the exercise with proper form without any additional weights. Please visit www.AbCoaster.com to view video of proper usage of the machine. MOVING STORING AND MAINTAINING...
-
Page 9: Exercise Instructions
EXERCISE INSTRUCTIONS Adjust Hand Grip and place forearms and elbows on arm pads. Lightly grasp handles. Kneel on Seat so that your feet are hooked on the back edge of the pad. Keeping your back straight, pull your knees forward until you fully contract your abs. DO NOT move your upper body while performing exercise. - Page 10 ASSEMBLY INSTRUCTIONS Your Ab Coaster® has been thoroughly inspected and partly assembled before shipment. You will need to take a few additional steps as described below to complete assembly. FRONT POST ARMREST CONSOLE Step 1: Attach Rear Foot SEAT FRONT Step 2: Attach Front Foot FOOT Step 3: Attach Front Post...
- Page 11 Step 3: Attach front post to curved track. The front post is attached to track in 2 locations as shown using the 2 pre-attached Allen head screws for each location. Finger tighten only. Step 4: Attach armrest console to top of front post using the 4 pre-attached Allen head screws.
-
Page 12: Getting On And Off The Ab Coaster
GETTING ON AND OFF THE Ab Coaster ® Step 1: Make sure the Ab Coaster® is placed on a flat, stable surface. Step 2: Approach the Ab Coaster® from the side, not the back, of the unit. WRONG! Step 3: Place forearms and elbows on arm pads. Grasp handles to maintain your balance.
Need help?
Do you have a question about the PS750 and is the answer not in the manual?
Questions and answers