
Subscribe to Our Youtube Channel
Related Manuals for Hans Grohe Croma E 26067 1 Series


Summary of Contents for Hans Grohe Croma E 26067 1 Series
- Page 1 EN Installation / User Instructions / Warranty FR Instructions de montage / Mode d'emploi / Garantie ES Instrucciones de montaje / Manejo / Garantía Showerpipe 26067xx1...
-
Page 2: Technical Information
English Technical Information Water pressure Recommended 15 - 75 PSI (0.1 - 0.5 MPa) Maximum 145 PSI (1 MPa) Hot water temp. Recommended 120°-140° F (48° - 60° C)* Maximum 158°F (70° C)* Flow rate (max.) 5.3 GPM (20 L/min) * Please know and follow all applicable local plumbing codes when setting the temperature on the water heater. - Page 3 Français Données techniques Pression d’eau recommandée 15 - 75 PSI (0.1 - 0.5 MPa) maximum 145 PSI (1 MPa) Température d'eau chaude recommandée 120°-140° F (48° - 60° C)* maximum 158°F (70° C)* Capacité nominale 5.3 GPM (20 L/min) * Vous devez connaître et respecter tous les codes de plom- berie locaux applicables pour le réglage de la température du chauffe-eau.
- Page 4 Español Datos tecnicos Presión en servicio recomendada 15 - 75 PSI (0.1 - 0.5 MPa) max. 145 PSI (1 MPa) Temperatura del agua caliente recomendada 120°-140° F (48° - 60° C)* max. 158°F (70° C)* Caudal máximo 5.3 GPM (20 L/min) * Debe conocer y cumplir todos los códigos locales apli- cables para ajustar la temperatura del calentador de agua.
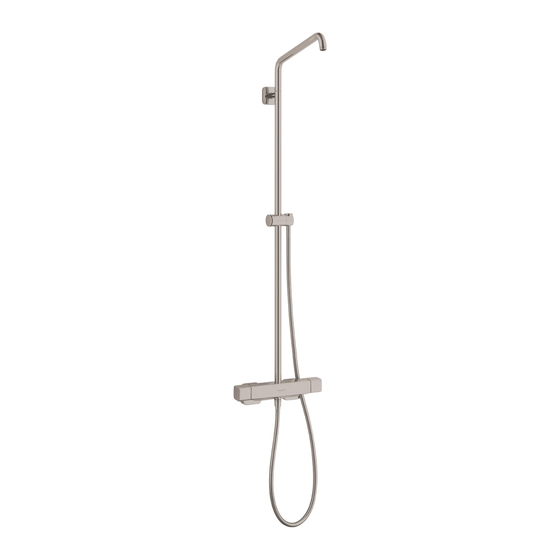
- Page 5 Showerpipe 26067001 2½" (63 mm) 13" (330 mm) 2⅜" (60 mm) Ø ⅞" (22 mm) 12" (306 mm) 1¾" (45 mm) 2⅝" (68 mm) 2¾" (70 mm) 3¾" (96 mm) 5⅞" (150 mm)
- Page 6 Installation Suggestions / Suggestions d'installation / Sugerencias para la instalación English min. 1" (25 mm) The installation dimensions shown in this installation suggestion are ideal for people of approximately 6' (1800 mm) in height. The dimensions can be changed if required. In this case, the minimum ceiling height of 90⅝"...
- Page 7 Service Stops / Butées d’arrêt d’isolation / Cierres de servicio closed fermé cerrado open ouvert 4 mm abierto Tools Required / Outiles Utiles / Herramientas Útiles 3 mm 30 mm 4 mm 24 mm 10 mm 8 mm 6 mm (¼")
- Page 8 Important! Importante! > 5 min English Français Español The showerpipe must be installed Le showerpipe doit être instal- El showerpipe debe ser instalado with showerpipe rough set lé avec l’ensemble de pièce con un juego de piezas interiores 16181181 (not included). intérieure pour tuyau de douche del tubo de ducha 16181181 (no 16181181 (non inclus).
-
Page 9: Installation / Installation / Instalación
Installation / Installation / Instalación " 5 ⅞ ( 1 5 English Français Español Turn the water off at the main. Fermez l’eau à la valve principale. Cierre el paso del agua en la entrada del suministro. Remove the spacing jig, nuts, and Retirez le gabarit d’espacement, plugs. - Page 10 ¾ " ( 2 0 ¾ " ( 2 0 English Français Español Mark a point on each nipple ¾” Faites une marque sur chaque Marque un punto en cada niple de from the surface of the finished raccord fileté à ¾ po de la surface ¾”...
- Page 11 English Français Español Remove the mounting plates. Retirez les plaques de montage. Retire las piezas de montaje. Drill the screw holes using a ¼" Percez les trous pour la plaque de Perfore los orificios para la placa (6 mm) bit. montage à...
- Page 12 30 mm 14.7 ft-lb (20 Nm) 24 mm English Français Español Install the stops. Installez les boitiers de service. Instale las válvulas. Lightly lubricate the o-rings on the Lubrifiez les joints toriques. Lubriquez las juntas. mounting plates using white plumb- ers’...
- Page 13 4 mm 4.4 ft-lb (6 Nm) English Français Español Lubricate the o-rings on the shower Lubrifiez les joints toriques sur le Lubrique las juntas toroidales en el arm. bras de douche. brazo de ducha. Install the shower arm on the riser. Installez le bras de douche sur le Presione el brazo de ducha en la colonne montante.
- Page 14 English Français Español Lubricate the o-rings on the riser. Lubrifiez les joints toriques sur le Lubrique las juntas toroidales en la mitigeur. válvula mezcladora. Install the riser on the mixer. Installez la colonne montante sur Instale tubería de subida a la Make sure that the riser is level.
- Page 15 6 mm 8 mm English Français Español Drill the holes for the mounting Percez les trous pour la plaque de Perfore los orificios para la placa plate using a ¼" (6 mm) bit. montage à l’aide d’un foret de 6 de montaje con una broca de 6 mm (¼...
- Page 16 3 mm 4.4 ft-lb (6 Nm) 0 - ¼" (0 - 5 mm) English Français Español Install the escutcheon on the Installez le rosace sur la douille. Instale el embellecedor en el sleeve. casquillo. Installez la colonne montante sur Install the riser on the mixer. le mitigeur.
- Page 17 English Français Español Install the Install the showerhead Installez la pomme de douche Instale la ducha cabezal (not included) on the shower arm. (non compris) sur le bras de (no incluida) en el brazo de douche. ducha. Place the black rubber hose wash- Placez la rondelle de tuyau en Coloque la arandela de goma er in the short end of the hose.
- Page 18 Optional Installation / En Option / Opcional 93527000 English Français Español If the tile does not go all the way Si les carreaux ne couvrent pas la Si el azulejo no va hasta arriba up the wall, install the mounting surface jusqu’au plafond, installez de la pared, instale la placa de plate with the tile matching disk,...
- Page 19 Justify the handle / Réglez la poignée / Ajuste la manija...
- Page 20 Set the High Temperature Limit Stop (optional) / Réglage de la butée limite d’eau chaude (en option) / Ajuste el tope de límite de alta temperatura (opcional) **To prevent scald injury, the maximum output temperature of the shower valve must be no higher than 120°F (49°C). In Massachusetts, the maximum output temperature can be no higher than 112°F (44°...
- Page 22 Replacement Parts / Pièces détachées / Repuestos Showerpipe 95688000 98187000 26067001 (50x2) 95985xx0 93526xx0 98716000 98447000 (M6x5) 98131000 (15x2.5) 92166xx0 92137000 93527000 92468xx0 not included 98165000 non compris (20x2) no incluido 93517xx0 98341xx0 93520xx0 96922000 98131000 (15x2.5) 93228000 93630000 96737000 93518xx1 98913000 98137000...
- Page 23 User Instructions / Instructions de service / Manejo 26067001 ouvert ouvert abierto abierto fermé cerrar...
- Page 24 cold froid chaud frío caliente > 104°F easier harder plus facile mais dificil más ligero más pasedo...
- Page 25 Check valve maintenance / Entretien de les clapets anti-retour/ Mantenimiento de las válvulas antirretornos 3 mm 30 mm 10 mm rouge rojo 10 mm 14.75 ft-lb (20 Nm)
- Page 26 3 mm 4.4 ft-lb (6 Nm) 30 mm 12.6 ft-lb (17 Nm)
-
Page 27: Troubleshooting
Troubleshooting Problem Possible Cause Solution Insufficient water – Supply pressure inadequate – Check water pressure – Cartridge filters dirty – Clean the filters – Showerhead or handshower filter – Clean the filter dirty Crossflow: hot water forced into cold – Check valves dirty or worn –... -
Page 28: Dépannage
Dépannage Dysfonctionnement Origine Solution Pas assez d´eau – Pression d´alimentation insuffisante – Contrôlez la pression – Filtre de l´élément thermostatique – Nettoyez les filtres encrassé – Joint-filtre de douchette encrassét – Nettoyez le joint-filtre entre la douchette et le flexible Circulation opposée, l´eau chaude –... -
Page 29: Localización De Fallas
Localización de Fallas Problema Causa Solución Sale poca agua – Presión insuficiente – Comprobar presión – Filtro del termoelemento sucio – Limpiar filtro – Filtro de la ducha sucio – Limpiar / cambiar filtros entre flexo y ducha Flujo de agua cruzada agua caliente –... - Page 30 Cleaning Recommendation for Hansgrohe Products Modern bathroom faucets, kitchen faucets and shower products are made from different materials to comply with the needs of the market with regard to design and functionality. To avoid damage to the product, it is necessary to take proper care of it. For best results: •...
- Page 31 Important • Les residus de produits pour le corps comme les savons liquides, shampooings, gels de douche, teintures pour cheveux, parfums, apres-rasage et vernis a ongles peuvent causer des deteriorations. Rincez le produit avec de l’eau propre après chaque utilisation. •...
-
Page 32: Limited Consumer Warranty
Limited Consumer Warranty This warranty is limited to products manufactured by Hansgrohe, Inc. excessive water pressure or corrosion. (“Hansgrohe”) that are purchased by a consumer in the United States Labor and other expenses for disconnection, deinstallation, or Canada after March 1, 1996, and installed in either the United or return of the product for warranty service (including but States or in Canada.
Need help?
Do you have a question about the Croma E 26067 1 Series and is the answer not in the manual?
Questions and answers