Table of Contents
Advertisement
USER MANUAL
FR : Un manuel dans votre langue est disponible sur Internet:
IT: Il manuale nella sua lingua può essere trovato su Internet:
ES: Puede encontrar un manual en su idioma en Internet:
PT: Um manual em seu idioma pode ser encontrado na Internet:
PL: Instrukcję w swoim języku możesz znaleźć na stronie:
SWE: En handbok på ditt språk finns på Internet:
NL: Een handleiding in uw taal vindt u op internet:
www.easypix.info/download-manuals/download/w2024/
Advertisement
Table of Contents

Related Manuals for Easypix AQUAPIX W2024 Splash


Summary of Contents for Easypix AQUAPIX W2024 Splash
- Page 1 PT: Um manual em seu idioma pode ser encontrado na Internet: PL: Instrukcję w swoim języku możesz znaleźć na stronie: SWE: En handbok på ditt språk finns på Internet: NL: Een handleiding in uw taal vindt u op internet: www.easypix.info/download-manuals/download/w2024/...
-
Page 2: Table Of Contents
Table of content Retaining instructions ................3 Explanation of safety warnings ..............3 Product introduction .................. 4 Intended use ....................4 Restrictions ....................5 Safety instructions..................6 Operating environment ................8 Using your camera..................8 Description of the product ................. 9 Description of the product display ............10 First steps: Preparing your camera for first use ........ - Page 3 Furthermore, Easypix reserves the right to revise this publication at any time without incurring an obligation to notify any person of the revision. Easypix is not responsible or liable for misuse of the information that is contained herein. If you have any suggestions for improvements or amendments or have found errors in this publication, please notify us.
-
Page 4: Retaining Instructions
Retaining instructions Read this manual and its safety instructions before using this product. Follow all the instructions. This will avoid fire, explosions, electric shocks or other hazards that may result in damage to property and/or severe or fatal injuries. The product shall only be used by persons who have fully read and understand the contents of this user manual. -
Page 5: Product Introduction
Product introduction The Aquapix W2024 ‘Splash’ is a high quality digital still and video camera. Waterproof to 3M and featuring a 10MP sensor, it captures photos up to 16MP resolution and high definition 720p video. Powered by 2x AAA batteries (not included) W2024 ‘Splash’ utilizes a full colour 2.4”... -
Page 6: Restrictions
Restrictions WARNING The product is not suitable for children under 3 years because of choking hazard. • Contains small parts, in order to avoid swallowing, please ensure any use by children is undertaken with adult supervision. • The camera is suitable for use underwater to a maximum depth of 3 metres. -
Page 7: Safety Instructions
Safety instructions WARNING This product is only suitable for the purpose described, the manufacturer is not liable for damage caused by abnormal use. WARNING Please read this instruction manual carefully before use, and ensure the batteries are installed correctly. • Do not leave the camera in a high or low temperature environment for a prolonged period of time. - Page 8 WARNING BATTERIES • Insert the batteries and memory card before using the camera underwater. Take care to ensure that all flaps and covers are closed and that no water can penetrate the camera. If this happens, turn off the camera and do not use it underwater. •...
-
Page 9: Operating Environment
Operating environment • Do not expose the device to abnormally high or low temperatures. • Store the device cool (at room temperature) in a dry and dust-free location and never expose the product to high temperatures or direct sunlight. • Always protect your camera from falls, shock and impact. Using your camera As your camera is waterproof, it can be used under water while playing and swimming etc. -
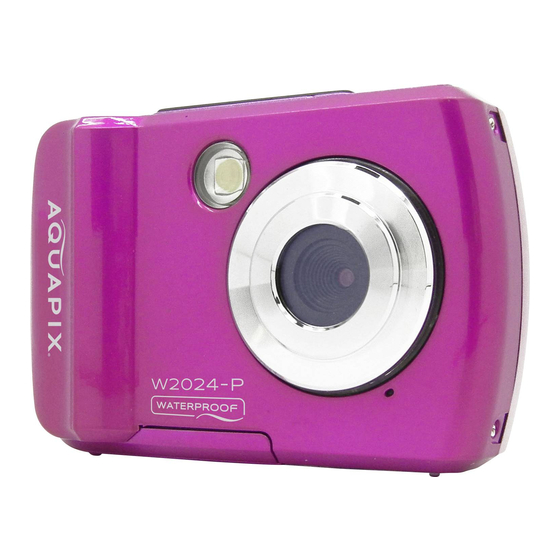
Page 10: Description Of The Product
Description of the product 1. Battery door lock 10. UP / ZOOM IN (T) button 2. Tripod connection 11. DOWN / ZOOM OUT (W) button 3. Flash 12. RIGHT / FLASH LIGHT button 4. Lens 13. LEFT / PLAYBACK button 5. Microphone 14. MODE button 6. -
Page 11: Description Of The Product Display
Description of the product display PHOTO MODE VIDEO MODE... - Page 12 Function Set by Camera mode Mode button Image Resolution Menu / options Image Quality Menu / options Anti-shake Menu / options Landscape Menu / options Number of photos that can still be taken Not adjustable Memory card Micro SD installed confirmation Zoom bar T/ W buttons Battery power...
-
Page 13: First Steps: Preparing Your Camera For First Use
First steps: Preparing your camera for first use Opening and Closing the battery compartment: NOTICE Always ensure the camera and your hands are dry. Ensure that there is no debris inside the battery- chamber or memory card slot. Always ensure that the battery cover is firmly closed and the security lock is in the lock position before using the camera. -
Page 14: 2. Format Your Memory Card
NOTICE Batteries and electronic equipment should be disposed of in accordance with applicable local regulations, and you should not throw them into household garbage to avoid irreversible pollution. 2. Format your memory card NOTICE To ensure the optimal functioning of your camera, please note the following important information: •... -
Page 15: Switching Your Camera On/Off
Memory Card installation (MicroSD Card of Class 4 or higher) 1. Ensure the camera is turned off 2. Open the battery / memory card cover as described above 3. Insert a Micro SD card into the memory card slot in the direction indicated near the card slot. -
Page 16: Camera Modes
Camera modes There are 3 camera modes: Photo, Video and Playback. The mode icon is displayed in the top-left corner of the TFT screen. Photo mode is the default mode when the camera is switched on. You can change the camera mode by pressing the Mode (M) button. When in Photo Mode, the photo icon will display on the top-left corner of the TFT screen. - Page 17 When in Playback Mode, this icon will display on the top-left corner of the TFT screen. You can use the Left/ Right buttons to scroll through and view the photos and videos that you have previously taken. You can also delete or edit them as desired.
-
Page 18: Photo Mode
Photo mode SHUTTER T – ZOOM IN Camera mode W – ZOOM OUT Zoom bar MODE BUTTON MENU/SET BUTTON 1. After switching on, the camera will be in photo mode and ready to take photos. 2. You can press the Mode button (M) to change to photo mode. The camera mode is displayed at the top-left corner on the TFT screen. -
Page 19: Video Mode
Video mode 1. Press the M (Mode) button to switch to video mode. 2. Use the T (zoom in) or W (zoom out) buttons to zoom in/ out. 3. Press the Shutter button to start recording. A red recording indicator flashes on the TFT screen to confirm recording is in progress. -
Page 20: Button Functions
Button functions Some buttons have one single function however other buttons have multiple functions depending on the current operating mode. The table below outlines the various button functions: Photo playback Button Photo mode Video mode Video playback mode mode Start / Stop Start and pause video Shutter Take a photo... -
Page 21: Playback Mode Icons
Playback mode icons The following status icons are displayed when reviewing photos or playing video. PHOTO PLAYBACK MODE Camera mode Current image no. / Total quantity Memory card Zoom bar Magnification factor Battery power Date / time stamp Current image format... - Page 22 VIDEO PLAYBACK MODE ICONS Playback mode Resolution Current image no. / Total quantity Memory card Battery power Playback time counter Press shutter button to play the video Current file format NOTE: You can hide the icons on screen by pressing the Mode button for 2 seconds.
-
Page 23: Camera Settings
Camera settings Each camera mode has a set of menu options specific to that mode. To select a menu and option please use the buttons as indicated below: Menu Menu DOWN selected TO THE RIGHT Options TO THE LEFT MODE-BUTTON Use direction buttons to SET-BUTTON select menu and... -
Page 24: Time And Date Settings
Changes made to these options remain saved until you decide to change them again at a later time, or restore the camera to factory default settings. Note: Some menu options are single-use functions that are not stored by the camera and therefore do not display this icon when selected. At any time you can press the Mode button to exit the menus and return to the previous screen Time and date settings... -
Page 25: Transferring Files From Camera To Computer
Transferring files from camera to computer NOTICE Disconnect all other USB-powered devices from the computer. Connecting the camera and other USB-powered devices to the same computer simultaneously may cause a camera malfunction or excessive power supply from the computer, which could damage the camera or memory card. - Page 26 MAC: 1. Use the USB cable that came with your camera to connect your camera to your computer. 2. Turn on the camera. 3. MSDC appears on the LCD. 4. The camera’s device icon appears on the desktop. 5. Click on the device icon and open the DCIM folder and the folder inside to view the media files.
-
Page 27: Cleaning
• Allow the camera to dry at room temperature after rinsing. Box contents • Camera • Hand strap • USB cable • Manual EN/DE Manuals in further languages are available for download at www.easypix.info/download-manuals/download/w2024/... -
Page 28: Technical Specifications
Technical specifications *by interpolation Waterproof Up to 3m Image Sensor 5MP CMOS sensor 16M (4608x3456)*, 14M (4416x3312)*, 12M (4000x3000)*, 10M (3648x2736)*, 8M (3264x2448)*, 7M (3648x2048)*, Image Resolution 5M (2592x19444), 3M (2048x15364), 2M (31920x1080), VGA (640x480) Video Resolution HD 720P (1280x720), VGA (640x480), QVGA (320x240) File Format JPEG (Photo), AVI (Video) External Memory... -
Page 29: Disposal
Disposal Dispose of packaging For disposal, separate packaging into different types. Cardboard and board must be disposed of as paper and foil must be recycled. Disposal of Waste Electrical and Electronic Equipment and/or Battery by users in private households in the European Union. This symbol on the product or on the packaging indicates that this cannot be disposed of as a household waste. -
Page 30: Declaration Of Conformity
Declaration of conformity For the product W2024 Splash we hereby confirm that it meets the basic requirements laid down in 2014/53/EU 2011/65/EC RoHs 2014/30/EU EMV 2012/19/EC WEEE The EC Declaration of Conformity can be downloaded here: http://www.easypix.info/download/pdf/doc_w2024.pdf...
Need help?
Do you have a question about the AQUAPIX W2024 Splash and is the answer not in the manual?
Questions and answers