Table of Contents
Advertisement
Quick Links
Download this manual
See also:
User Manual
Advertisement
Table of Contents

Related Manuals for Easypix LCD


Summary of Contents for Easypix LCD
- Page 1 User’manual...
-
Page 2: For Customers In Europe
For customers in North and South America For customers in USA This device complies with Part 15 of the FCC rules. Operation is subject to the following two conditions: (1) This device may not cause harmful interference. (2) This device must accept any interference received, including interference that may cause undesired operation. -
Page 3: Table Of Contents
Table of Contents Page 1. System Requirements ---------------------------------------------------------------------- 2. Package Contents --------------------------------------------------------------------------- 3. Quick Start -------------------------------------------------------------------------------------- 4. Name of Parts ---------------------------------------------------------------------------------- 5. Display Information -------------------------------------------------------------------------- 6. Getting Started -------------------------------------------------------------------------------- • Installing Camera Batteries -------------------------------------------------------------- • Inserting SD Card (must use to save pictures) -------------------------------------- •... - Page 4 Table of Contents Page 10. Deleting Pictures and Videos ----------------------------------------------------------- • Deleting Single Picture or Video -------------------------------------------------------- • Deleting All Pictures and Videos -------------------------------------------------------- • Formatting Internal Memory or SD Card ---------------------------------------------- 11. Customizing Your Camera Settings -------------------------------------------------- * Capture Mode Menu ------------------------------------------------------------------ * Playback Status Menu ---------------------------------------------------------------- 12.
-
Page 5: System Requirements
1. System Requirements • Personal computer, laptop, desktop, or IBM compatible with Pentium 166 MHz minimum, and with an active USB (Universal Serial Bus) port. • Windows 98SE / ME / 2000 / XP, CD ROM drive, color monitor, mouse and keyboard. •... -
Page 6: Quick Start
3. Quick Start CAUTION • Please install the camera driver before using your camera with a PC. • Best way to transfer picture to PC is using the Mass Storage mode to copy all your pictures. • Getting Ready 1. Slide open the battery compartment cover 2. - Page 7 • Deleting a Picture 1. Turn on the camera. 2. Slide the Function switch to (playback mode). 3. Use to select the picture you want to delete. 4. Press the Mode button to turn on the menu and then use to select [Delete] on the screen.
-
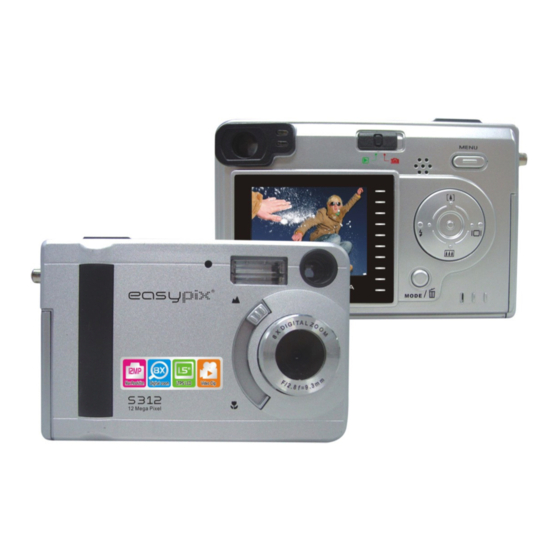
Page 8: Name Of Parts
11. Function Switch 12. MENU Button 13. Strap Eyelet 14. Battery Compartment Cover & SD Card Slot 15. Arrow pad : Flash : Display : Zoom In : Zoom Out 16. Mode Button 17. LCD monitor 18. Tripod Socket - 4 -... - Page 9 Display Button Press the Right button and the current information on the LCD monitor will be displayed. Menu Button You can turn the menu ON or OFF by pressing the Menu button. As menu turns on, the items...
-
Page 10: Display Information
5. Display Information Note: If the icon appears on the LCD when you take pictures in dark conditions, please keep your hands steady, otherwise you may capture a blurred picture. - 6 -... - Page 11 - 7 -...
-
Page 12: Getting Started
6. Getting Started • Installing Camera Batteries: 1. Slide open the battery compartment cover. 2. Insert batteries. Be sure to load batteries with + and – terminals as shown on the camera. 3. Close the battery compartment cover. - 8 -... -
Page 13: Inserting Sd Card (Must Use To Save Pictures)
When the card is partially ejected, pull it out. 4. Close the battery compartment cover. Note: If the “MEMORY FULL” warning message appears on the LCD monitor, it means the SD card is full. Please remove the memory and insert a new one or transfer all pictures/videos from the memory card onto your computer. -
Page 14: Setting The Date, Time And Date Stamp
• Setting the Date, Time and Date Stamp: Use the following procedure to change the date and time setting. 1. Slide the Function switch to (capture mode). 2. Press the Mode button twice to turn on function menu. Press the Shutter button to confirm. -
Page 15: Taking Pictures
7. Taking Pictures • Taking a Picture 1. Turn on the camera. 2. The LCD monitor will display image and symbols. 3. Slide the Function switch to (capture mode). 4. The LCD monitor will display (snapshot mode). If icon is different, Press the Menu button and then... -
Page 16: Using Digital Zoom
When you take pictures at night, indoors, or outdoors in heavy shadows, use the flash. Press the button repeatedly to scroll through the flash options. The flash icon that is displayed on the LCD monitor is the active option. - 12 -... -
Page 17: Setting Picture Quality
3. Press the Menu button to return to capture mode and you will see the icon 12M/3.2M /2M on the LCD. Note: 1. This setting remains until you change it. 2. Movies can be shot with the QVGA (320 x 240) or VGA (640 x 480) resolution. -
Page 18: Using The Self Timer
5. Compose the picture, then press the Shutter button all the way down. 6. The red Self Timer light, located on the front of the camera, blinks for 10, 15, 20 seconds (Selectable) and you will see the counter on the LCD before the picture is taken. 8. Shooting Videos •... -
Page 19: Reviewing Pictures And Videos
2. Video cannot be zoomed in playback mode. • Using the Thumbnail Function View six pictures at once on the LCD monitor (Index View) so that you can search through the pictures quickly. 1. Make sure the Function switch is set to , and then press the Shutter button. -
Page 20: Using The Slide Show Function
[Print] on the screen and press the button to select ON/OFF. 4. Press the Mode or Menu button to return to playback status. And you will see the icon appear on the LCD if you choose ON. - 16 -... -
Page 21: Deleting Pictures And Videos
10. Deleting Pictures and Videos This function allows the user to delete current or all the stored images from the SD card. • Deleting a Single Picture or Video 1. Turn on the camera. 2. Slide the Function switch to (playback mode). -
Page 22: Formatting Internal Memory Or Sd Card
2. Files that are erased cannot be recovered. Make sure you have selected the images you want to erase. 3. Files that have been protected (see the following section) cannot be erased even if “Delete All” is selected. • Formatting Internal Memory or SD Card 1. -
Page 23: Customizing Your Camera Settings
2. Press the Menu button to confirm and return to mode. • The settings can be adjusted in 1/2 steps within the range –2EV ~ +2EV. • You can check the result of the compensation by viewing the image on the LCD monitor. - 19 -... - Page 24 [White Balance] When the white balance is set to match the light source, the camera can take pictures more accurately. The camera sets the white balance automatically according to Auto shooting conditions. Sunny Use when shooting in outdoor sunlight on a clear day. Use when shooting outdoors and there is insufficient sunlight such Cloudy as under cloudy skies, in the shade or at dusk.
- Page 25 [Time Stamp] Will not print time on the picture. Date Only Only prints the date on the picture. Date & Time Prints date and time on the picture. [MODE BUTTON] Slide the Function switch to (capture mode). Press the MODE button twice to turn ON/OFF the function menu.
- Page 26 English Set the language to English. (*default) Français Set the language to French. Deutsch Set the language to German. Italiano Set the language to Italian. Español Set the language to Spanish. Set the language to Russian. Set the language to simplified Chinese. [Beeper] Press to set the beeper on/off .
- Page 27 [Light Frequency] Set the anti-flicker frequency to 50 Hz. (*default-please select if using the camera in Europe, Japan and Asia) Set the anit-flicker frequency to 60 Hz. (please select if using the camera in the United States) [Default Setting] Press Shutter to turn on the submenu and then press Shutter button again to confirm or press the Menu button not to return to default setting.
-
Page 28: Playback Status Menu
* Playback Status Menu [Menu Button] When you slide the Function switch to (playback mode), pressing the Menu button can turn ON/OFF Playback status menu. Press to select the item. button to set Protect and Print to On/OFF. Slide Show Directs to Slide Show. -
Page 29: Installing Your Camera Driver And Software
12. Installing Your Camera Driver and Software • Installing Driver 1. Turn on the computer. 2. Insert installation CD into the CD-ROM drive and the installation CD menu will appear. 3. When you see the following screen, choose “Digital Camera Driver”. 4. -
Page 30: Uninstalling Software
13. Uninstalling Software The following instructions will help you to uninstall (remove) software from your computer. • Uninstalling Software 1. Click "Start" from the task bar and choose "Settings" -> "Control Panel". (For Windows XP: "Start" -> "Control Panels") 2. Double click "Add/Remove Programs". 3. -
Page 31: Downloading Images To Your Computer
14. Downloading Images to You Computer For Windows 98SE/ME customers: Please install camera driver before connecting. 1. Slide the Function switch to (Playback mode). 2. Turn the camera and computer on, then connect the camera to the computer with the included USB cable. -
Page 32: Arcsoft Photoimpression
15. ArcSoft PhotoImpression 5 ArcSoft PhotoImpression 5 is a complete digital image editing application designed with real people in mind. Easy-to-use “Getting Start” guides, user-friendly UI, complete image editing functionality, give users wonderful experience to organizing, viewing, enhancing, editing, printing and sharing photos. Click “Start”... -
Page 33: Arcsoft Videoimpression
1. Get Photo – Choose how to view or acquire photos. 2. Enhance – Crop, brighten, rotate, resize and modify photos. 3. Create – Add clip art, special effects, frames and more. 4. Project – Make calendars, photo books and greeting cards. 5. - Page 34 Create a Video – Create a new video project. You can retrieve media materials from the device connected or choose media files from system folder. You can choose video materials from your photo album as well. Create a Slide Show – Create a slide show project. You can retrieve media materials from the device connected or choose media files from system folder.
- Page 35 1. Media - Select the videos and images that will comprise your final movie or slide show. 2. Edit - Modify video and image color and adjust the duration of each movie component. Only available for video projects. 3. Effects - Add neat special effect transitions between each component, or apply a pre-made theme.
-
Page 36: Using The Camera In Pc Cam Mode
17. Using the Camera in PC-Cam mode The camera offers two USB modes: Removable Disk and PC Camera. Note: Please install camera driver before you can use the camera in PC-Cam mode. Setting Up the PC-Cam 1.Turn the camera power on and slide the Function switch to (Capture mode). -
Page 37: Checking The Connection Of Your Camera
18. Checking the Connection of Your Camera *Turn the camera power on and slide the Function switch to (Capture Status). *Connect the camera to the computer with the included USB cable. For Windows 98SE/ME only Double click “My Computer” icon -> Control Panel ->... -
Page 38: Internet Video Conference
19. Internet Video Conferencing To run a video conference with another person, you and the other person must have the computer station configured with web camera, microphone, speakers, modem and have access to the Internet. You have to download video conference software, purchased or free, such as basic software like I-phone or Microsoft NetMeeting, or Yahoo Messenger. -
Page 39: Appendix
15~18fps ( SD card not included. No Audio function) Compression JPEG / MJPEG (AVI) Digital zoom 8 x Digital Zoom for Preview & Playback Display 1.5” TFT LCD Continuous Capture 3 Images PC Interface USB 1.1 Video Output Self Timer... -
Page 40: Faq
A4: No, with the camera, if you select a larger picture size, it will take longer for it to come up on the LCD monitor. So if you want to speed things up, please select a smaller picture size. (M... -
Page 41: Troubleshooting
Troubleshooting Problem Source Solution The camera is not The power is not on • Press the ON/OFF button to turn the running camera on. The batteries were not • The correct direction to insert the AAA inserted properly batteries is indicated on the camera. Batteries are depleted •... - Page 42 Problem Source Solution The lens is dirty • Clean the lens. Picture is not clear The pictures are Hands were not steady • Ensure hands are steady when taking blurred when taking the picture picture and remain steady one moment after clicking the Shutter button.
Need help?
Do you have a question about the LCD and is the answer not in the manual?
Questions and answers