Table of Contents
Advertisement
Quick Links
Advertisement
Table of Contents

Related Manuals for TACKLIFE TKDP01A


Summary of Contents for TACKLIFE TKDP01A
- Page 1 User Manual 5SpeedDrillPress Model:TKDP01A ID:DP0813W...
-
Page 2: Table Of Contents
TABLE OF CONTENTS Specifications Introduction General Safety Rules Specific Safety Rules for the Wood Lathe Electrical Information Know Your Wood Lathe Assembly & Adjustments Operation Maintenance Troubleshooting Guide Exploded View & Parts List - 01 -... -
Page 3: Specifications
37.26 lbs INTRODUCTION Thanks for purchasing the TACKLIFE Drill Press. We know you are excited to put your tool to work, but first, please take a moment to read through the manual. Safe operation of this tool requires that you read you read and understand this operator’s manual and all the labels affixed to the tool. This manual provides information regarding potential safety concerns, as well as helpful assembly and operating instruc- tions for your tool. -
Page 4: General Safety Rules
GENERAL SAFETY RULES Safety is a combination of common sense, staying alert and knowing how your item works. SAVE THESE SAFETY INSTRUCTIONS. WORK AREA SAFETY 1. Keep work area clean and well lit. Cluttered or dark areas invite accidents. 2. Do not operate power tools in explosive atmospheres, such as in the presence of flammable liq- uids, gases or dust. -
Page 5: Specific Safety Rules For The Wood Lathe
of untrained users. 5. Maintain power tools. Check for misalignment or binding of moving parts, breakage of parts and any other condition that may affect the power tool’s operation. If damaged, have the power tool re- paired before use. Many accidents are caused by poorly maintained power tools. 6. -
Page 6: Electrical Information
Make sure the chuck key is removed from the chuck before turning the machine ON. Adjust the table or depth stop to avoid drilling into the table. DO NOT TOUCH MOVING PIECES. Keep hands away from the drill bit. NEVER perform layout, assembly or set-up work on the table while the drill press is operating. ALWAYS turn off and unplug the machine before removing scrap pieces from the table, cleaning, making adjustments or changing attachments. - Page 7 GUIDELINES AND RECOMMENDATIONS FOR EXTENSION CORDS When using an extension cord, be sure to use one heavy enough to carry the current your product will draw. An undersized cord will cause a drop in line voltage resulting in loss of power and over- heating. The table below shows the correct size to be used according to cord length and ampere rat- ing.
-
Page 8: Know Your Wood Lathe
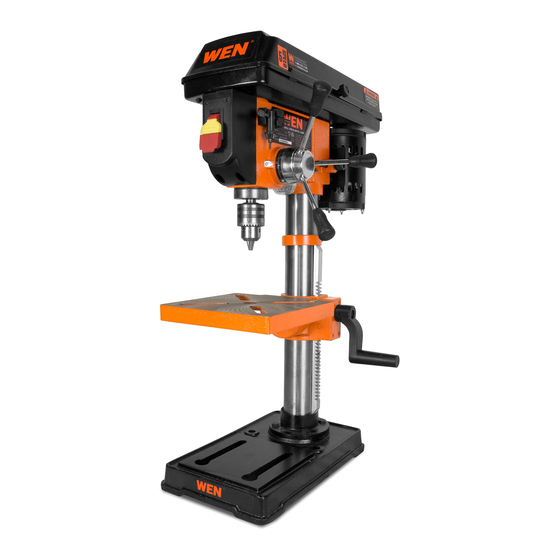
KNOW YOUR WOOD LATHE TOOL PURPOSE Drill presses allow you to drill, enlarge and finish holes in workpieces. Refer to the diagram below to become familiarized with the parts and controls of your drill press. Belt Tension Lever Base Drive (Motor) Pulley Motor Table Bevel Guide Belt... -
Page 9: Assembly & Adjustments
ASSEMBLY & ADJUSTMENTS UNPACKING With the help of a friend or trustworthy foe, carefully remove the drill press from the packaging. Make sure to take out all contents and accessories. Do not discard the packaging until the drill press is com- pletely assembled. - Page 10 ATTACHING THE COLUMN ASSEMBLY TO THE BASE Place the column on the base, aligning the column flange holes to the base holes. Install a hex bolt in each column support hole and tighten bolts using an adjustable wrench (not included). See Fig. 2. ATTACHING THE TABLE TO THE COLUMN Loosen the table locking handle (Fig.
- Page 11 INSTALLING THE CHUCK 1. Unplug your drill press before you begin installing the chuck. Lower the drill press table and place a cloth on it to protect the chuck if it is dropped. 2. Wipe the chuck and spindle with a clean rag. Do not use solvents yet, these will be used when you are ready to set it into place.
- Page 12 RAISING OR LOWERING THE TABLE Loosen the table locking handle (Fig. 8 - 1) so that you can slide the table to the desired height. Once the table is at the desired height, securely tighten the table locking handle. ROTATING THE TABLE Fig.
- Page 13 RECOMMENDED SPEED SPINDLE SPEEDS IN RPM BASED ON MATERIAL & DRILL BIT SIZE 1-5/8" 3/4" 1/2" (41.4 mm) (19.0 mm) (2.4 mm) 1470 1100 1-1/4" 11/16" 3/8" (31.75 mm) (17.5 mm) (4.0 mm) 2090 1470 7/8" 15/32" 1/4" (22.0 mm) (12.0 mm) (6.4 mm) 2090...
- Page 14 If the belt is broken, remove it from the housing cover. If the belt is not broken, but is too stretched to operate correctly, work the belt off the drive (motor) pulley (Fig. 19 - 3). Then remove the belt from the front (spindle) pulley (Fig.
-
Page 15: Operation
NOTE: Feeding too slowly might cause the drill bit to turn in the chuck. Feeding too rapidly might stop the motor, cause the belt to slip, force the workpiece loose, or break the drill bit. Practice with scrap material to get the feel of the machine before attempting to do any drilling operation. OPERATION DRILLING SPEEDS There are a few important factors to keep in mind when determining the best drilling speed:... - Page 16 CLEANING & STORAGE 1. After every operation, use a vacuum to remove dust and chips from the tool surfaces, motor hous- ing and work area. Keep the ventilation openings free from dust and debris to prevent the motor from overheating. 2.
-
Page 17: Troubleshooting Guide
TROUBLESHOOTING GUIDE PROBLEM CAUSE SOLUTION Incorrect belt tension Adjust the belt tension (See p. 17). Dry spindle Lubricate the spindle. Tighten the set screws on the side of the spindle Noisy operation Loose spindle pulley pulley. Tighten the set screws on the side of the motor Loose motor pulley pulley. -
Page 18: Exploded View & Parts List
EXPLODED VIEW & PARTS LIST - 17 -... - Page 19 Description Qty. Description Qty. Capacitor Screws, Belt Cover 28.3 M4 x 6 Self Locking Nut, 28.4 28.5 Fan Screw, M4 x 8 Square Nut, M5 Belt Cover Knob, Flat Washer, Ø10 M5 x 18 Spring Washer,Ø10 Drive (Motor) Hex Nut, M10 Pulley Socket Head Screw, Belt...
- Page 20 Description Qty. Description Qty. Coupling Belt Tension Lever Tensioning Hex Nut, M8 Handwheel Cable Plate Phillips-Head Screw, Phillips-Head Screw, M4 x 12 M5 x 8 Tensioning Washer Toothed Locking Set Screw, M5 x 10 Washer, Ø5 Tensioning Gear Grounding Terminal, Ø5 Phillips-Head Screw, M5 x12...
- Page 21 Warranty Registration We are glad to invite to register the warranty information at www.tacklifetools.com.After registration,you may kindly enjoy the exclusive service...
- Page 22 Tel:929-533-7707 Shenzhen Take Tools Co., Ltd. www.tacklifetools.com www.facebook.com/Tacklife.US support@tacklifetools.com No.B714,Niulanqian Building, Minzhi Road, Longhua District, Shenzhen, Guangdong, China 518000...
Need help?
Do you have a question about the TKDP01A and is the answer not in the manual?
Questions and answers