Table of Contents
Advertisement
Available languages
Available languages
Quick Links
H H H H
- - - - K K K K
AUSHALTS
AUSHALTS
AUSHALTS
AUSHALTS
Bedienungsanlei i i i tung/Garantie
Bedienungsanle
Bedienungsanle
Bedienungsanle
ÜHL L L L SCHRANK
ÜH
ÜH
ÜH
SCHRANK
SCHRANK
SCHRANK
H H H H
- - - - R R R R
OUSEHOLD
OUSEHOLD
OUSEHOLD
OUSEHOLD
tung/Garantie
tung/Garantie
tung/Garantie
Instruction Manual
Instruction Manual
Instruction Manual
Instruction Manual
KS 2198
KS
2198
KS
KS
2198
2198
EFRIGERATOR
EFRIGERATOR
EFRIGERATOR
EFRIGERATOR
Advertisement
Table of Contents

Related Manuals for BOMANN KS 2198


Summary of Contents for BOMANN KS 2198
- Page 1 KS 2198 2198 2198 2198 H H H H - - - - K K K K AUSHALTS AUSHALTS AUSHALTS AUSHALTS ÜH ÜHL L L L SCHRANK ÜH ÜH SCHRANK SCHRANK SCHRANK H H H H - - - - R R R R...
-
Page 2: Table Of Contents
DEUTSCH DEUTSCH DEUTSCH DEUTSCH Inhalt Inhalt Inhalt Inhalt Einleitung…………………………………………………………………….………..…Seite 3 Allgemeine Hinweise……………………………………………………………………Seite 3 Spezielle Sicherheitshinweise für dieses Gerät……………………………..……….Seite 4 Transport und Auspacken des Gerätes.…………………………………………...…Seite 7 Geräteausstattung…………………………………………………………………...….Seite 8 Installation…………………………………..……………………………………………Seite 8 Inbetriebnahme / Betrieb…………………………………………..…...……………..Seite 11 Reinigung und Wartung………………………………………………………….……Seite 16 Störungsbehebung..……………..…………………………………………….…..….Seite 18 Technische Daten……………………..…………………………………………..Seite 19 Garantie / Kundenservice..……………………………………………………………Seite 19 Entsorgung……………………………………………………………………………..Seite 21 EU-Produktdatenblatt………………………………………………………………….Seite 22... -
Page 3: Einleitung
DEUTSCH DEUTSCH DEUTSCH DEUTSCH Einleitung Einleitung Einleitung Einleitung Vielen Dank, dass Sie sich für unser Produkt entschieden haben. Wir wünschen Ihnen viel Freude mit dem Gerät. Symbole in dieser Bedienungsanle Symbole in dieser Bedienungsanlei i i i tung Symbole in dieser Bedienungsanle Symbole in dieser Bedienungsanle tung tung... -
Page 4: Spezielle Sicherheitshinweise Für Dieses Gerät
Schalten Sie das Gerät aus, ziehen Sie den Netzstecker (ziehen Sie am Stecker, • nicht am Kabel) oder schalten Sie die Sicherung ab, wenn Sie das Gerät nicht be- nutzen, zur Reinigung, Benutzerwartung oder bei Störung. Das Gerät und wenn möglich das Netzkabel müssen regelmäßig auf Zeichen von •... - Page 5 WARNUNG: WARNUNG: WARNUNG: WARNUNG: • Stellen Sie sicher, dass die Belüftungsöffnungen im Gerätegehäuse oder im Einbaugehäuse nicht blo- ckiert werden. • Gebrauchen Sie keine mechanischen Einrichtungen oder sonstigen Mittel um den Abtauvorgang (falls notwendig) zu beschleunigen, außer den in der Anlei- tung beschriebenen Hilfsmitteln (Modellabhängig im Lieferumfang enthalten).
- Page 6 Gebrauchs des Gerätes Gebrauchs des Gerätes unterwiesen wurden und die Gebrauchs des Gerätes Gebrauchs des Gerätes daraus resultierenden Gefahren verstanden haben. • Kinder Kinder Kinder Kinder dürfen nicht mit dem Gerät spielen. • Reinigung und Benutzer Benutzer- - - - Wartung Wartung dürfen nicht durch Benutzer Benutzer...
-
Page 7: Transport Und Auspacken Des Gerätes
Bei Beschädigung des Kühlkrei Bei Beschädigung des Kühlkreis s s s laufs: laufs: Bei Beschädigung Bei Beschädigung des Kühlkrei des Kühlkrei laufs: laufs: offenes Feuer, Zündquellen unbedingt vermeiden, • Gerät von der Stromversorgung trennen, • Raum, in dem das Gerät steht durchlüften und •... -
Page 8: Geräteausstattung
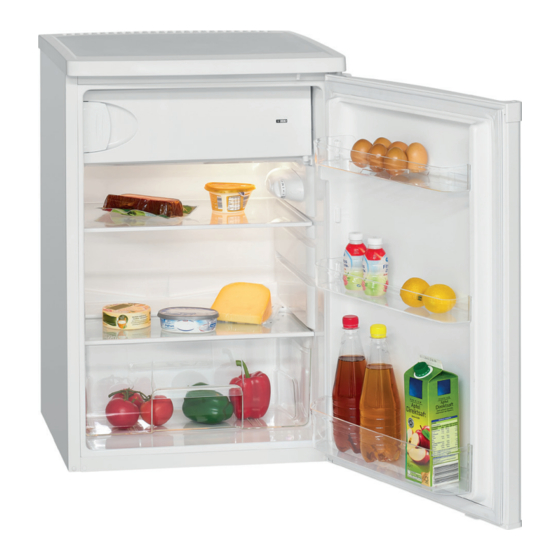
Geräteausstattung Geräteausstattung Geräteausstattung Geräteausstattung Geräteübersicht Geräteübersicht Geräteübersicht Geräteübersicht 1 1 1 1 Gefrierfach 2 2 2 2 Temperaturregler / Innenraumbeleuchtung 3 3 3 3 Glasablage 4 4 4 4 Gemüseschale mit Glasabdeckung 5 5 5 5 Türablagen 6 6 6 6 Standfüße Lieferumfang Lieferumfang Lieferumfang... - Page 9 Vermeiden Sie eine Aufste Vermeiden Sie eine Aufstel l l l lung: lung: Vermeiden Sie eine Aufste Vermeiden Sie eine Aufste lung: lung: • neben Heizkörpern, einem Herd, direkter Sonneneinstrahlung, sonstigen Wär- mequellen; an Orten, an denen eine hohe Feuchtigkeit auftritt (z. B. im Freien, Badezim- mer), da die Metallteile in solchen Fällen rostanfällig sind;...
- Page 10 WARNUNG: WARNUNG: WARNUNG: WARNUNG: Beim Auswechseln des Türanschlags darf das Gerät nicht mit dem Netzstrom verbun- den sein. HI HI HI HIN N N N WEIS WEIS: : : : WEIS WEIS Ziehen Sie eine weitere Person zur Hilfe hinzu. •...
-
Page 11: Inbetriebnahme / Betrieb
Anschlagwechsel der Gefrierfachklappe Anschlagwechse l der Gefrierfachklappe Anschlagwechse Anschlagwechse l der Gefrierfachklappe l der Gefrierfachklappe Halten Sie die Gefrierfachklappe geschlossen. Demontieren Sie die Halterung (1). • Entnehmen Sie die Gefrierfachklappe samt oberer Scharnierstiftabdeckkappe (a) • nach unten ab. Demontieren Sie den Schnapper (2) und bringen Sie ihn auf der gegenüberliegen- •... - Page 12 Einstellungen Einstellungen Einstellungen Einstellungen Stellung [ OFF ] bedeutet, dass sich das Gerät im ausgeschalteten Zustand befindet. Drehen Sie den Temperaturregler von dieser Stellung aus im Uhrzeigersinn, das Gerät schaltet sich automatisch ein. Die Leistungsstufen [ 1–7 ] regeln die verschiedenen Werte der Innentemperatur. Stellung OFF Stellung OFF Stellung 1...
- Page 13 Frischhaltebeutel, Folien aus Polyä- Spezielle Hauben aus Kunststoff mit • • thylen Gummizug Kunststoffbehälter mit Deckel Aluminiumfolie • • Empfehlungen Empfehlungen Empfehlungen Empfehlungen Lagern Sie frische, verpackte Waren auf den Glasböden, frisches Obst und Gemü- • se in der Gemüseschale. Stellen Sie Flaschen in die Türablage.
- Page 14 rückgesetzt wird; aus wirtschaftlichen Gründen sollten Sie dies jedoch möglichst vermeiden. Frische Lebensmittel sollten möglichst schnell bis auf den Kern durchgefroren wer- • den. Während des Gefriervorgangs sollte die Temperatur von frischen Lebensmit- teln daher so schnell wie möglich reduziert werden, damit die Bildung von Eiskris- tallen gering gehalten wird und die Lebensmittelstruktur nicht beschädigt wird.
- Page 15 Die Berührung von Metallteilen im Inneren des Gerätes kann bei sehr empfindlicher • Haut verbrennungsähnliche Symptome hervorrufen. Entnehmen Sie Tiefkühlgut keinesfalls mit feuchten oder nassen Händen. • Betriebsgeräusche Betriebsgeräusche Betriebsgeräusche Betriebsgeräusche Geräuscheart Geräuscheart Geräuscheart Geräuscheart U U U U r r r r sac sache Murmeln Kompressor in Betrieb...
-
Page 16: Reinigung Und Wartung
Die Türdichtung muss vollkommen intakt sein, damit die Tür ordnungsgemäß • schließt. Reinigung und Wartung Reinigung und Wartung Reinigung und Wartung Reinigung und Wartung WARNUNG: WARNUNG: WARNUNG: WARNUNG: Vor Reinigungs- und Wartungsarbeiten das Gerät grundsätzlich von der Stromver- • sorgung trennen. Das Gerät nie mit Dampfreinigungsgeräten reinigen. - Page 17 Abtauen Abtauen Abtauen Abtauen ACHTUNG: ACHTUNG: ACHTUNG: ACHTUNG: Gebrauchen Sie niemals Metallgegenstände (z. B. Messer), um Eis vom Verdampfer zu entfernen. Anderenfalls kann dieser beschädigt werden. Ein beschädigter Verdamp- fer kann schwere Schäden verursachen. HI HI HI HIN N N N WEIS WEIS WEIS: : : : WEIS...
-
Page 18: Störungsbehebung
Leuchtmittel wechseln Leuchtmittel wechseln Leuchtmittel wechseln Leuchtmittel wechseln Lampendaten: Typ E14 – – – – 10 W / 220 Lampendaten: Typ E14 10 W / 220- - - - 240 V 240 V~ ~ ~ ~ Lampendaten: Typ E14 Lampendaten: Typ E14 10 W / 220 10 W / 220 240 V... -
Page 19: Technische Daten
Hinweis zur Richtlinienkonformi i i i tät Hinweis zur Richtlinienkonform Hinweis zur Richtlinienkonform tät tät tät Hiermit erklärt der Hersteller, dass sich das Gerät KS 2198 in Übereinstimmung mit den folgenden Anforderungen befindet: Europäische Niederspannungsrichtlinie 2014/35/EU EU-Richtlinie für elektromagnetische Verträglichkeit 2014/30/EU Ökodesign Richtlinie 2009/125/EG RoHS-Richtlinie 2011/65/EU... - Page 20 Gerät zur gewerblichen Nutzung geeignet, leisten wir beim Kauf durch Unterneh- mer für das Gerät eine Garantie von 6 Monaten. 3. Innerhalb der Garantiezeit werden Funktionsfehler, die trotz vorschriftsmäßigem Anschluss, sachgemäßer Behandlung und Beachtung der gültigen Einbauvorschrif- ten und der Betriebsanleitung auf Fabrikations- oder Materialfehler zurückzuführen sind, durch Reparatur oder Austausch beseitigt.
-
Page 21: Entsorgung
Sollte Ihr Gerät innerhalb der Garantiezeit einen Mangel aufweisen, bitten wir Sie, die Internetseite des Serviceportals www.sli24.de aufzurufen. Nach Eingabe des Gerätetyps wird Ihnen angezeigt, wie die Reklamation bearbeitet wird. C. Bomann GmbH C. Bomann GmbH C. Bomann GmbH C. Bomann GmbH Heinrich-Horten-Straße 17... -
Page 22: Eu-Produktdatenblatt
Brand Brand BOMANN BOMANN Brand Brand BOMANN BOMANN Modell Modell Modell Modell KS 21 KS 2198 KS 21 KS 21 Kategorie Kategorie 7 7 7 7 Kategorie Kategorie 1) 1) 1) 1) Energieeffizienzklasse A+++ Jährlicher Energieverbrauch kWh/Jahr Nutzinhalt Kühlraum gesamt... -
Page 23: English
ENGLISH ENGLISH ENGLISH ENGLISH Introduction Introduction Introduction Introduction Thank you for choosing our product. We hope you will enjoy using the appliance. Symbols in the e e e se Instructions for Use Symbols in th se Instructions for Use Symbols in th Symbols in th se Instructions for Use se Instructions for Use... -
Page 24: Special Safety Information For This Unit
When not in use, for cleaning, user maintenance works or with disruption, switch off • the appliance and disconnect the plug (pull the plug itself, not the lead) or turn off the fuse. The appliance and if possible the mains lead have to be checked regularly for signs •... - Page 25 WARNING: WARNING: WARNING: WARNING: • Do not use mechanical devices or other means to ac- celerate the defrosting process (if necessary), except those described in this manual (depending on the model included the scope of delivery). • Do not damage the refrigerant circuit. •...
-
Page 26: Transport And Unpacking The Appliance
• Do not try to repair the appliance on your own. Al- ways contact an authorized technician. To avoid the exposure to danger, always have faulty cable be re- placed only by the manufacturer, by our customer service or by qualified person and with a cable of the same type. -
Page 27: Appliance Equipment
NOTE NOTE: : : : NOTE NOTE The appliance has wheels which facilitate the transport and installation of the appli- ance. Tilt the appliance back slightly and move it gently. Unpacking the appliance Unpacking the appliance Unpacking the appliance Unpacking the appliance Remove the appliance from its packaging. -
Page 28: Installation
Installation Installation Installation Installation Conditions for the installation location Condition s for the installation location Condition Condition s for the installation location s for the installation location Good ventilation is required around the appliance, in order to dissipate the heat •... - Page 29 Make sure that the voltage supply matches the specifications on the rating label • before connecting. Connect the mains cable to a properly installed and earthed wall outlet. • If the plug after installation is not accessible, a corresponding disconnect device •...
-
Page 30: Startup / Operation
Transfer the lower door hinge to the opposite appliance side; after moving the pin to 8 8 8 8 limit the door opening into the exposed hole. Insert the hinge pin into the hole of the appliance door and fasten the hinge. Turn the feet in. Check if the door is aligned vertically and horizontally optimally so that the smooth opening and closing of the door is guaranteed. - Page 31 Settings Settings Settings Settings Setting [ OFF ] means that the appliance is in the off state. Turn the temperature con- trol clockwise, starting from this setting; the appliance will turn on automatically. The power levels [ 1–7 ] regulate the different values of the internal temperature. Setting OFF Setting Setting 1...
- Page 32 Recommendations Recommendations Recommendations Recommendations Store fresh packed items on the glass shelves, fresh fruits and vegetables in the • vegetable box. Place bottles in the door storage racks. • By the air circulation different climate zones arises. • The coldest zone is located at the rear and the lower fridge part. Recommended for the storage of foods such as fish, sausages and meat.
- Page 33 Keep a space between the individual items, so that the cold air can circulate. • Storing frozen food Storing frozen food Storing frozen food Storing frozen food Packed frozen merchandise should be stored in a 4-star-freezer compartment in • accordance with the manufacturer’s data. Make sure the food items do not defrost after purchase and to store them as fast as possible in the freezer.
-
Page 34: Cleaning And Maintenance
Switching off Switching off Switching off Switching off To switch off the appliance turn the temperature con n n n trol to the off state. To switch off the appliance turn the temperature co trol to the off state. To switch off the appliance turn the temperature co To switch off the appliance turn the temperature co trol to the off state. - Page 35 CAUTION: CAUTION: CAUTION: CAUTION: Do not use any acidic or abrasive detergents. • Do not damage the refrigerant circuit. • Cleaning the appliance including interior Cleaning the appliance including inte rior Cleaning the appliance including inte Cleaning the appliance including inte rior rior Clean the appliance interior, the exterior surfaces, the accessories and the door...
-
Page 36: Troubleshooting
Then you may restart the appliance by connecting the plug and turning the temper- • ature control. Changing the bulb Changing the bulb Changing the bulb Changing the bulb Lamp data type E14 - - - - 10 W / 220 Lamp data type E14 10 W / 220- - - - 240 V~ 240 V~... -
Page 37: Disposal
Dimension H x W x D / Weight…..…...……………………………………………… Dimension H x W x D / Weight…..…...……… ……………………………………………….. ……….. Dimension H x W x D / Weight…..…...……… Dimension H x W x D / Weight…..…...……… ……………………………………… ……………………………………… ……….. ……….. Appliance size: ……..……….............…..84.8 x 54.5 x 56.6 cm Net weight: ……………………………………………………...………..……approx. -
Page 38: Eu Product Data Sheet
No. 1060/2010 No. 1060/2010 ata sheet for household refrigerators/freezers a ata sheet for household refrigerators/freezers a ccording to regulation ccording to regulation No. 1060/2010 No. 1060/2010 Brand Brand BOMANN BOMANN Brand Brand BOMANN BOMANN Model Model Model Model... - Page 40 C. Bomann GmbH C. Bomann GmbH C. Bomann GmbH C. Bomann GmbH www.bomann www.bomann- - - - germany.de germany.de www.bomann www.bomann germany.de germany.de Made in P.R.C.
Need help?
Do you have a question about the KS 2198 and is the answer not in the manual?
Questions and answers