Table of Contents
Advertisement
Quick Links
Advertisement
Table of Contents

Subscribe to Our Youtube Channel
Related Manuals for Trelock COCKPIT2 FC 820


Summary of Contents for Trelock COCKPIT2 FC 820
- Page 1 COCKPIT FC 820 / 830 / 840 / 845 MANUAL www.trelock.de...
- Page 2 You have decided to purchase the TRELOCK bike computer FC 820 / FC 830 / FC 840 (each with Uni-Base) or FC 845 (Night-Light-Base) and, as such, your choice is an excellent one. Your new bike computer is easy and convenient...
-
Page 3: Table Of Contents
Contents Scope of supply Insertion of batterie Assembly/Installation Display design and operating principle General default settings Main menus Training Additional information and instructions Notes... -
Page 4: Scope Of Supply
1. Scope of supply 1.1 FC 820, 830, 840 1.2 FC 845... -
Page 5: Insertion Of Batterie
2. Insertion of batterie 2.1 Sensor When supplied to the customer, the In order to insert this battery, use a coin battery has already been inserted into the to turn the battery compartment cap in bike computer. In order to activate the an anti-clockwise direction and insert computer, the red plastic fl... -
Page 6: Assembly/Installation
3. Assembly/Installation 2.2 Only FC 845 3.1 Assembly/Installation FC 820, 830, 840 The display for your bike computer is fed a) Handlebar via a battery in the night-light base. In or- der to insert this battery, use a coin to turn the battery compartment cap in an anti- clockwise direction and insert the battery with the + sign pointing upwards (see fi... - Page 7 3.2 FC 820, 830, 840...
- Page 8 3.3 FC 845...
- Page 9 3.4 Assembly/Installation of sensor...
- Page 10 3.5 Assembly/Installation of magnet...
-
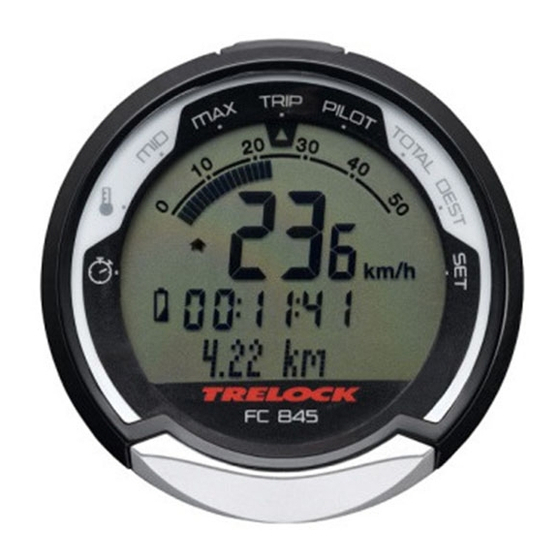
Page 11: Display Design And Operating Principle
4. Display design and operating principle SET-button Visual guidance Analogue speedometer system display Comparison of Display line 1 current speed with average speed Display line 2 Display line 3 Change battery MODE button... -
Page 12: General Default Settings
5. General default settings 5.1 Selection of language Once the computer (by removing the plastic tab) has been activated, you automatically access the “Sprache?” (Language) menu. By pressing the SET button, you access the lan- guage selection option. Use the MODE button to choose one of the eight languages shown (German, English, French, Dutch, Spanish, Italian, Russian or Polish) and confi... - Page 14 5.2 Choice between km/h and m/h In the “Dimensions?” menu, “km/h” is pre-set as the standard unit. If you wish to accept this default setting, press the MODE button. To change it to “m/h”, press the SET button. Then use the MODE button to choose between “m/h”...
- Page 15 5.3 Choice between °C and °F (only FC 840, 845 ) Use the MODE button to choose between ”°F“ and ”°C“ now. Confi rm your choice via the SET button.
- Page 16 5.4 Setting(s) of wheel size(s) (FC 830, 840, 845 ) You can use your cycle computer on 2 cycles – even if the wheels are different sizes. To do this, you need a separate holder and sensor for each cycle. For FC 830/840, you need Art. ZF 406 Uni-Base, ZF 435 transmitter, ZF 50 magnet.
- Page 17 5.5 Entering the code number In the “Code No. 1” bzw. “Code No. 2” window, enter the 4-digit code of the sensor to register this on the computer. Smooth, unin- terrupted communication between the computer and the sensor is assured by the Radio Select technology only once the sensor is registered.
- Page 18 5.6 Setting(s) of wheel size(s) (wheel circumference) Under “Wheel Size 1” or “Wheel Size 2” (only for FC 830, 840 845), you should now enter the wheel circum- ference of your bike. This can be seen from the wheel size data shown on the side of your tyre.
- Page 19 Wheel Size (WS) Chart (wheel sizes / wheel circumference) ETRTO ETRTO 47 – 305 16x1.75x2 1272 60 – 559 26/2.35 2146 32 – 630 27x1 1/4 2199 47 – 406 20x1.75x2 1590 50 – 406 20/2.00 1593 40 – 622 28x1.5 2224 60 –...
- Page 20 5.7 Setting the current time If you wish to change the time, press the SET button. One after another, hours, minutes and seconds (start automatically after confi rmation of minutes) can be changed via the MODE button. Use the SET button to confi rm your ent- ries and to move to the next digit.
- Page 21 5.8 Entering and changing the PIN anti-theft protection You can use a PIN to protect your cycle computer from misuse by unauthorized people. The cycle computer cannot be used unless the correct PIN is entered. Once the time has been set, you automatically access the “Change PIN?”...
- Page 22 5.9 Entering and changing the PIN time If the bike computer is in Sleep mode and is not ‘awakened’ for a set time, it has to be reactivated by entering your PIN. The period concerned (PIN Time) can be (re)set in the “Set PIN Time” window –...
-
Page 23: Main Menus
6. Main menus 5.10 Energy economy function An energy economy function is linked to Press the MODE button to move between the PIN-time setting. The PIN-time default the main functions (menus) - see 6.1 - 6.9. setting is 60 min. and the PIN default setting To enter fi... - Page 24 6.1 „ Stopwatch” menu (only FC 530, 535 ) Starting, stopping and resetting the stopwatch Use the SET button to start and stop the Current speed stopwatch. By pressing and holding the SET button for 3 Stopwatch seconds, the stopwatch is reset to “0”.
- Page 25 “Average” MID menu The “MID“ menu shows the current average Current speed speed of the given lap. By pressing and holding the SET button for 3 seconds, you stop the measurement of the Current time current lap and reset all lap readings on the Average speed computer to “0”.
- Page 26 “Lap” TRIP menu The ride time and lap kilometres ridden are displayed via the “TRIP” menu. Current speed By pressing and holding the SET button for 3 seconds, you stop the measurement of the current lap and reset all lap readings on the Lap ride rime computer to “0”.
- Page 27 The total kilometre status and total ride time of the current bike are displayed via the “Total” menu. The total kilometre status can be adjusted via the “Set” menu, enabling you, for instance, to transfer the kilometre reading from an old bike computer to your new TRELOCK computer.
- Page 28 6.8 “ DEST” menu (only FC 840, 845) 3 seconds Current speed Remaining journey time (calculated from the remaining distance and the average speed measured to the relevant point) Remaining distance in kilometres (Countdown) Setting the remaining distance counter (Countdown) Press and hold the SET button for 3 seconds.
- Page 29 6.9 “Set” SET menu By pressing and holding the SET button in the Changing the presetting “SET” menu for 3 seconds, you then have the option of correcting your default settings and making further settings. Pressing the MODE button brings you automatically to the menus “Clock?” Current speed “Wheel Size?”...
-
Page 30: Training
7. Training 8. Additional information and instructions 7.1 Targeted training 8.1 Battery change Your TRELOCK bike computer gives you a = When this symbol appears, the battery wide range of options for training in a targeted needs changing. manner. You have the possibility, for example,... - Page 31 The wrong wheel size has been entered. 8.4 Maintenance and care Why is no speed displayed? Your TRELOCK bike computer requires no The distance between the sensor and the maintenance and no special care. Just use a magnet is too large. The sensor battery damp cloth for cleaning purposes.
- Page 32 TRELOCK. TRELOCK guarantees the initial Default PIN setting: purchaser for a period of two years from the date of purchase that this TRELOCK product is free of defects in respect of materials and workmanship, My personal PIN: and ensures that any defective product is repaired or replaced with a new product.
-
Page 33: Notes
Notes... - Page 35 www.trelock.de...
Need help?
Do you have a question about the COCKPIT2 FC 820 and is the answer not in the manual?
Questions and answers