Table of Contents
Advertisement
Advertisement
Table of Contents

Related Manuals for Center 392


Summary of Contents for Center 392
- Page 1 INTEGRATING SOUND LEVEL METER SE-392...
-
Page 2: Table Of Contents
6.1 Recording Data……………………………………..7 6.2 Recording Interval Setup…………………...………….7 6.3 Clearing Stored Data…………………………………...7 7. LEQ & INTEGRATING SETUP……………………………8 8. SETTING THE DATE AND TIME………………………… 8 9. CALIBRATION PROCEDURES….………………………..9 10. MEASUREMENT PREPARATION……..…….………..10 11. OPERATING PRECAUTIONS…………………………. 10 12. MEASUREMENT………….…………………………….. 11 13. SETUP TestLink SE-392……………………..…... 12... -
Page 3: Safety Information
Integrating Sound Level Meter 1. SAFETY INFORMATION Read the following safety information carefully before attempting to operate or service the meter. Use the meter only as specified in this manual; otherwise, the protection provided by the meter may be impaired. Environment conditions ... -
Page 4: Specifications
Integrating Sound Level Meter With Windows software AC/DC signal output 4. SPECIFICATIONS Standard applied: IEC61672-1 Class 2, ANSI S1.4 Type2. Frequency range: 20Hz ~ 8KHz Measuring level range: 30 ~ 130dB Frequency weighting: A / C Microphone: 1/2 inch electret condenser microphone Display: Liquid crystal display Digital display: 4 digits Resolution: 0.1dB... -
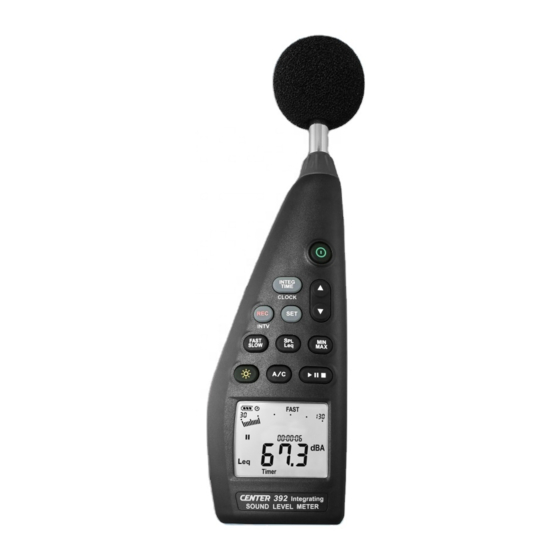
Page 5: Name And Functions
Integrating Sound Level Meter Weight: 390g ( including battery ) Accessories: 1.5V battery X 4pcs, carrying case, instruction manual, windscreen, 3.5 plug, software, micro USB cable. Option: Microphone extension cable (5m or 10m length). 5. NAME AND FUNCTIONS... -
Page 6: Display Screen
Integrating Sound Level Meter Display Screen: SYMBOL FUNCTION Battery capacity indicator Auto power off indicator Maximum/Minimum indicator Fast/Slow time weighting indicator Sound level range indicator Bar graph Time-weighted sound level reading sound pressure level Equivalent continuous sound level reading Time and elapsed time indicator (hour:minute:second) Start/pause/stop integrating sound level measurements... - Page 7 Integrating Sound Level Meter Power button: ○ Press the button to turn on. Press and hold the button for 3 seconds to turn off. Auto Power Off: When the unit is powered on, it is under auto power off mode by default. The unit will power itself off after 30 minutes if no key operation.
- Page 8 Integrating Sound Level Meter button: MAX/MIN ○ Press the button to enter the maximum and minimum recording mode. Under this mode, the maximum and minimum value will be stored and automatically updated in the memory simultaneously. Pressing the button will display the “ ”...
-
Page 9: Data Logger & Interval Setup
Integrating Sound Level Meter Tripod mounting thread: ○ For long-term measurements, the unit can be mounted on a camera tripod. Proceed carefully to avoid dropping the unit. Battery Compartment. ○ 6. DATA LOGGER & INTERVAL SETUP 6.1 Recording Data: Press the button to start recording the measured values. -
Page 10: Leq & Integrating Setup
Integrating Sound Level Meter Press button, LCD display will show “ Lo bat ”warning indication. If the meter is under the record mode, it will stop automatically. 7. Leq & INTEGRATING SETUP 7.1 Setting The Integrating Measurement Time︰ (1) Press the button to enter time setup. -
Page 11: Calibration Procedures
Integrating Sound Level Meter (3) Press to increase or decrease number to adjust Date / Time. (4) Press CLOCK( ) button to finish setting. (5) Press button to exit setting anytime. Note: There is an internal rechargeable backup battery to run the clock. When the power is turned off, the backup battery can be recharged by the AA batteries or DC adapter power source. -
Page 12: Measurement Preparation
Integrating Sound Level Meter 10. MEASUREMENT PREPARATION (1) Battery Loading: (a) Back out the screw at the top of the battery cover and lift the cover away from the unit. (b) Insert the four AA batteries, observing proper polarity as depicted on the bottom of the battery compartment. -
Page 13: Measurement
Integrating Sound Level Meter humidity environment. (4) Keep microphone dry and avoid severe vibration. (5) Please take out the battery and keep the instrument in low humidity environment when not in use. 12. MEASUREMENT (1) Turn power on and select the desired response time and frequency weighting. -
Page 14: Setup Testlink Se-392
Integrating Sound Level Meter 13. SETUP TestLink SE-392 (Sound Level Meter)— USB interface software: The SE-392 package contains: 1. 80mm CD. 2. Micro USB cable. System Required: Windows XP / VISTA / 7 / 8 / 10. ... - Page 15 Integrating Sound Level Meter Erase Memory: Delete measurement series stored in the instrument memory. LEQ: Perform LEQ calculation from online data. Graph Tool Bar - Display or hide Statistic1. - Display or hide Statistic2. - Normal cursor. - When selected, the mouse cursor will become a cross sign when moving to the graph, click on the graph to mark a cross sign on the graph.
- Page 16 Integrating Sound Level Meter There are time and value display on top and right side of each cursor. You can move mouse cursor over cursor A or B and click to drag cursor to move left or right. Right below cursor A and B is a slider. You can also click and drag slider to move cursor A or B.
- Page 17 Integrating Sound Level Meter for examples: When you have Sound Level DATA LOGGER meter connected to PC and select "DataLogger" from main menu or click from tool bar to load recorded data from the meter and there will be a progress indicator to show the loading progress, if error occurs, just click "DataLogger"...
- Page 18 Integrating Sound Level Meter (e) Click to start recording. (2) How to save the recorded real time data to a file? (a) Click the graph window you want to save and the graph window will become active, then choose File | Save from main menu or click from the tool bar.
- Page 19 Integrating Sound Level Meter (b) Press the REC button of the meter to start recording data. (c) After a while, press REC button again to stop recording data. (d) Connect the Sound Level Meter to PC. (e) Start SE392 program. (f) Choose Data Logger from main menu or click from tool bar.
- Page 20 CENTER TECHNOLOGY CORP. GCA000392-02000...
Need help?
Do you have a question about the 392 and is the answer not in the manual?
Questions and answers