Table of Contents
Advertisement
Advertisement
Table of Contents

Related Manuals for Cane Creek DB Kitsuma


Summary of Contents for Cane Creek DB Kitsuma
- Page 1 I NSTR U C TI ON MANUAL...
-
Page 3: Table Of Contents
Table of Contents 3 ..Safety and Warning Information 5 ..Introduction and Registration 6 ..Features Overview 7 ..Product Anatomy 9 ..Adjuster Basics 11 ..Frame Clearance 13 ..Installation 15 ..Setting Sag 19 ..Air Volume Adjust 21 .. - Page 4 OR DEATH. If the shock ever loses oil, air or makes unusual noises, stop riding and have the shock inspected by a Cane Creek Authorized Suspension Service Center or call the Cane Creek Customer Service Team. Warning Modification, improper service or use of aftermarket...
- Page 5 Cane Creek Cycling Components or a Cane Creek Authorized Suspension Service Center. Visit www.CaneCreek.com or contact us at 800-234-2725 to locate a Cane Creek Authorized Suspension Service Center. Cane Creek rear shocks contain a nitrogen charge in the reservoir.
-
Page 6: Introduction And Registration
This owner’s manual is your reference guide to understanding and tuning your DB Kitsuma rear shock. It also provides important information about proper installation, set-up and maintenance of your shock. -
Page 7: Features Overview
Features Overview END EYE Open ID ID w/Bushing Trunnion 54mm Width / Air & Coil 15.02 12.7mm M10 Threads Damper Adjuster Abbreviation Positions Adjustments Low Speed Compression Low Speed Rebound High Speed Air & Coil Compression High Speed Rebound Climb Switch Spring Rates Minimum Maximum... -
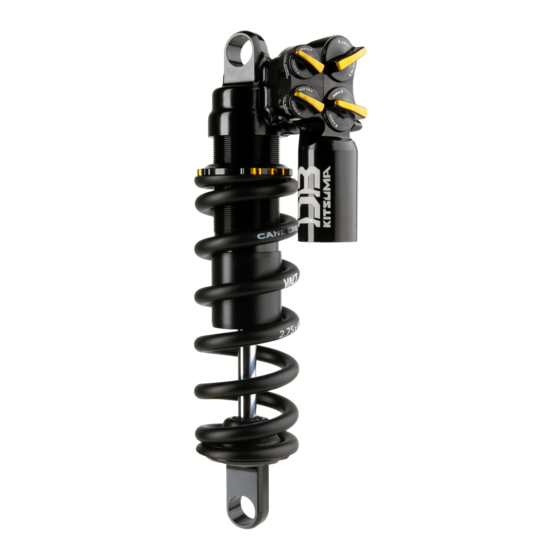
Page 8: Product Anatomy
Product Anatomy Eyelet Climb Switch Low Speed Compression High Speed Compression Low Speed Rebound High Speed Rebound Travel Indicator O-Ring Air Valve Air Volume Reducers Air Can... - Page 9 Product Anatomy Eyelet Climb Switch Low Speed Compression High Speed Compression Low Speed Rebound High Speed Rebound Spring Preload Adjustment Nut Coil Spring Bottom Out Bumper Stroke Reducer Spring Clip...
-
Page 10: Adjuster Basics
When adjusting these settings, you are adjusting the rate of oil flow in the shock damper system. A Cane Creek “DB” shock has the following settings. Low Speed Compression (LSC) - Shaft compression during most compression events. - Page 11 DB Kitsuma features tool free adjustments with all adjusters clearly labeled on the shock. Turning an adjuster counter clockwise will open the circuit which allows more oil flow. (open compression = soft...
-
Page 12: Frame Clearance
Frame Clearance It is critical to check for clearance between your frame and shock at all points of travel during installation of the shock. The eye to eye and stroke measurements of the shock must match what is specified and approved by the frame manufacturer. Follow the steps below carefully to ensure proper clearances and avoid damage. - Page 13 Frame Clearance 4. If there is sufficient clearance, add air pressure back to the shock. A suggested starting point for PSI is 75% - 100% of rider’s weight (lbs) in psi. Cycle the shock 10-20 times through at least 30% of its travel to equalize the positive and negative pressure.
-
Page 14: Installation
Installation Installation of the shock requires the use of the appropriate hardware for your specific frame. The mounting points of the shock are a standardized size and additional hardware is typically needed to fit the shock to each frame. Shock hardware may be needed to properly take up the width and thickness of the frame’s mounting points and bolts. - Page 15 Installation 1. With the appropriate hardware installed to the shock eyelets, mount the shock to the frame by first inserting the mounting bolts. Do not force the shock in place if there is any fitment interference with the frame. 2. Torque all mounting bolts to the frame manufacturer’s specifications.
-
Page 16: Setting Sag
Setting Sag Sag is the point at which your shock is compressed under neutral riding weight. This is the most important setting of your shock and will have the greatest impact on the shock’s effectiveness. Typical recommended sag for shocks is between 25% and 35% of the shock’s travel. - Page 17 Setting Sag 2. Slide the Travel Indicator O-ring to the shock body and mount the bike in your normal riding gear. Ensure the bike is on a level surface and your weight is centered over the bottom bracket as you are in a normal riding position.
- Page 18 Setting Sag Coil For a recommended starting coil weight, visit www.CaneCreek.com or contact the Cane Creek Customer Service Team at 800-234-2725. ready to help you IMPORTANT If less than 1 turn of preload engagement is needed to achieve proper sag, you will need to change to a lower spring rate.
- Page 19 Setting Sag Reducing Spring Preload Reducing the preload will decrease the ride height and increase sag. To reduce the preload on your spring, turn the Spring Adjustment Nut counter-clockwise (Make sure the spring preload still has 1 full turn of preload engagement when reducing preload).
-
Page 20: Air Volume Adjust
Air Volume Adjustment Air volume can be adjusted by adding volume reducing spacers inside of the air can. This adjustment causes the air spring to ramp up at the end of the shock’s travel which will further increase the resistance to bottom out. Air pressure should be only used to achieve the correct sag value. - Page 21 Air Volume Adjustment 3. Pull the outer air canister down until it separates from the shock 4. Install the desired amount of volume reduction spacers * Large volume reducer bands can be cut to smaller sections if needed. 5. Reinstall the outer air can 6.
-
Page 22: Coil Installation
Your ideal spring rate will be based on rider weight, frame design, and riding style. (For spring weight calculation help, visit www.CaneCreek.com or call the Cane Creek Service Team). Warning Riding on a spring that is not appropriate for your body weight can cause SERIOUS INJURY OR DEATH and damage to the bike and shock. -
Page 23: Service And Maintenance
Service and Maintenance Every Service and Maintenance Ride Hours Hours Check sag - Reset if necessary Clean and inspect shock exterior Clean with mild soap and water (AIR) Inspect external air sealing surfaces for scratches or damage. (AIR) Inspect and clean air valve threads to prevent dirt from entering air spring during inflation. -
Page 24: Warranty Information
LIMITED ONE (1) YEAR WARRANTY ON SUSPENSION PRODUCTS Subject to the limitations, terms and conditions here of, Cane Creek warrants, to the original retail owner of each new Cane Creek suspension product, that the Cane Creek suspension product, when new, is free from defects in materials and workmanship. - Page 25 THIS IS THE ONLY WARRANTY MADE BY CANE CREEK ON ITS SUSPENSION PRODUCTS AND COMPONENTS, AND THERE ARE NO WARRANTIES THAT EXTEND BEYOND THE DESCRIPTION HEREIN.
-
Page 26: Tuning Field Notes
Tuning Field Notes DATE TRAIL AIR PRESSURE COIL SPRING RATE PRELOAD VOLUME REDUCTION SOFT FIRM SOFT FIRM FAST SLOW FAST SLOW NOTES... - Page 27 Tuning Field Notes DATE TRAIL AIR PRESSURE COIL SPRING RATE PRELOAD VOLUME REDUCTION SOFT FIRM SOFT FIRM FAST SLOW FAST SLOW NOTES...
- Page 28 Tuning Field Notes DATE TRAIL AIR PRESSURE COIL SPRING RATE PRELOAD VOLUME REDUCTION SOFT FIRM SOFT FIRM FAST SLOW FAST SLOW NOTES...
- Page 29 Tuning Field Notes DATE TRAIL AIR PRESSURE COIL SPRING RATE PRELOAD VOLUME REDUCTION SOFT FIRM SOFT FIRM FAST SLOW FAST SLOW NOTES...
- Page 30 Cane Creek Cycling Components 355 Cane Creek Rd Fletcher North Carolina 28732 1.800.234.2725 canecreek.com service@canecreek.com AAC0252...
Need help?
Do you have a question about the DB Kitsuma and is the answer not in the manual?
Questions and answers