
Related Manuals for PRESONUS ATOM SQ


Summary of Contents for PRESONUS ATOM SQ
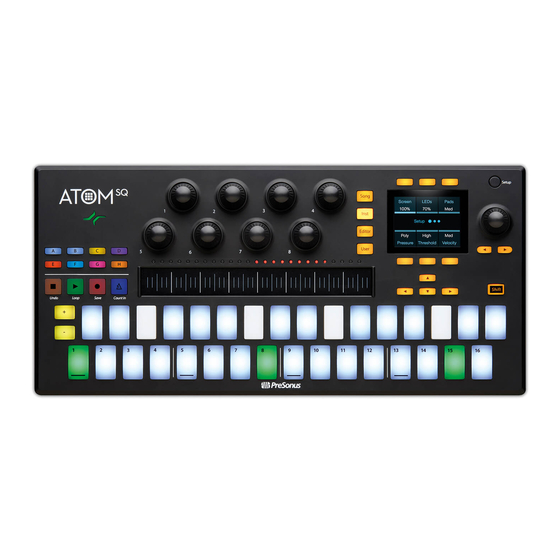
- Page 1 ATOM SQ Hybrid MIDI Keyboard / Pad Performance and Production Controller Owner’s Manual ® English www.presonus.com...
-
Page 2: Table Of Contents
Advanced Ableton Live What’s in the box — 2 Integration — 32 What’s in your MyPreSonus account — 2 Pads — 32 Companion PreSonus Products — 3 RGB Colors — 32 4.1.1 Firmware Updates — 3 4.1.2 Triggering Notes or Clips — 32 Standard Controller Mode —... -
Page 3: Overview
This will help you to get better performances and faster results. Throughout this manual, you will find Power User Tips that can quickly make you an ATOM SQ expert and help you get the most out of your investment. Product Registration PreSonus is committed to delivering the best experience for our customers. -
Page 4: What's In The Box
PreSonus ATOM SQ Quick Start Guide 5’ (1.5m) USB cable What’s in your MyPreSonus account Once you register your ATOM SQ, you will be able to download the following: Studio One Artist recording software and content Universal Control (necessary for firmware updates) Ableton Live Lite EDM Elite Vol. -
Page 5: Companion Presonus Products
My PreSonus account after registering your ATOM SQ. Note: At the time of this manual’s publication, a firmware update is required for full functionality of your ATOM SQ. You must download and install Universal Control and run the firmware update on your unit. -
Page 6: Standard Controller Mode
This is the recommended mode for Pro Tools. To use MCU or HUI modes, most software applications will require the ATOM SQ to be set up as a control surface. Consult your application’s reference manual for set- up instructions. -
Page 7: Setup Mode
Screen Encoder will change the clock’s BPM. When an External Clock is being sent from a host, External Clock will be displayed and BPM will not be adjustable from your ATOM SQ. 3. Mardi Gras. When pressed, all buttons, pads, and LEDs will cycle on/... -
Page 8: Pads
Song mode will send common Mackie HUI commands. 6. MIDI Mode. This is default mode for ATOM SQ that allows for user customization. Note: HUI and MCU mode functions will vary depending on the software application being used. -
Page 9: Touch Strip
The Up, Down, Left, and Right navigation buttons to the left of the Shift button will change their functions depending on which mode ATOM SQ is in. In MCU or HUI modes, they can go to the next or previous track or control some Zoom... -
Page 10: Transport Buttons
Screen Encoder to change the selected screen parameter value. 2.8.1 Instrument Mode Instrument mode will change the screen to display functions used to control a virtual instrument and to access the Arpeggiator Mode built into the ATOM SQ firmware. 2.8.1.1 Pad Configuration Pads Range... - Page 11 ATOM SQ Standard Controller Mode Owner’s Manual Screen Controls • Key. Follows the layout of a piano. White keys on the bottom lane and black keys on the top lane. If a Scale type other than Chromatic is selected, the bright pads will guide you to play the correct notes in the scale.
- Page 12 ATOM SQ Standard Controller Mode Owner’s Manual Screen Controls 2.8.1.2 Arpeggiator Press the right arrow button below the Screen Encoder to navigate to the Arpeggiator Page. Please note: Arpeggiator Mode will only remain engaged while on the arpeggiator page. Mode...
-
Page 13: Song Mode
ATOM SQ Standard Controller Mode Owner’s Manual Screen Controls 4. Arp. Toggles between the Arpeggiator’s Off, On, and Hold modes. 5. Rate. When selected, the Screen Encoder will adjust how fast or slow the arpeggiator steps through each note in the sequence. -
Page 14: Editor Modes
Press the Editor button to access the Control Editor. This Control Editor lets you customize the messages sent from the different controllers on your ATOM SQ. Move a knob, press a button, touch the Touch Strip, or press a pad to edit the controller. -
Page 15: User Mode
ATOM SQ Standard Controller Mode Owner’s Manual Screen Controls User Mode 2.8.4 Touch Pitch Page 1 Page 1 Knob Button 1. Touch Strip. When selected, the Screen Encoder will change how the touch strip behaves: • Range. Touching and sliding will change the viewable range in Key mode or change transposition in Blocks or Continuous modes. -
Page 16: Advanced Studio One
Pattern Editor. While the Pattern Editor in Studio One is active, the top lane of pads on your ATOM SQ can be used to select the sample or note you would like to program. The bottom lane of pads control 16 steps of the Studio One step sequencer, allowing the programming of 16 steps in banks of 16. -
Page 17: Touch Strip
Power User Tip: Your ATOM SQ encoders have a built-in velocity multiplier, so the faster you turn them, the more quickly they will reach the minimum or maximum of the... -
Page 18: Navigation Buttons
While accessing their global functions, the A-H buttons will illuminate orange. To change these buttons to their global control functions, hold the Shift button while pressing the desired button. These are functions that are fixed. Commands are shown on ATOM SQ’s screen while pressing and holding the Shift button. - Page 19 8. Delete Encoders 1-8 Holding down the ATOM SQ’s Shift button will change the knob assignments to their global control functions. These are controls that are fixed. Power User Tip: Because these knobs have a velocity multiplier built-in, the faster they are turned, the more quickly they reach the minimum or maximum value.
-
Page 20: Screen Controls
Studio One. Focus is indicated in two different ways: • Arrangement, Browser, Editor, and Console. When one of these windows is in focus on ATOM SQ, you will see a thin blue rectangle around it. • Instrument, Effect, Note FX editors. When one of these editors in focus on ATOM SQ, you see a bright yellow button labeled ATOM SQ. -
Page 21: Instrument Mode
Screen Controls Instrument Mode 3.2.1 When Instrument mode is engaged, the screen on your ATOM SQ will display commonly used commands to browse and load Instruments, add or manage Events, as well as configure certain pad and performance parameters. 3.2.1.1 Browse... - Page 22 Event, the Pattern will be converted to an Instrument Part. 3.2.1.3 Performance Configuration Page Up again to access the Performance Configuration page. This page lets you adjust the controls on your ATOM SQ to suit your performance needs. Strip Note...
- Page 23 ATOM SQ Advanced Studio One Integration Owner’s Manual Screen Controls • Modwheel. The Touch Strip will be assigned to the Modulation Wheel MIDI control with minimum value at the far left position and the maximum value at the far right. While active, the modulation will stay in the last position that was touched, indicated by the red LEDs above the strip.
- Page 24 ATOM SQ Advanced Studio One Integration Owner’s Manual Screen Controls Chromatic), the bright pads will guide you to play the correct notes in the scale. The dim pads are considered “wrong notes” but are still playable. • Continuous. Assigns all pitches from left to right starting from the bottom lane (pads 1-16), then continuing in the upper lane (pads 17-32).
-
Page 25: Song Mode
Screen Controls Song Mode 3.2.2 ATOM SQ’s Song mode will change the screen to display commonly used functions and commands for the overall song like Tempo, showing or hiding the Console, adding effects, working with the Arranger Track, etc. 3.2.2.1 Transport... - Page 26 ATOM SQ Advanced Studio One Integration Owner’s Manual Screen Controls 3. Volume. When selected, the Screen Encoder changes the volume of the currently selected track. 4. Solo. Solos the currently selected track. 5. Mute. Mutes the currently selected track. 6. Rec. Record enables the currently selected track.
-
Page 27: Editor Modes
Part). Note: Pressing the Editor button will open the respective editor type for the currently selected Event(s) in the Editor Window. Pressing the Song or Inst buttons will close the Editor window in Studio One and ATOM SQ’s screen will change accordingly. The User buttons are also available while in Editor mode. - Page 28 ATOM SQ Advanced Studio One Integration Owner’s Manual Screen Controls Pattern: Variations Duplicate Variation Variation Variation Variation 1 Pattern: Variations Synth Lead Track Steps Resolution Swing 1/16 1. New Variation. Creates a new, empty pattern variation. 2. Duplicate Variation. Copies the current variation’s pattern into a new variation.
- Page 29 Alternatively, the Navigation Up and Down buttons will also transpose the selected note(s) up or down. Holding down ATOM SQ’s Shift button + either Navigation Up or Down will transpose a note Up or Down one musical octave respectively.
- Page 30 ATOM SQ Advanced Studio One Integration Owner’s Manual Screen Controls Part: Alt Humanize Restore Split at Timing Grid Part: Alt Synth Lead Track Extend to Repeat to Explode Part End Part End to Tracks 1. Humanize. Alters note start and end times and velocity within a very small threshold.
-
Page 31: User Mode
6. Split at Grid. Splits the Event at every crossing in the current quantization grid. 3.2.4 User Mode While in User mode, your ATOM SQ will send any commands currently assigned via Studio One’s External Devices Editor. To open the External Device Editor in Studio One, select... -
Page 32: Integration
Advanced Studio One Integration Owner’s Manual Screen Controls Double-click on ATOM SQ to bring up the Editor. User buttons have default commands assigned, but these can be changed and customized. To assign a function to any of the ATOM SQ screen buttons, right- click on the User #’x’... - Page 33 ATOM SQ Advanced Studio One Integration Owner’s Manual Screen Controls Page 3: Scratchpad Toggle Tracklist Detached User Controls: Global Page 3/4 Open... Chord Apply Track Selector Chords Page 4: This page displays specialized controls for the Studio One Show Page:...
-
Page 34: Pads
Pads change color depending on which pad layout mode is selected while in Instrument mode. In Song mode, the clip color in Live’s Session view will determine the color of the pads on the top lane of ATOM SQ. 4.1.2 Triggering Notes or Clips All 32 pads are velocity sensitive in Instrument mode. -
Page 35: A-H Buttons
ATOM SQ Advanced Ableton Live Integration Owner’s Manual Control Functions A-H Buttons 4.1.5 In Instrument mode, the A-H buttons can change the current drum bank or change the current Octave in Keyboard layout. In Keyboard layout, the ‘A’ button is used as a momentary button for Sustain (press and hold to Sustain). -
Page 36: Navigation Buttons
Session view even though Arranger view is still in focus. 4.1.8 Transport Buttons These are dedicated transport buttons on ATOM SQ. Some buttons have a primary and secondary command (when Shift is also held). • Stop. Stops the transport from playing. Press a second time to return to zero. -
Page 37: Instrument Mode
ATOM SQ Advanced Ableton Live Integration Owner’s Manual Screen Controls Instrument Mode 4.2.1 Instrument mode will change the screen to display functions used to control a virtual instrument. 4.2.1.1 Pad Configuration Pads Range Octave Keys Pad Configuration Chrom Scale Root Velocity 1. - Page 38 ATOM SQ Advanced Ableton Live Integration Owner’s Manual Screen Controls 5. Root. When selected, the Screen Encoder will change the Root note of a scale (C, C#, D, D#, E, F, F#, G, G#, A, A#, B). The Root note is indicated by the green pads.
-
Page 39: Song Mode
ATOM SQ Advanced Ableton Live Integration Owner’s Manual Screen Controls 5. Rate. When selected, the Screen Encoder will adjust how fast or slow the arpeggiator steps through each note in the sequence. 6. Octaves. When selected, the Screen Encoder will change how many octaves the sequence will step through before restarting. -
Page 40: Editor Mode
ATOM SQ Advanced Ableton Live Integration Owner’s Manual Screen Controls Editor Mode 4.2.3 Editor mode will display functions specific to controlling a Device. Lock < Device Device > Track Name Device Name On/Off < Bank Bank > 1. Lock. Locks knob 1-8 controls to the currently selected Device. -
Page 41: Studio One Artist Quick Start
Studio One Artist provides you with all of the tools necessary to capture and mix a great performance. Power User Tip: As a valued PreSonus customer, you are eligible for a discount upgrade to Studio One Professional. For more details on the Studio One upgrade program for PreSonus customers, please visit https://shop.presonus.com/products/software/studio-... -
Page 42: Setting Up Studio One
“Install. ” The content will automatically begin to download and install from your My PreSonus user account. Power User Tip: You may be prompted to enter your My PreSonus user account information. Clicking “Remember Credentials” will allow you to have immediate access to any content you purchase from the PreSonus Marketplace. -
Page 43: Configuring Audio Devices
Please consult the documentation that came with your MIDI hardware for complete installation instructions. Note: Studio One will automatically configure your ATOM SQ for control. No setup is required. - Page 44 Make sure you have connected the MIDI Out of your external MIDI controller to a MIDI In on your PreSonus audio interface (if available) or another MIDI interface. If you are using a USB MIDI controller, connect it to your computer and power it on.
- Page 45 ATOM SQ Studio One Artist Quick Start Owner’s Manual Setting Up Studio One 3. From the menu on the left, select your MIDI controller from the list of manufacturers and models. If you do not see your MIDI controller listed, select New Keyboard.
- Page 46 ATOM SQ Studio One Artist Quick Start Owner’s Manual Setting Up Studio One Make sure you have connected the MIDI In of your external sound module to the MIDI Out of your MIDI interface. 1. In the External Devices window, click the Add button.
-
Page 47: Creating A New Song
ATOM SQ Studio One Artist Quick Start Owner’s Manual Creating a New Song Creating a New Song Now that you’ve configured your audio and MIDI devices, let’s create a new Song. We’ll start by setting up your default audio I/O. - Page 48 ATOM SQ Studio One Artist Quick Start Owner’s Manual Creating a New Song 2. Click on the Audio I/O Setup tab. 3. From the Inputs tab, you can enable any or all of the inputs on your audio interface that you’d like to have available. We recommend that you create a mono input for each of the inputs on your interface.
-
Page 49: Creating Audio And Instrument Tracks
ATOM SQ Studio One Artist Quick Start Owner’s Manual Creating a New Song Creating Audio and Instrument Tracks 5.3.2 1. In the upper left corner of the Arrange window, you will notice several buttons. The button furthest to the right is the Add Tracks button. -
Page 50: Recording An Audio Track
ATOM SQ Studio One Artist Quick Start Owner’s Manual Creating a New Song Recording an Audio Track 5.3.3 1. To begin recording, create an audio track from the Add Tracks window, set its input to Input 1 on your audio interface, and connect a microphone to the same input. - Page 51 ATOM SQ Studio One Artist Quick Start Owner’s Manual Creating a New Song Drag-and-Drop Virtual Instruments To add a virtual instrument to your session, open the browser and click on the Instrument button. Select the instrument or one of its patches from the Instrument browser and drag it into the Arrange view.
- Page 52 Also known as Reds or Red Drum, Redfish is not only fun to catch, it’s also delicious! © 2020 PreSonus Audio Electronics, Inc. All Rights Reserved. Impact, Presence, SampleOne, and Studio One are all trademarks or registered trademarks of PreSonus Software Ltd.
- Page 53 ATOM SQ Hybrid MIDI Keyboard / Pad Performance and Production Controller Owner’s Manual 18011 Grand Bay Ct. • Baton Rouge, ® Louisiana 70809 USA• 1-225-216-7887 Part# 70-52000154-A www.presonus.com...