Table of Contents
Advertisement
Advertisement
Table of Contents

Subscribe to Our Youtube Channel
Related Manuals for Bose X


Summary of Contents for Bose X
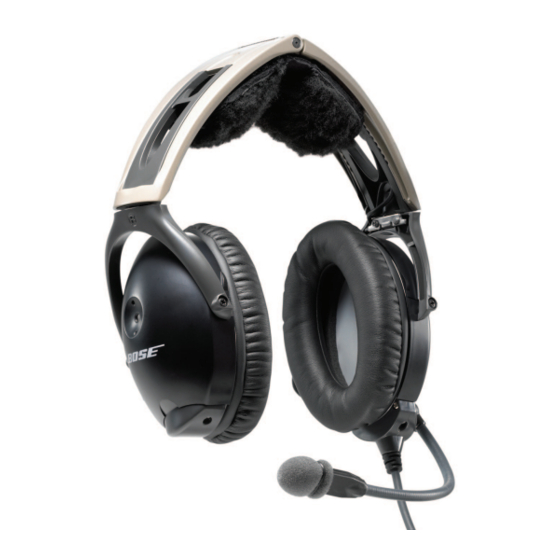
- Page 1 AVIATION HEADSET Owner’s Guide...
-
Page 2: Declaration Of Conformity
In accordance with EMC Directive 89/336/EEC and Article 10(1) of the Directive, is in compliance with the following norm(s) or documents(s) Technical regulations:EN55013, EN55020 Accredited by: Bose Corporation, The Mountain, Framingham, MA 01701-9168 USA 15 June 2003 Nic Merks Bose Products B.V. Vice President, Europe Nijverheidstraat 8, 1135 GE Edam Manufacturer’s authorized... -
Page 3: Cautions And Advisories
If your headset is aircraft powered, connect the head- set to the aircraft power sources only as described in this guide. An aircraft powered headset will not operate properly if used with a Bose Series II Aviation Headset battery pack or with any commercial battery pack. AUTIONS AND... -
Page 4: How Use Of The Headset Affects Hearing Safety
Using entertainment audio sources When listening to in-flight entertainment or a home audion source through a Bose Aviation Headset , be sure to limit the volume to safe levels that do not interfere with your ability to hear informational sounds and warning alarms, such as stall warnings or gear up, while piloting. -
Page 5: Earcup Inner Screen
Earcup inner screen Do not attempt to remove, replace, or repair this screen. If operating problems indicate the need for screen replacement, contact the Bose ® Aviation Headset Department. Refer to “Contact information” on page 34. If the screen gets wet or any foreign objects become lodged on or adjacent to it, follow the instructions in “Headset Care and... -
Page 6: Table Of Contents
ONTENTS Cautions and Advisories ........3 Operational advisory . - Page 7 Service ..........34 To return your headset to Bose for repair ....34 Contact information .
-
Page 8: Introduction
NTRODUCTION We appreciate your choice Congratulations on your purchase of a Bose This headset combines Bose Acoustic Noise Cancelling technology to electronically reduce unwanted aircraft noise, and ® Bose TriPort headset technology for a smaller, lighter, more comfortable headset that delivers full-spectrum noise reduction. - Page 9 Figure 4 The (a) battery powered and (b) aircraft powered versions of the headset NTRODUCTION...
-
Page 10: Getting Your Headset Ready For Use
The Bose Aviation Headset the carton. Please fill in the requested information and mail it to Bose. We will use this information to provide you with appropriate advisories and updates. Be sure to include your headset serial number, which is located on the underside of the magnesium headband, underneath the headband cushion. -
Page 11: Removing An Attached Boom Microphone Cable
Figure 6 Pulling the cable assembly straight out from the earcup note the important markings for left (L) and right (R) above each ear- cup. These markings indicate which ear each earcup is intended to fit over. Removing an attached boom microphone cable 1. -
Page 12: Clothing Clip
ETTING EADSET EADY FOR Figure 7 Positioning the mic cable assembly on the preferred earcup Figure 8 Moving the clothing clip along the cable Access cover Connector pins Cable assembly 4. Press the assembly onto the connector pins until it is fully engaged and the cable assembly is flush with the earcup. -
Page 13: Preparing To Use Battery Power
Preparing to use battery power Figure 9 Optional operation switches inside the battery compart- ment The battery compartment on your headset control model serves two purposes. In addition to holding the batteries, it contains small switches (Figure 9) that give you the option to change some of the factory-set operation defaults for your headset. -
Page 14: Inserting Batteries
ETTING EADSET EADY FOR Figure 10 Installing the two batteries Preparing the aircraft powered headset for use Inserting batteries Insert the two supplied alkaline AA batteries (IEC LR6) into the control module (Figure 10). CAUTION: The battery compartment is designed to prevent inadvert- ent reverse polarity from installing the batteries incorrectly. -
Page 15: Mounting The Connector
Figure 11 Attaching and removing the cable Figure 12 Harness connector and schematic CAUTION: Do not attempt to pull the connector out without first pull- ing back on the sleeve. Forcing the connector out will cause damage to the cable and/or your aircraft instrument panel. Align keyway Mounting the connector Mount the connector into a cutout, as shown in Figure 12 below. -
Page 16: Details On Making The Connections
ETTING EADSET EADY FOR Details on making the connections The pinout for the optional installed connector is: Headset power (10-32 VDC). Use a fuse or a Black System ground. Connect to the existing audio ground. White Phone communication–Left. Black Phone communication–Right. White Microphone/Hi-audio. -
Page 17: Use Proper Adhesives
® The Bose aircraft panel connector cannot be installed to an audio system using transformer-coupled audio outputs. Call the Bose Avia- tion Headset Department for details. Use proper adhesives Adhesives approved for use with this connector are: • Ciba-Geigy Uralane 5754-A/B •... -
Page 18: Mono, Stereo, And Helicopter Connection Diagrams
ETTING EADSET EADY FOR Mono, stereo, and helicopter connection diagrams Figure 13 Diagram of connections for a mono signal Ring and wiring Ti p (phone audio) Figure 14 Diagram of connections to aircraft stereo jacks Figure 15 Diagram of connections to a helicopter single jack... -
Page 19: Using Your Headset
If this problem continues when the sound level returns to normal, however, refer to “In case of difficulty” on page 30. If the problem persists, contact the Bose ment for assistance. During a long flight, you may feel a slight pressure point, which can be relieved by adjusting the headband position. -
Page 20: Microphone Placement
SING EADSET Figure 17 Properly placing the micro- phone, (a) wide side nearly touching your mouth, not (b) farther away or (c) tilted Operating the battery powered headset Microphone placement Proper microphone placement is important for clear communica- tions. With the headset on your head, make these adjustments: 1. -
Page 21: Power Button
Figure 18 The LED, volume control knobs, and power switch on the control module of a battery powered headset Power button Use the power button to turn the headset on or off, or to change the LED brightness (Figure 18). •... -
Page 22: Controlling The Volume Of A Single Battery Powered Headset
Volume control using multiple headsets When an aircraft has more than one headset connected to its audio system, the pilot in command should adjust the volume of his/her Bose ® Aviation Headset as follows: 1. -
Page 23: Operating The Aircraft Powered Headset
Operating the aircraft powered headset Figure 19 The volume control knobs and power switch on the aircraft powered headset control module An LED, located on the control module, changes color to indicate the power status, as follows: LED Color Type of light Green Blinking Amber... -
Page 24: Notice The Individual Earcup Controls
Volume control using multiple headsets When an aircraft has more than one headset connected to its audio system, the pilot in command should adjust the volume of his/her Bose Aviation Headset as follows: 1. Turn off ANR by setting the power switch to OFF. -
Page 25: Headset Care And Maintenance
All other care and maintenance, in and out of the warranty period, must be performed by Bose or an authorized dealer. Other maintenance is performed by condition only. CAUTION: Do not immerse the headset in water or any other liquid. -
Page 26: Ear Cushions
Located inside the earcup, the inner screen is critical to proper head- set operation. If the screen appears to cause operating problems, contact the Bose ® Aviation Headset Department. Replacement parts Replacement parts can be ordered directly from Bose Corporation. Please refer to “Contact information” on page 34. -
Page 27: Headband Cushion
Do not use electric heaters, blowers, or hairdryer type devices to dry the inner screen. If the headset is immersed in liquid, do not use it. Contact the Bose Aviation Headset Department for assistance. Through normal use, parts like windscreens and ear cushions may require periodic replacement. -
Page 28: Battery Replacement
EADSET ARE AND AINTENANCE Figure 22 a) Sliding open the battery compartment door b) Inserting new batteries into the control module bat- tery compartment Properly position the replacement ear cushion against the earcup. 4. Tuck an edge of the ear cushion skirt into the slot behind the ear cushion flange. -
Page 29: Battery Door Replacement
The headband cushion is designed to give the maximum level of comfort to your headset. Please follow the maintenance instructions below for regular care. Bose recommends that the cushion be replaced after regular care and maintenance fails to restore the wool pile to its original size and shape. -
Page 30: Troubleshooting
Look for the problem in the left column of the table, then follow the instructions on “What to do” in the right column. If the problem per- ® sists, contact the Bose Aviation Headset Department, using the contact information on page 34 of this guide, for assistance. - Page 31 Stereo missing or communi- cations in one ear only Squealing, whistling, or chirping sound when the system is turned on Low rumbling sound with headset turned on in a quiet environment Crackling sound audible with headset turned on in a loud environment, or ANR is inter- mittent No active noise reduction...
-
Page 32: Specifications
ECHNICAL NFORMATION Sound pressure levels (SPL) are relative to 20 micropascals. Headphone Damage could occur to avionics equipment that is intended for use only with 600-ohm headsets. If in doubt, consult the avionics equipment manufacturer. Impedance Monaural mode: 160 ohms (ON) and 230 ohms (OFF) at 1 kHz Stereo mode: 320 ohms (ON), 460 ohms (OFF) Frequency... -
Page 33: Faa Technical Standards Order
Storage: -67 to 158°F (-55 to 70°C) (Category A) Altitude: 15,000 feet maximum pressure alti- tude for full cancellation The Bose ® Aviation Headset , including its interface, cables, and electret boom microphone, is FAA approved to TSO C-57a and C-58a. -
Page 34: Service & Warranty Information
Service Contact information NFORMATION Limited 5-year warranty: Bose Corporation warrants this headset to be free from defects in materials and workmanship for a period of five years from the date of purchase. Ear cushion life will vary with use. Ear cushions carry a six-month limited warranty against manu- facturer’s defects. -
Page 35: Ordering Parts And Accessories
FAX:+31(0)299-390109 E-MAIL: aviation_europe@bose.com World Wide Web: www.bose.com The following accessories and customer-replaceable components may be purchased directly from Bose. Refer to contact information on page 34. • Additional control module cable Specify: battery powered; or aircraft powered • Ear cushions •... - Page 36 ©2006 Bose Corporation, The Mountain, Framingham, MA 01701-9168 USA AM270261 Rev.01...
Need help?
Do you have a question about the X and is the answer not in the manual?
Questions and answers