Table of Contents
Advertisement
Quick Links
Instruction Manual Rollei City Traveler XL Tripod
Thank you for choosing this Rollei product. Please read the manual
carefully before you use this travel tripod.
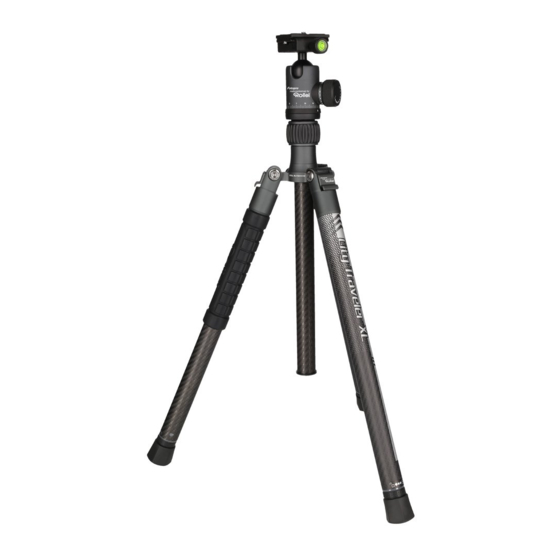
The tripods of the City Traveler Series are made out of Carbon.
Therefore they are leightweight and due to there compact design,
these tripods are ideal for using them on your next city trip. City
Traveler tripods are especially designed for DSLM and DSLR cameras
and support them excellently.
1
Angle Adjustment
To change the leg angle press the angle adjustment knob down. Then you are able to change the leg's position. There are three lock-in
position on the leg angle adjustment. If you have put the leg up and then lower it down the leg angle adjustment will automatically go into
the lock-in positions. To put the tripod into the folded length, you need to put the leg to the top by folding it by 180°. Therefore press the
leg angle adjustment knob down and while you have pressed it push the leg to the top.
2
180° reverse folding
3
Center Column
To adjust the height of the center column loosen the center
column lock by turning it counter clockwise, move the center
column up or down to your desired height. Finally lock the center
column position by turning the center column lock clockwise.
Furthermore you can unscrew the hook at the bottom part of the
center column to insert it the other way round. This position is
used in macro photography.
4
Anti-rotate screw
If you have attached a ball head on the tripod you can firmly fix
it by using the anti-rotate screw. With this function the ball head
cannot screw of by accident. Use the wrench to screw the anti-
rotate screw inside the plate. Please make sure that the ball head
is fixed, but that the panoramic function can still be used. If the
anti-rotate screw is too tight, the panorama function of the ball
head might be blocked. If this is the case please unscrew the anti-
rotate screw a bit, until the panorama function is working well
again.
5
Hidden Hook
This hook can be used to put a counterweight onto the tripod.
This can be a sand bag, carry bag or others and it will increase the
stability of the tripod.
6
Silicone grip
7
Leg length adjustment
To adjust the leg length rotate clockwise the rubber feet totally.
Then you can pull out the leg completely. Finally please lock the
leg length by rotating it counter clockwise. Please note the leg
length can be locked at any position.
ENGLISH
1
3
6
5
Attention
1. Do not overload the tripod.
2. Always tighten the center column lock if you use the tripod.
3. For your safety do not let the product touch any electric objects,
high voltage equipment and superactive chemicals.
4. Only use standard lubricant when necessary.
Cleaning
After using the tripod in water, sand or dust, please clean it carefully.
Therefore expand all legs and use a dry cloth to clean the tripod. If
it is completely wet, let it dry completely. If you have used it in salt
water or sand you should also clean and rinse it with fresh water.
4
25–16 mm
42 cm
2
4
7
156 cm
23 cm
840 g
8 kg
Advertisement
Table of Contents

Related Manuals for Rollei City Traveler XL


Summary of Contents for Rollei City Traveler XL
- Page 1 Instruction Manual Rollei City Traveler XL Tripod Thank you for choosing this Rollei product. Please read the manual carefully before you use this travel tripod. The tripods of the City Traveler Series are made out of Carbon. Therefore they are leightweight and due to there compact design, these tripods are ideal for using them on your next city trip.
- Page 2 Ball Head Construction Quick release plate Platform Ball Ball housing Ball head locking knob Base locking knob Base Scale Parts Name Vertical spirit level Platform locking knob Anti-slip groove Platform How to install the quick release plate Locking knob Align the quick releaseplate in regard to the anti-slip screw and anti-slip groove.
Need help?
Do you have a question about the City Traveler XL and is the answer not in the manual?
Questions and answers