Table of Contents
Advertisement
Quick Links
Before assembly
•
We recommend that time is taken to read the
instructions before starting assembly, then
follow the easy step by step guide.
The instruction sheet is only a guide to
the assembly. Certain items may not be
shown to scale.
•
Check all components prior to assembly
•
This product should be assembled by no
less than two people.
•
Some of the components may have sharp
edges wear protective work gloves while
handling components.
•
Never attempt to erect the assembly in
high winds.
•
Drill components where indicated.
x 2
Gloves
Drill
Recommended tools for assembly
•
Electric drill/screw driver
•
Cross head screwdriver bit
•
Hammer
•
Sharp knife
•
Hacksaw
•
3mm diameter drill bit
•
12mm diameter drill bit
•
Spirit level
•
Silicon sealant
•
Step ladder
No.
Components
1
Floor section
2
Plain wall panel
3
Front window panel
4
Left door
5
Right door
6
Apex panel
7
Front right/back left roof panel
8
Front left/back right roof panel
9
Middle roof panel
10
Roof purlin
(36 x 29 x 2050mm)
11
Coverstrip
(48 x 12 x 1690mm)
12
Kick strip
(38 x 12 x 1360mm)
13
Lattice wing panel
14
Door glazing
(372 x 264mm)
15
Window gazing
(190 x 370mm)
16
Roof felt roll
(2.8m)
17
Bargeboards
(48 x 12 x 1150mm)
18
Apex cover
(110 x 12 x 1990mm)
19
Door beading top/bottom
20
Door/window beading TR/BL*
21
Door/window beading TL/BR*
22
Door/window beading middle
23
Door vertical spar
(44 x 10 x 360mm)
24
Door horizontal spar
(44 x 10 x 537mm)
25
Window beading top/bottom
26
Window horizontal spar
(44 x 10 x 537mm)
*TR/BL = Top right/bottom left
TL/BR = Top left/bottom right
No.
Fixing Kit
27
Door frame beading
(15 x 15 x 100mm)
28
Finial
29
Latch door handle kit
30
Door hinge
31
Tower bolts
32
70mm screws
33
63mm screws
34
50mm screws
35
35mm screws
36
25mm screws
37
19mm round head screws
38
19mm black round head screws
39
40mm nails
40
30mm nails
41
25mm panel pins
42
10mm felt nails
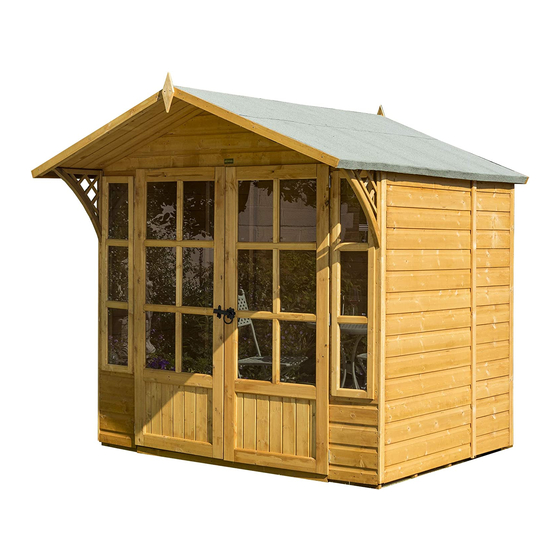
Eaton Summerhouse
Assembly Instructions
Dimensions
Overall external
Height = 2220mm
Width = 2130mm
Depth = 2700mm
Footprint
Width = 1980mm
Depth = 2050mm
Min. base area
Width = 2080mm
Depth = 2150mm
Qty.
2
6
2
1
1
2
2
2
2
4
7
1
2
12
6
3
4
1
4
(14 x 10 x 555mm)
28
8
(14x10 x 380mm)
8
(14x10 x 380mm)
8
(14x10 x 390mm)
6
4
4
(14 x 10 x 195mm)
4
Qty.
1
2
1
3
6
2
2
8
39
42
30
10
10
30
41
2
138
148
8
7
10
18
17
27
4
5
1
12
29
English SS167C
9
2
22
31
16
6
13
14
15
11
20
21
24
26
23
25
19
Advertisement
Table of Contents

Related Manuals for Rowlinson Garden Products Eaton Summerhouse


Summary of Contents for Rowlinson Garden Products Eaton Summerhouse
- Page 1 Eaton Summerhouse English SS167C Assembly Instructions Before assembly • We recommend that time is taken to read the instructions before starting assembly, then follow the easy step by step guide. The instruction sheet is only a guide to the assembly. Certain items may not be shown to scale.
- Page 2 T&G floor supplied in the kit). boards must run from the front Rowlinson Garden Products recommend using pressure treated bearers of the building to the back. with all buildings on any type of base. 2. Glazing Lay the doors and window panels on the ground.
- Page 3 6. Roof purlins Insert the four roof purlin into the rebates in the apex sections. Fix in place at the ends of the purlin, using 2 x 50mm screws per purlin. Screw through the purlin and into the frame of the apex panels. It is recommended to drill pilot holes for these screws with a 3mm drill bit before assembly.
- Page 4 Green Lane components shown and are only correct at time of Wardle Nr. Nantwich printing. We reserve the right to change the Cheshire specification of our products without prior notice. CW5 6BN www.rowgar.co.uk 2015 © Rowlinson Garden Products Ltd...
Need help?
Do you have a question about the Eaton Summerhouse and is the answer not in the manual?
Questions and answers