
Subscribe to Our Youtube Channel
Related Manuals for Rime Lite i.2A


Summary of Contents for Rime Lite i.2A
- Page 1 USER GUIDE i.2A/4A/6A Please read this manual before operating i flashes, and keep it for future reference.
-
Page 2: Intellectual Property
All intellectual property, owned by or which is otherwise the property of Rime Lite or its respective suppliers relating to IGBT flashes, including but not limited to, accessories, parts, or software, is proprietary to Rime Lite. No title to or ownership in the intellectual property is transferred to you. All applicable... -
Page 3: General Safety Instructions
Do not subject i flashes to excessive pressure. Do not touch i flashes with wet hands Do not store in dusty areas. Please be aware that Rime Lite claims no responsibility for damage from data loss due to breakdown, repair, or other causes. - Page 4 Package Your package contains the following items. i-flash body Modeling Lamp:300w Power Cable Sync Cable Pyrex protect glass Protect cap You can obtain the following accessories for from your local dealer: i flashes NS-SWING III-Transmitter Swing III-Receiver Swing I-Transmitter Swing I-Receiver Canon and Nikon...
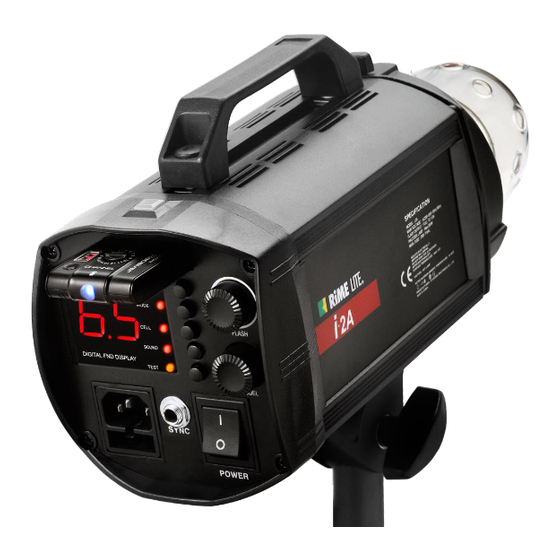
- Page 5 Overview Number Description Number Description ① Halogen Lamp ② X-non Flashtube ③ Modeling Lamp Base ④ Locking Holder ⑤ Handle ⑥ Photo Cell ⑦ Bracket for stand...
- Page 6 Number Description Number Description ① ⑥ FND Display Charge Jack ② ⑦ AC Inlet Mode Selection Buttons ③ ⑧ Plug-in Radio Trigger 1/10 Stop Power Adjust Dial ④ ⑨ Sync Connector Modeling Lamp Adjust Dial ⑤ ⑩ LED Operation Indicator Power Switch...
-
Page 7: Specification
SPECIFICATION i.6A Model i.2A i.4A Flash Power 45.5 F-Stope, 1m, ISO100, With New reflector(H) 32.5 45.0 12~600 Power range(W) 6~200 8~400 Variable Range of flash 6 F-Stop Recycling, max (/sec) at full power Recycling, min (/sec) at lowest power. 0.01 0.02... - Page 8 Operation Instruction for i flashes A. Insert a power cord into the main Inlet. B. Turn the power switch ON C. Before the switch turn it off, you better to set all buttons & indicators to “Minimum” or “OFF” . How to use HSS mode HSS function is possible only with SWING III SWING III has two version.
- Page 9 The Data sheet in HSS mode i.2A F-STOP(Distance : 1m, D-time with Standard reflector(Hard type) H1, h1 1/125 H2, h2 1/125 H3, h3 1/125 H4, h4 1/125 H5, h5 1/125 H6, h6 22 1 1/125 H7, h7 1/125 i.4A F-STOP(Distance : 1m,...
- Page 10 H6, h6 1/125 H7, h7 1/125 HSS Mode for Canon Full frame body type HSS Mode for Canon APC-S body type and All Nikon DSLR 2. t-Mode. Duration time setting Mode. -Press Mode Button( A2)-The Mode LED operation indicator On -The display will change from F-Step mark to t.1, t.2 …...
- Page 11 3. F-Mode. (Normal Mode) 'F-Stop' Mode (Flash power increments ) 1/10 f-stop -Press Mode Button once more(A2)- Mode LED Off -The display will change from t-mode mark t.1, t.2 … to F-stop mark 1.1, 1.5, 2.0... - F-mode has sequential 6f-stop (0.1 f-stop 1/10 power increments, 7 f-stop power variation).
- Page 12 The data sheet in t-mode(Duration Time Mode): 7 F-Steps (t.1 , t.2…….t.7) Mode(A2) LED On,...
- Page 13 ‘t’-Mode Performance...
- Page 14 The data sheet in F-mode (Normal Flash Power Mode) : 60 F-Steps ( 0.1 f-stop increments) Mode(A2) LED Off i.2A T-Mode. Duration Time Color Temperature F-Stop t.1(C.1) 1/3700 5440 2.8 5 t.2(C.2) 1/2950 5440 1/2150 5420 5.6 5 1/1150 5330...
- Page 15 i.6A T-Mode. Duration Time Color Temperature F-Stop 1/12800 6200 t.1(C.1) t.2(C.2) 1/6400 5700 1/2220 5590 11 7 1/1900 5600 1/1650 5600 22 8 1/1350 5570 32 6 1/1170 5560 ISO 100 / 1m Distance / RST-165H:Standard reflector(Hard type) 4. Continuative flashing (RPT) It is very helpful function for DSLR’s ‘bulb-shot’...
- Page 16 press: flashing 15times per second ‘t’ 4-1) RPT(C.1, C.2) Mode ‘1’ (in mode): Super-short duration time RPT mode In 5FPS, 10FPS, 15FPS function. The duration time and F-stop at C.1 C.2 is the same as t.1, t.2 of ‘t’ mode data. Ex) Press RPT(A1) Button once time(5FPS) lightly only in t.1, t.2..
-
Page 17: Control Panel
Duration time F-stop C.1 : 1/2600 C.2 : 1/2200 5. Control panel A1) RPT/HSS Button. Press, the button lightly RPT Mode: ‘C.1’(RPT) only in 1.1~1.9 or t.1 ‘C.2’(RPT) only in 2.1~ 2.9 or t.2 5FPS (5 times auto-flashes per second). 2rd Pressing -10FPS (10 times flashes per second) 3rd Pressing –... - Page 18 Replacing lamp and flash tube .You must switch off and disconnect the power cord before changing lamp or flash tube!!
- Page 20 Accessories...
- Page 21 If during the period of warranty this product proves defective under normal use and service, you should return the product to the retailer from whom it was originally purchased, or to any Rime Lite authorized dealer or authorized service center, if outside the time limit for returns imposed by the retailer.
Need help?
Do you have a question about the i.2A and is the answer not in the manual?
Questions and answers