Advertisement
Quick Links
Advertisement

Related Manuals for Jason.L ST SUPREME H24T


Summary of Contents for Jason.L ST SUPREME H24T
- Page 1 ASSEMBLY INSTRUCTION MODEL : ST SUPREME H24T Manual Straight Desk Frame (1200mm - 1800mm Length)
- Page 2 Component List - ST SUPREME H24T Left Column Right Column Foot Qty:1 Qty: 1 Qty: 2 Crossbar Assy.Right Hex Shaft L480mm Qty: 1 Qty : 2 Crossbar Assy.Left Qty: 1 Axle Drive L950mm Qty : 1 Side L Plate Qty : 2 Crank Handle Assembly.
-
Page 3: Description Qty
Assembly Instruction: Left Stand Assembly Step 1 : Install Leveling Base ITEM NO. DESCRIPTION QTY. Foot Leveling Base STEP 2 : Install Foot ITEM NO. DESCRIPTION QTY. Left Column Screw M6 XL16 STEP 3 : Install Crossbar Left Assy. ITEM NO. DESCRIPTION QTY. - Page 4 Assembly Instruction: Right Stand Assembly Step 1 : Install Leveling Base ITEM NO. DESCRIPTION QTY. Foot Leveling Base STEP 2 : Install Foot 12 12 ITEM NO. DESCRIPTION QTY. Right Column Screw M6 XL16 STEP 3 : Install Crossbar Right Assy. ITEM NO.
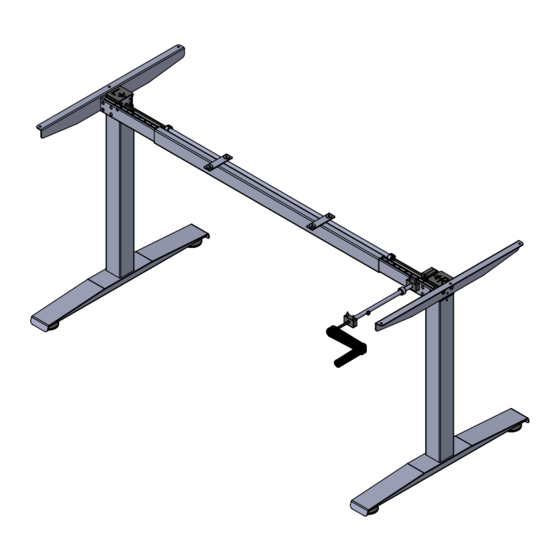
- Page 5 Assembly Instruction: Integrate Left & Right Stand ITEM NO. DESCRIPTION QTY. Crossbar Hand Crank Notes : 1.Please follow arrow left and right direction to adjust the frame length fixed table top size 2.Tighten set screw M6(X4) after fixed frame length. (Recommended length 115cm, 145cm, 175cm) Set Screw M6 (X4)
- Page 6 Assembly Instruction: Axle Drive And Hex Shaft Assy. ITEM NO. DESCRIPTION QTY. Hex Shaft L480mm Axle Drive L950mm Press down Press down Notes: 1.Before Insert Hex Shaft, make sure Left Stand & Right Stand are at lowest position. Please see attachment caution ! (Refer Pg.5/7) 2 .After insert Hex Shaft 08 , align Axle Drive 09 to the middle of Left &...
- Page 7 Caution: Column Must Be At Lowest Position Before Install Hex Shaft Press down the column make sure it is at lowest postion. The marking O not appear means it is at lowest position refer to below diagram. Press Marking not seen (Means at lowest position) Marking partially seen...
- Page 8 Assembly Instruction: Install Side L Plate ITEM NO. DESCRIPTION QTY. Side L Plate Screw M5 XL10 Pg.6/7...
- Page 9 Assembly Instruction: Install Crank Handle Assembly ITEM NO. DESCRIPTION QTY. Crank Handle Assy. Pg.7/7...
Need help?
Do you have a question about the ST SUPREME H24T and is the answer not in the manual?
Questions and answers