Bosch 11240 Operating/Safety Instructions Manual
Bosch rotary hammer operating/safety instructions 11240, 11247
Hide thumbs
Also See for 11240:
- Quick reference manual (25 pages) ,
- Operating/safety instructions manual (33 pages)
Table of Contents
Advertisement
Available languages
Available languages
BM 1619929519 12/02
IMPORTANT:
Read Before Using
11240
11247
Toll Free Number:
1-877-BOSCH99 (1-877-267-2499) http://www.boschtools.com
For English
See page 2
12/10/02
2:52 PM
IMPORTANT :
Lire avant usage
Operating/Safety Instructions
Consignes de fonctionnement/sécurité
Instrucciones de funcionamiento
y seguridad
Consumer Information
Renseignement des consommateurs
Información para el consumidor
Appel gratuit :
Parlez-vous français?
Voir page 10
Page 1
IMPORTANTE:
Leer antes de usar
Número de teléfono gratuito:
¿Habla español?
Ver página 18
Advertisement
Table of Contents

Related Manuals for Bosch 11240


Summary of Contents for Bosch 11240
- Page 1 BM 1619929519 12/02 12/10/02 IMPORTANT: Read Before Using Operating/Safety Instructions Consignes de fonctionnement/sécurité Instrucciones de funcionamiento y seguridad 11240 11247 Renseignement des consommateurs Información para el consumidor Toll Free Number: 1-877-BOSCH99 (1-877-267-2499) http://www.boschtools.com For English See page 2 2:52 PM...
-
Page 2: Power Tool Safety Rules
BM 1619929519 12/02 12/10/02 Power Tool Safety Rules Read and understand all instructions. Failure to follow all instructions WARNING listed below, may result in electric shock, fire and/or serious personal injury. SAVE THESE INSTRUCTIONS Work Area Keep your work area clean and well lit. Cluttered benches and dark areas invite accidents. -
Page 3: Tool Use And Care
BM 1619929519 12/02 12/10/02 Tool Use and Care Use clamps or other practical way to secure and support the workpiece to a stable platform. Holding the work by hand or against your body is unstable and may lead to loss of control. Do not force tool. - Page 4 BM 1619929519 12/02 12/10/02 Position the cord clear of rotating bit. Do not wrap the cord around your arm or wrist. If cord becomes entangled with the spinning bit it could entrap you causing serious personal injury. Position yourself to avoid being caught between the tool or side handle and walls or posts.
- Page 5 BM 1619929519 12/02 12/10/02 MPORTANT: Some of the following symbols may be used on your tool. Please study them and learn their meaning. Proper interpretation of these symbols will allow you to operate the tool better and safer. Symbol Name Volts Amperes Hertz...
-
Page 6: Functional Description And Specifications
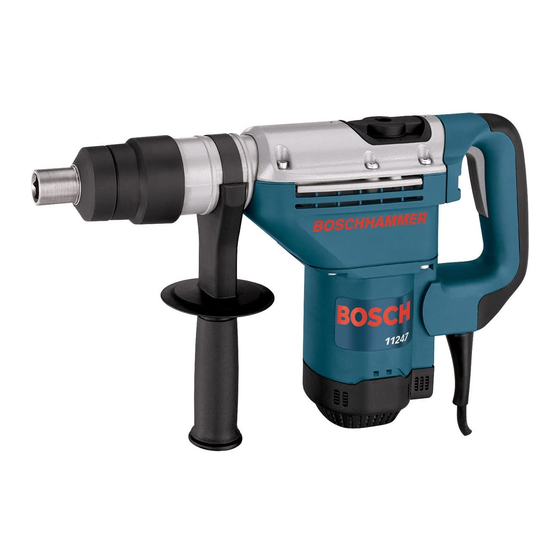
Thick wall core bits NOTE: For tool specifications refer to the nameplate on your tool. 2:52 PM Page 6 Rotary Hammer FIG. 1 SELECTOR LEVER VENTILATION HAND GRIP OPENINGS 11240 11247 SDS Max Spline 1 9/16" 1 9/16" 4" 4" TRIGGER SWITCH... -
Page 7: Operating Instructions
Clean the insert shank end of the accessory to remove any debris, then lightly grease with a light oil or lubricant. (Model 11240 only) Pull and hold locking sleeve backward. Insert accessory into the tool holder through the dust shield, while twisting and pushing inward until it sets into place. -
Page 8: Maintenance
BM 1619929519 12/02 12/10/02 Drilling/Hammering: used for drilling with solid carbide bits and core bits AUXILIARY HANDLE The tool must be supported with the auxiliary handle, which can be swiveled 360˚. To reposition and/or swivel the handle, loosen the hand grip, move the handle to the desired position along the barrel and securely retighten the hand grip. - Page 9 BM 1619929519 12/02 12/10/02 REPLACEMENT OF CORD AND CARBON BRUSHES Your tool is designed to provide a qualified service technician optimal access to replace the carbon brushes and the cord. This provides the service technician the ability to replace these components without the need of disassembling the entire tool housing.
-
Page 10: Règles De Sécurité Générales
BM 1619929519 12/02 12/10/02 Règles de Sécurité Générales Vous devez lire et comprendre toutes les instructions. Lenon-respect, même partiel, AVERTISSEMENT des instructions ci-après entraîne un risque de choc életrique, d'incendie et/ou de blessures graves. Aire de travail Veillez à ce que l'aire de travail soit propre et bien éclairée. - Page 11 BM 1619929519 12/02 12/10/02 offre une stabilité insuffisante et peut amener un dérapage de l'outil. Ne forcez pas l'outil. Utilisez l'outil approprié à la tâche. L'outil correct fonctionne mieux et de façon plus sécuritaire. Respectez aussi la vitesse de travail qui lui est propre.
- Page 12 BM 1619929519 12/02 12/10/02 Placez-vous de manière à éviter d'être pris entre l'outil ou la poignée latérale et les murs ou les montants. Si le foret se coince ou grippe dans l'ouvrage, le couple de réaction de l'outil pourrait écraser votre main ou votre pied. Ne frappez pas le foret avec une masse ou un marteau à...
- Page 13 BM 1619929519 12/02 12/10/02 Important : Certains des symboles suivants peuvent être utilisés sur votre outil. Veuillez les étudier et apprendre leur signification. Une interprétation appropriée de ces symboles vous permettra d'utiliser l'outil de façon plus efficace et plus sûre. Symbole Volts Ampères...
-
Page 14: Marteau Rotatif
REMARQUE : Pour spécifications de l'outil, reportez-vous à la plaque signalétique de votre outil. 2:52 PM Page 14 Marteau rotatif FIG. 1 LEVIER SÉLECTEUR PRISES D’AIR POIGNÉE (PRISE) 11240 11247 SDS Maxi. Cannelé 40 mm 40 mm 102 mm 102 mm... -
Page 15: Consignes De Fonctionnement
Nettoyez la tige de l’embout pour en enlever toute saleté, puis enduisez-la modérément d’une huile ou graisse légère. (Modèle 11240 seulement) Tirez le manchon de verrouillage vers l’arrière et maintenez-le dans cette position. Insérez l’accessoire dans le porte-outil en l’enfilant dans le pare-poussière tout en le tournant et en le poussant jusqu’à... - Page 16 BM 1619929519 12/02 12/10/02 Perçage/Marteau : utilisé pour le perçage avec mèches solides au carbure et mèches creuses ACCOUPLEMENT À GLISSEMENT L’outil renferme un accouplement à glissement préréglé. L’arbre arrêtera de tourner si l’accessoire grippe et surcharge l’outil. POIGNÉE AUXILIAIRE La poignée auxiliaire, qui pivote sur 360°, doit être utilisée pour supporter l’outil.
- Page 17 BM 1619929519 12/02 12/10/02 REMPLACEMENT DU CORDON ET DES BALAIS DE CHARBON Votre outil est conçu pour fournir à un technicien de service compétent un accès optimal pour remplacer les balais de charbon et le cordon. Ceci permet au technicien de service de remplacer ces composants sans avoir à...
- Page 18 BM 1619929519 12/02 12/10/02 Normas de seguridad para herramientas mecánicas Lea y entienda todas las instrucciones. El incumplimiento de todas las instrucciones ADVERTENCIA indicadas a continuación puede dar lugar a sacudidas eléctricas, incendios y/o lesiones personales graves. Area de trabajo Mantenga el área de trabajo limpia y bien iluminada.
- Page 19 BM 1619929519 12/02 12/10/02 Utilización y cuidado de las herramientas Utilice abrazaderas u otro modo práctico de fijar y soportar la pieza de trabajo a una plataforma estable. La sujeción de la pieza de trabajo con la mano o contra el cuerpo resulta inestable y puede ocasionar pérdida de control.
- Page 20 BM 1619929519 12/02 12/10/02 percusión y taladrado puede ser perjudicial para las manos y los brazos. Posicione el cordón de modo que esté alejado de la broca que gira. No enrolle el cordón alrededor del brazo o de la muñeca. Si pierde el control y tiene el cordón enrollado en el brazo o en la muñeca, el cordón puede atraparle y causarle lesiones.
- Page 21 BM 1619929519 12/02 12/10/02 Importante: Es posible que algunos de los símbolos siguientes se usen en su herramienta. Por favor, estúdielos y aprenda su significado. La interpretación adecuada de estos símbolos le permitirá utilizar la herramienta mejor y con más seguridad. Símbolo Nombre Volt...
-
Page 22: Descripción Funcional Y Especificaciones
NOTA: Para obtener las especificaciones de la herramienta, consulte la placa del fabricante colocada en la herramienta. 2:52 PM Page 22 Martillo giratorio FIG. 1 PALANCA SELECTORA ABERTURAS DE EMPUÑADURA VENTILACIÓN 11240 SDS Max 40 mm 102 mm -22- INTERRUPTOR GATILLO ABERTURAS DE VENTILACIÓN 11247... -
Page 23: Instrucciones De Funcionamiento
éste pueda tener y luego engráselo ligeramente con un aceite o lubricante ligero. (Modelo 11240 solamente) Tire hacia atrás del manguito de fijación y manténgalo en esa posición. Introduzca el accesorio en el portaherramienta a través del protector antipolvo, a la vez que gira y empuja hacia adentro el accesorio hasta que quede asentado en su sitio. -
Page 24: Mantenimiento
BM 1619929519 12/02 12/10/02 Taladrado/martilleo: utilizado para taladrar con brocas de carburo macizas y brocas huecas. EMBRAGUE DESLIZANTE Esta herramienta está dotada con un embrague deslizante interno preajustado. El husillo de salida dejará de girar si el accesorio se atasca y sobrecarga la herramienta. - Page 25 BM 1619929519 12/02 12/10/02 REEMPLAZO DEL CORDÓN Y DE LAS ESCOBILLAS DE CARBÓN La herramienta está diseñado para brindar a un técnico de servicio calificado acceso optimo para reemplazar las escobillas de carbón y el cordón. Esto proporciona al técnico de servicio la capacidad de reemplazar estos componentes sin necesidad de desmontar toda la carcasa de la herramienta.
- Page 26 BM 1619929519 12/02 12/10/02 2:52 PM Page 26 Notes: -26-...
- Page 27 BM 1619929519 12/02 12/10/02 2:52 PM Page 27 Notes: -27-...
- Page 28 BM 1619929519 12/02 12/10/02 LIMITED WARRANTY OF BOSCH PORTABLE AND BENCHTOP POWER TOOLS Robert Bosch Tool Corporation (“Seller”) warrants to the original purchaser only, that all BOSCH portable and benchtop power tools will be free from defects in material or workmanship for a period of one year from date of purchase. SELLER’S SOLE OBLIGATION AND YOUR EXCLUSIVE REMEDY under this Limited Warranty and, to the extent permitted by law, any warranty or condition implied by law, shall be the repair or replacement of parts, without charge, which are defective in material or workmanship and which have not been misused, carelessly handled, or misrepaired by persons other than Seller or Authorized Service Station.
Need help?
Do you have a question about the 11240 and is the answer not in the manual?
Questions and answers