Table of Contents
Advertisement
Advertisement
Table of Contents

Related Manuals for Feelworld LIVEPRO L1


Summary of Contents for Feelworld LIVEPRO L1
- Page 1 LIVEPRO L1 Multi - format Video Mixer USER MANUAL...
- Page 2 Thank you for your purchasing our product! In order to let you quickly grasp how to use this signal switcher, the following is the detailed product instruction.You can read it and how to use it before using the switcher. Please read all the information we provide carefully, and brake you to use our products correctly.
- Page 3 Features USB capture video complying with UVC for live streaming 4 CH HDMI inputs 2” TFT display on board to live preview 4 inputs Auto cut and manual switch (T-Bar) 14 transition effects on T-Bar ...
-
Page 4: Table Of Contents
CONTENTS 1. Production Instruction............5 1.1 Product Overview..............5 1.2 System Connection............5 1.3 Front Panel...............6 1.4 Interface Panel..............7 2. Product Using..............7 2.1 MENU................7 2.2 Main Menu...............7 2.2.1 INPUT................8 2.2.2 HDMI................8 2.2.3 USB3.0................8 2.2.4 AUDIO................9 2.2.5 IP SETTING..............9 2.2.6 LANGUAGE..............9 2.2.7 RESET................10 2.2.8 INFO................10 2.3. - Page 5 3. Switch Input Source............12 4. Software Operation............12 5.OBS Streaming..............18 6.Streaming Setting.............21 7. Upgrade................22 8. Specification..............27...
-
Page 6: Production Instruction
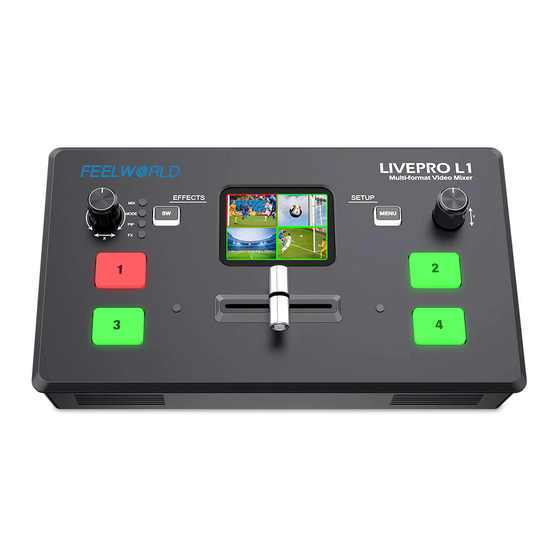
1.Product Instruction 1.1 Product Overview LIVEPRO L1 is a mini signal switcher and mixer which is able to stream any one from the 4 HDMI inputs to any live broadcasting platform via the third party live streaming software such as OBS. It adopt compact design, equipped with a 2 inches TFT screen to preview the 4 inputs in real time. -
Page 7: Front Panel
1.3 Front Panel TFT display To display 4 inputs and menu PUSH Knob, turn to select menu item, push to confirm Work as a quick button to switch HDMI output between 6-picture PVW and PGM when TFT is under the state of previewing 4 inputs MENU Menu and Back Button... -
Page 8: Interface Panel
AUDIO In, analog audio input port, connect to microphone AUDIO IN / OUT AUDIO Out, analog audio output port, connect to loudspeaker. 2. Product Using 2.1 MENU When LIVEPRO L1 is power on, the native TFT display show starting up page. 2.2 Main Menu... -
Page 9: Input
2.2.1 INPUT Push MENU and select the first menu item <Input> Push knob to enter <Input> menu 2.2.2 HDMI Push MENU and select the second menu item <HDMI> Push knob to enter <HDMI> menu HDMI means HDMI output, select Preview output and PGM output for HDMI. Output:Preview or PGM Format:1920x1080x60 2.2.3 USB3.0... -
Page 10: Audio
2.2.4 AUDIO Choose <AUDIO> SOURCE:EMBEDED or EXTREANAL AUDIO BAR:ON/OFF 2.2.5 IP SETTING Manually set IP address 2.2.6 LANGUAGE LANGUGE, select Chinese or English... -
Page 11: Reset
2.2.7 RESET Reset: Yes or No 2.2.8 INFO INFO:show the SN, IP, MAC,MCU version and VIDEO version. 2.3 BUTTON SW Push button SW, the TFT will show the transition effect menu <MIX>. The <MIX> LED indication beside will light up. Keep pushing, it will skip to the next menu <MODE>, again to <PIP >... -
Page 12: Mode
Cut Directly Fade In/Out Iris Box Wipe to Right Wipe to Bottom Wipe to Bottom Right Iris Cross Wipe to Left Wipe to Top Center Split Horizontal Center Split Vertical Cross Inwards Blinds Vertical Box Inwards Iris Round 2.3.2 MODE Keep pushing the button SW to open up MODE menu. -
Page 13: Pip
, green turns to red. Note: When T-Bar is not in the end position, no source can be selected. 4.Software Operation After software is installed, click the icon and login the software. Click Search to search LIVEPRO L1 device. - Page 14 After searching, all available mini devices in the subnet can be found, up to 128 devices can found if there are. Select the desired device by SN and IP and enter the management interface. The software interface is a simulation of operation panel on real L1 device. INPUT INFO...
- Page 15 HDMI Output USB3.0 Output <MIX> Choose switch time and transition effect.
- Page 16 <PIP> Choose layout mode for PIP Streaming Capture Device:choose FEELWORLD USB3.0 Capture OBS:Slide On AUDIO...
- Page 17 TEST PATTERN HDMI Output Setting...
- Page 18 Password Protection Set password for the device. After password is set, password will be required when enter the software operation interface. IP Setting Manually set Gateway, MASK and IP for the device.
-
Page 19: Obs Streaming
VERSION T-Bar Calibration Factory Reset 5.OBS Streaming LIVEPRO L1 is compatible with many third party steaming softwares, we recommend OBS, which available download https://obsproject.com/download. Download the software and update to the latest version. 1.Click”+”icon 2.choose video capture device 3.Click video capture device to open up setting page 4.Choose : FEELWORLD USB 3.0 Capture... - Page 20 If there is no video format YUY 2 after setting above, check the USB 3.0port connection. Make sure it is linked to USB 3.0port on PC by USB 3.0 cable. (USB 3.0 cable or port is standard in blue while USB 2.0 is in black) If the captured video is showing mosaic, change the video format to YUY2.
- Page 21 Audio Setting When there is no audio playing first check the video source see if the it is set in default value and then check the audio setting on OBS. 1.Set Default for the audio source. 2. Audio setting on OBS. Choose Audio, click Setting and choose audio device (Mic/Auxiliary Audio Device)
-
Page 22: Streaming Setting
6.Streaming Setting 1. Find the UL and Live Streaming Code provided by streaming broadcast website. 2. Copy rtmp address and broadcast code 3. Back to OBS, click setting in the lower right corner and click “Stream”. Choose Stream Type as “Custom Streaming Server” Paste the RMTP address to server and broadcast code to stream key. -
Page 23: Upgrade
2.1 Power on the device connect LAN ports between PC and device by Cat 6 cable; 2.2 FEELWORLD device default IP address is 192.168.0.99,to make sure the LAN communication, IP of PC must be under the same IP section, which means the IP of PC must be 192.168.0.XXX (but must not be completely... - Page 24 If the IP address is not in the same section, manual change of IP address is required. Here are the steps: Step 1. Click Start menu, then type Control Panel and click the option on the result. Step 2. Open Network and Internet > Network and Sharing Center. ...
- Page 25 2.3 Open XTOOL on PC,Click Communication 2.4 Choose Net Comm in pop up window and confirm 2.5 Upgrade Program After communication setting is done, the status light in bottom left turns green. Choose ALL and XTOOL will automatically select the all latest programs version even when there are other old files in list.
- Page 26 FPGA bin file to upgrade. After selecting, click upgrade. 2.5.1 During the process of upgrading, each upgrading status and upgrade result of each program file is showing. 2.5.2 After upgrade is done, there will pop up a window showing “New Version Upgraded”...
- Page 27 2.5.3 Click “Version” XTOOL will show the latest version info of the device so that users can check if the upgrade is successful or not.
-
Page 28: Specification
8.Specification Input HDMI In 4×HMDI-A HDMI Out 1×HMDI-A USB3.0 1×USB TypeA 1×3.5mm Stereo Jack Connections Audio 1×3.5mm Stereo Jack Communication LAN 1×RJ45 Power 1×DC Jack HDMI SMPTE:720p@50/60|1080i@50|1080p@23/24/ 30/50/60 VESA:1024 X 768@60|1280 X 720@60|1280 X Input 768@60 |1280 X 800@60|1280 X 1024@60|1360 Resolutions X768@60|1366 X 768@60|1440 X 900@60|1600 X1200@60|1680X1050@60|1920X1080@60|...
Need help?
Do you have a question about the LIVEPRO L1 and is the answer not in the manual?
Questions and answers