Sundstrom SR 580 Operating Instruction
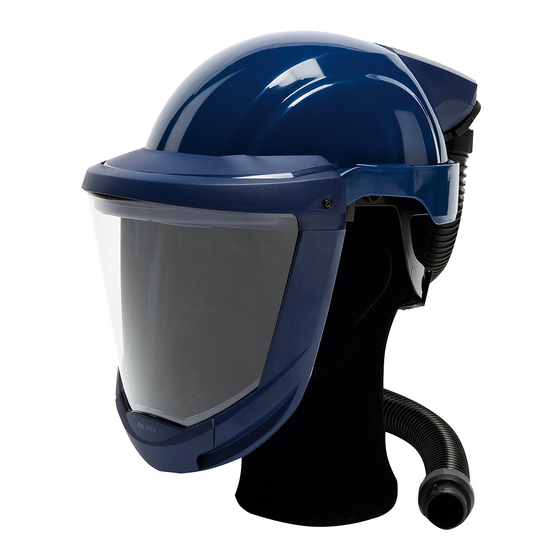
Protective helmet with visor
Hide thumbs
Also See for SR 580:
- Instructions for use manual (224 pages) ,
- User instructions (100 pages) ,
- Operating instruction (18 pages)

Subscribe to Our Youtube Channel
Related Manuals for Sundstrom SR 580


Summary of Contents for Sundstrom SR 580
- Page 1 Operating instruction SR 580 Protective helmet with visor Revision: 04 OI06H-8018 SR 580 2020-05-18...
-
Page 2: General Information
Instructions for use for SR 580 should be read before use. SR 580 together with the fan unit SR 500/SR 500 EX/SR 700 and approved filters is included in the Sundström fan-assisted respiratory protective device system conforming to EN 12941/ EN 12942:1998 SR 580 can be used together with fan unit SR 500 EX in explosive atmospheres. - Page 3 Unpacking SR 580 Packing list: • Complete SR 580 • Breathing hose • User instructions • Cleaning tissue OI06H-8018 SR 580 2020-05-18...
- Page 4 1.1 Check that the O-ring of 1.3 Mount the hose with the the hose is in place and is nut in the helmet. undamaged. 1.2 Check that the thread is 1.4 Mount the hose in the fan. OI06H-8018 SR 580 2020-05-18...
-
Page 5: Functional Check
(175 l/min). If minimum flow is not achieved, check that -the flow meter is held upright, - the ball moves freely, - the bag seals well around the hose. OI06H-8018 SR 580 2020-05-18... - Page 6 3.2 Raise the visor and put on the helmet. If necessary, adjust the width of the helmet using the knob located at the rear of the harness. OI06H-8018 SR 580 2020-05-18...
- Page 7 You can adjust the angle of the helmet connection as required. 3.5 Insert a finger inside the face seal and move it along the length of the contact surface to check the fit. OI06H-8018 SR 580 2020-05-18...
- Page 8 4.2 Pull out the membrane. 4.4 Press the valve cover firmly back into position. A Check and, if necessary, ‘snap’ indicates that it is clean the seal groove in the locked in position. valve seat. OI06H-8018 SR 580 2020-05-15...
- Page 9 5. Replacement of visor 5.3 Remove the visor 5.1 Unhook the face seal from the harness. 5.2 Remove the lower visor frame OI06H-8018 SR 580 2020-05-18...
- Page 10 5.5 Fit the lower visor frame 5.7 Attach the hooks in the to the helmet by sliding it into harness. position. A ‘click’ indicates that is locked in position. OI06H-8018 SR 580 2020-05-18...
- Page 11 6.1 Unhook the face seal 6.3 Unfasten the face seal by from the head harness. pulling its frame until the pins release from the holes in the visor. Remove the face seal. 6.2 Remove the lower visor frame. OI06H-8018 SR 580 2020-05-18...
- Page 12 Control that the pin and lip is fastened on both sides. 6.5 Fit the lower visor frame to the helmet by sliding it into position. A ‘click’ indicates that it is locked in position OI06H-8018 SR 580 2020-05-18...
- Page 13 7.3 Fit the Velcro tape with from the head harness. the rough side towards the forehead strap and the groove facing upwards. 7.2 Remove the sweatband. 7.4 Attach the face seal hooks in the head harness. OI06H-8018 SR 580 2020-05-18...
-
Page 14: Replacement Of Gasket
8. Replacement of gasket 8.1 Unscrew the hose from 8.3 Fit the new gasket. the helmet. 8.2 Remove the gasket from the flange. OI06H-8018 SR 580 2020-05-18... - Page 15 If necessary, spray the product with 70 % ethanol or isopropanol solution for disinfection. N.B. Never use a solvent for cleaning. 9.1 Clean the exhalation membrane and the valve seat. Check that everything is ok. Clean the valve cover on the outside. OI06H-8018 SR 580 2020-05-18...
-
Page 16: Maintenance Schedule
The helmet should be • used within 5 years after the date of production or within 3 years Replacement of exhalation membrane of being taken into use, whichever of these dates is the earlier. OI06H-8018 SR 580 2020-05-18...
Need help?
Do you have a question about the SR 580 and is the answer not in the manual?
Questions and answers