Table of Contents
Advertisement
Quick Links
Advertisement
Table of Contents

Related Manuals for Riello 7200/3F HV PLUS Series


Summary of Contents for Riello 7200/3F HV PLUS Series
- Page 1 7200/3F HV PLUS EN INSTALLATION, OPERATION AND MAINTENANCE MANUAL...
-
Page 2: Table Of Contents
RANGE The following symbols are used in this manual: MODEL CODE CAUTION! = Identifies actions that require caution and RIELLO 7200/3F - 800 HV PLUS 20136273 adequate preparation. RIELLO 7200/3F - 1000 HV PLUS 20136274 RIELLO 7200/3F - 1500 HV PLUS 20136275 STOP! = Identifies actions that you MUST NOT do. -
Page 3: Precautions
GENERAL INFORMATION GENERAL INFORMATION 3 DESCRIPTION OF THE APPLIANCE Size the solar expansion tank so as to ensure complete ab- sorption of the expansion of the fluid contained within the 7200/3F HV PLUS solar tanks can be integrated into solar system, with reference to the prevailing regulations on the systems to produce domestic hot water. -
Page 4: System Layout
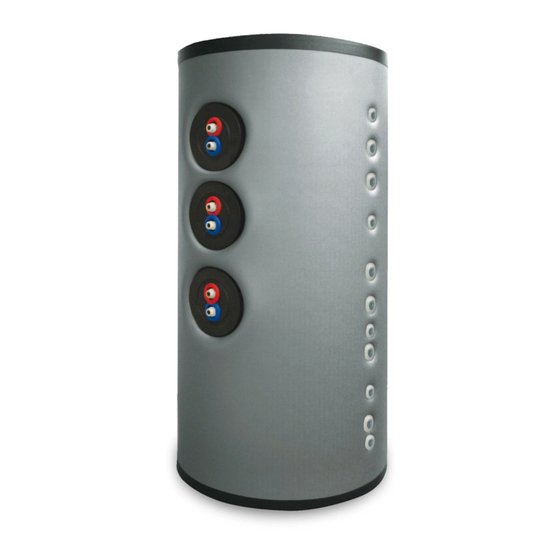
GENERAL INFORMATION GENERAL INFORMATION 5 SYSTEM LAYOUT Storage cylinder Probe/electronic anode pit (optional) Flange for inspection/insertion of additional exchang- Probe pit Thermometer connection Insulation Cover Guide Domestic hot water outlet Domestic cold water inlet Socket Storage cylinder drain 6 TECHNICAL SPECIFICATIONS 7200/3F HV PLUS DESCRIPTION 1000... -
Page 5: Installation
INSTALLATION INSTALLATION 7 UNPACKING THE PRODUCT 7200/3F HV PLUS solar heaters are supplied in a single pack- age on a wooden pallet. The insulation and cladding components on models 2000 and 3000 are supplied separately from the structural parts and should be assembled when you receive the product, as described in the section "Fitting the insulation (models 2000 - 3000)". -
Page 6: Place Of Installation
INSTALLATION INSTALLATION 12 WATER QUALITY REQUIREMENTS If disassembling is required, proceed in reverse order. To finish the assembly, apply the serial number plate, rat- REFERENCE VALUES ing plate and product plate, so that the tank can be easily identified. Electrical conductivity less than 200 μS/cm (25°C) Chlorine ions less than 50 ppm... -
Page 7: Water Connections
INSTALLATION INSTALLATION 13 WATER CONNECTIONS AE - S 90° 50 mm 45° AE - S 7200/3F HV PLUS DESCRIPTION 1000 1500 2000 3000 UAC - Domestic hot water outlet 1 ½” F 2" F Ø EAF - Domestic cold water inlet 1 ½”... -
Page 8: Recycling And Disposal
Do not use abrasive products, petrol or triethylene. End user RIELLO S.p.A. Via Ing. Pilade Riello, 7 37045 - Legnago (VR) www.riello.com The manufacturer strives to continuously improve all products. Appearance, dimensions, technical specifications, standard equipment...
Need help?
Do you have a question about the 7200/3F HV PLUS Series and is the answer not in the manual?
Questions and answers
Please how to install this boiler and how to prepare the pip connection with video
To install the Riello 7200/3F Series boiler and prepare the pipe connection, follow these steps:
1. Shut Down and Drain Systems:
- Shut down the boiler connected to the storage cylinder as per its manual.
- Switch off the storage cylinder at the control panel (if fitted) and at the mains power switch.
- Drain the central heating and domestic hot water circuits if there is a risk of freezing.
2. Install Magnesium Anodes:
- Use a spanner to install the anode and tighten the anode plug to 25–30 Nm.
3. Fit Insulation (for models 2000–3000):
- Place the tank in the installation room.
- Wrap the insulation around the storage cylinder, aligning fittings with the holes.
- Secure insulation using the zips at the edges.
4. Apply Identification Plates:
- Attach the serial number plate, rating plate, and product plate for identification.
5. Place of Installation:
- Install the unit in rooms that do not require electrical protection higher than IP X0D.
- Maintain minimum clearances: ≥0.3 m on sides, ≥0.6 m front, and ≥0.7 m top.
6. Water Connections:
- Follow section 13 (not detailed in the context) for connecting the water pipes, ensuring all fittings align and are properly sealed.
Make sure the installation is performed by a legally qualified heating engineer who will issue a declaration of conformity upon completion.
This answer is automatically generated