Table of Contents
Advertisement
Available languages
Available languages
MODEL / MODELO / MODÈLE :
DSR125
Automatic Battery Charging Station
Estación de carga automática de batería
Station de chargement de batteries automatique
OWNERS MANUAL / MANUAL DEL USUARIO / MANUEL D'UTILISATION
PLEASE SAVE THIS OWNERS MANUAL AND READ BEFORE EACH USE.
This manual will explain how to use the battery charger safely and effectively.
Please read and follow these instructions and precautions carefully.
POR FAVOR CONSERVE ESTE MANUAL DEL USUARIO Y LEALO ANTES
DE CADA USO. En este manual le explica cómo utilizar el cargador de batería
de manera segura y confiable. Por favor, lea y siga las siguientes instrucciones
y precauciones.
GARDER LE MANUEL D'INSTRUCTION ET LISEZ LE AVANT CHAQUE
UTILISATION. Ce manuel explique comment utiliser le chargeur de batterie
d'une façon securitaire et efficace. S'il vous plaît lisez et suivez ces instructions
et precautions.
0099002032-02
Advertisement
Table of Contents

Related Manuals for Schumacher DSR PROSERIES DSR125


Summary of Contents for Schumacher DSR PROSERIES DSR125
- Page 1 MODEL / MODELO / MODÈLE : DSR125 Automatic Battery Charging Station Estación de carga automática de batería Station de chargement de batteries automatique OWNERS MANUAL / MANUAL DEL USUARIO / MANUEL D’UTILISATION PLEASE SAVE THIS OWNERS MANUAL AND READ BEFORE EACH USE. This manual will explain how to use the battery charger safely and effectively.
-
Page 3: Important Safety Instructions
1. IMPORTANT SAFETY INSTRUCTIONS SAVE THESE INSTRUCTIONS. 1.1 SAVE THESE INSTRUCTIONS – damaged in any way; take it to a qualified This manual contains important safety serviceperson. and operating instructions. 1.9 Do not disassemble charger; take it to 1.2 Keep out of reach of children. a qualified serviceman when service or repair is required. -
Page 4: Preparing To Charge
may be overcharged with this charger. does not apply for this battery type. If the Overcharging may ignite or burst a battery “LITH” battery type is chosen, the rate of and cause injury to persons and damage charge automatically defaults to 12V, the to property. -
Page 5: Follow These Steps When Battery Is Outside Vehicle
7. FOLLOW THESE STEPS WHEN BATTERY IS OUTSIDE VEHICLE WARNING: A SPARK NEAR THE connect NEGATIVE (BLACK) charger clip BATTERY MAY CAUSE A BATTERY to free end of cable. EXPLOSION. TO REDUCE THE RISK OF 7.5 Do not face battery when making final A SPARK NEAR THE BATTERY: connection. -
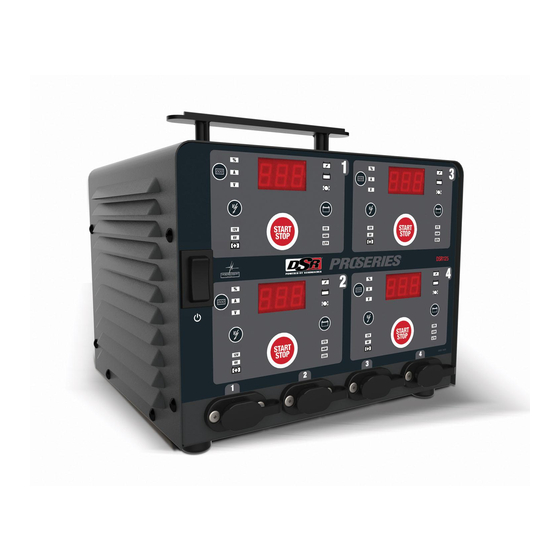
Page 6: Control Panel
10.5 Position the charger, with the mounting brackets installed, so that the keyhole slots on the mounting brackets line up with both screws you installed. Then slide the charger down so that the screw heads lock in the keyhole slot of the mounting brackets. 11. - Page 7 to be a wet cell. The electrolyte in a GEL BATTERY TYPE BUTTON cell has a silica additive that causes it to Use this button to select the type of battery. set up or stiffen. The recharge voltages on NOTE: Batteries should be marked with this type of cell are lower than the other their type.
-
Page 8: Using The Voltmeter To Test Battery State Of Charge
12. OPERATING INSTRUCTIONS OVERVIEW and Error Codes. To reset after an aborted Connect AC power and set the front panel charge, press the START/STOP button to ON/OFF switch to the ON position. turn the charger off. The switch will illuminate. Then select RECOVERY MODE an unused charging outlet from the four (Non-lithium ion batteries only) -
Page 9: Battery Percent And Charge Time
3. Read the voltage on the digital meter START/STOP button is pressed. Pressing or press the Display Mode button the START/STOP button activates the to set the tester to % (Battery %) and charger and deactivates the tester read the battery percentage. TESTING AFTER CHARGING TESTER AND CHARGER After the unit has been changed from... -
Page 10: Troubleshooting And Error Codes
16. TROUBLESHOOTING AND ERROR CODES Error Codes CODE DESCRIPTION REASON/SOLUTION The battery voltage is still under The battery could be bad. Have it checked or 10V (for a 12V battery) or 5V replaced. (for a 6V battery) after 2 hours of charging. -
Page 11: Before Returning For Repairs
1-800-621-5485 For REPAIR OR RETURN, contact Customer Service at 1-800-621-5485. DO NOT SHIP UNIT until you receive a RETURN MERCHANDISE AUTHORIZATION (RMA) number from Customer Service at Schumacher Electric Corporation. 18. SPECIFICATIONS Input ....................120V AC 60Hz, 12.5A max. -
Page 12: Limited Warranty
Manufacturer does not provide any warranty for any accessories used with this product that are not manufactured by Schumacher Electric Corporation and approved for use with this product. This Limited Warranty is void if the product is misused, subjected to careless handling, repaired, or modified by anyone other than Manufacturer or if this unit is resold through an unauthorized retailer. -
Page 13: Instrucciones Importantes De Seguridad
1. INSTRUCCIONES IMPORTANTES DE SEGURIDAD GUARDE ESTAS INSTRUCCIONES. 1.1 GUARDE ESTAS INSTRUCCIONES – daños de cualquier otra forma; hágalo Este manual contiene instrucciones revisar por una persona capacitada que operativas y de seguridad de importancia. efectúe reparaciones. 1.2 Manténgase alejado de los niños. 1.9 No desarme el cargador;... -
Page 14: Preparación Para La Carga
2.7 No utilice elementos personales de podrían explotar y provocar lesiones a metal tales como anillos, pulseras, personas o daño a la propiedad. collares y relojes al trabajar con una ADVERTENCIA: No utilice este cargador batería de plomo-ácido. Una batería para cargar baterías de iones de litio de plomo-ácido puede producir que no sean del tipo de litio-ferrofosfato... - Page 15 6. SIGA ESTOS PASOS CUANDO LA BATERÍA ESTÉ COLOCADA EN EL VEHÍCULO ADVERTENCIA: batería al borne POSITIVO (POS, P, +) sin UNA CHISPA PROVOCADA CERCA descarga a tierra de la batería. Conecte DE LA BATERÍA PUEDE CAUSAR LA el gancho NEGATIVO (NEGRO) al chasis EXPLOSIÓN DE LA BATERÍA.
-
Page 16: Conexiones A Tierra Y Energía De Ca
8. CONEXIONES A TIERRA Y ENERGÍA DE CA 8.1 Este cargador de batería está destinado El uso de un enchufe como adaptador a un uso en un circuito con tensión no se recomienda y no debe ser utilizado nominal de 120 V y requiere de un Estados Unidos. -
Page 17: Panel De Control
11. PANEL DE CONTROL BOTÓN DE MODO PRECAUCIÓN: Use la configuración DE VISUALIZACIÓN Recuperación solo para baterías de Utilice este botón para ajustar la pantalla 12 V. La configuración Recuperación digital a uno de los siguientes: no se puede usar con baterías de 6 V La configuración de 12 V se aplica % (% de batería) –... -
Page 18: Instrucciones De Operación
baterías regulares. Las baterías de ciclo LITH (Solamente baterías de iones de profundo tienen placas más gruesas y litio, LiFePO ) – La batería de LiFePO pueden aguantar varios ciclos de descarga. (litio-ferrofosfato) está hecha a base de iones de litio y ofrece buenas funciones de AGM –... - Page 19 PANTALLA DIGITAL normal cuando comience la carga normal Al conectar las pinzas de los cables de la después de que la batería se recupere. estación a una batería aparecerá el voltaje El Modo de recuperación puede tardar de la batería, aun cuando no lo haya hasta 10 horas.
-
Page 20: Porcentaje De Batería Y Tiempo De Carga
TESTER Y CARGADOR PRUEBA LUEGO DE LA CARGA Cuando se enciende por primera vez, Luego de que se ha cambiado la unidad el cargador funciona sólo como tester, de tester a cargador (presionando el no como cargador. Para continuar botón START/STOP), el dispositivo sigue utilizándolo como tester solamente, evite funcionando como cargador siempre que presionar el botón START/STOP. -
Page 21: Mantenimiento Y Cuidado
15. MANTENIMIENTO Y CUIDADO Con cuidados mínimos puede mantener • Enrolle los cables de entrada y salida el cargador de baterías funcionando cuidadosamente cuando almacene el correctamente durante años. cargador. Esto ayudará a evitar daños accidentales a los cables y el cargador. •... -
Page 22: Antes De Devolver A Reparaciones
1-800-621-5485 Para REPARACIÓN O DEVOLUCIÓN, comuníquese con Servicios al Cliente al 1-800-621-5485. NO ENVÍE LA UNIDAD hasta que usted reciba AUTORIZACIÓN DE DEVOLUCIÓN DE MERCANCÍA (RMA) de Servicios al Cliente de Schumacher Electric Corporation. 18. ESPECIFICACIONES Entrada ..................120V CA 60Hz, 12,5A máx. -
Page 23: Garantía Limitada
El Fabricante no presta garantía por lo accesorios utilizados con este producto que no sean los fabricados por Schumacher Electric Corporation y que no estén aprobados para su uso con este producto. La presente Garantía Limitada será nula si el producto se utiliza en forma errónea, se trata de manera inadecuada, es reparado o modificado... -
Page 24: Consignes De Sécurité Importantes
1. CONSIGNES DE SÉCURITÉ IMPORTANTES CONSERVER CES INSTRUCTIONS. 1.1 CONSERVER CES INSTRUCTIONS – 1.8 Ne pas faire fonctionner le chargeur s’il a Ce manuel contient des instructions reçu un choc violent, est tombé par terre importantes concernant la sécurité et le ou a été... -
Page 25: Préparation Pour Le Chargement
thermique assez fort pour souder une lithium-fer-phosphate (LiFePO ). Les bague ou autre chose du même genre au autres types de batteries au lithium- métal, causant de graves brûlures. ion peuvent ne pas être suffisamment chargées ou surchargées par ce 2.8 Utilisez le chargeur pour les batteries chargeur. -
Page 26: Étapes À Suivre Quand La Batterie Est Installée Hors Du Véhicule
6. ÉTAPES À SUIVRE QUAND LA BATTERIE EST INSTALLÉE DANS UN VÉHCULE AVERTISSEMENT : P, +) non mise à la masse de la batterie. UNE ÉTINCELLE PRÈS DE BATTERIE Raccorder la pince NÉGATIVE (NOIRE) PEUT CAUSER SON EXPLOSION. POUR au châssis du véhicule ou au moteur, RÉDUIRE LES RISQUES D’ÉTINCELLE loin de la batterie. -
Page 27: Directives D'assemblage
un risque de choc électrique ou • Les broches de la fiche de la rallonge d’électrocution. doit être le même nombre, la taille et forme que celles de la fiche du chargeur. NOTE : Conformément à la réglementation canadienne, l’utilisation d’un adaptateur •... - Page 28 BOUTON DU MODE D’AFFICHAGE BOUTON DE TYPE DE BATTERIE Utilisez ce bouton pour sélectionner une Utilisez ce bouton pour sélectionner le type des fonctions de l’affichage numérique de batterie. suivantes : REMARQUE : Le type de batterie devrait % (% Batterie) – L’affichage numérique être indiqué...
-
Page 29: Consignes D'utilisation
Gel – Mettre le bouton sur AGM. L’élément nominale des batteries plomb-acide de six gélifié est similaire à celui du style AGM car cellules. Cela fait de la batterie LiFePO l’électrolyte est suspendu, mais différent, un bon remplacement aux batteries au car techniquement la batterie AGM est plomb-acide pour les automobiles ou encore considérée être un élément liquide. - Page 30 MODE DE RÉCUPÉRATION de Float-Mode Monitoring (surveillance (Batteries non-ion-lithium seulement.) en mode flottant). Dans ce mode, le Si la batterie s’est déchargée sur une chargeur maintient la batterie à pleine longue période de temps, le sulfate charge en faisant circuler peu de courant peut s’accumuler et ne plus accepter au besoin.
-
Page 31: Pourcentage De La Batterie Et Durée De Charge
14. POURCENTAGE DE LA BATTERIE ET DURÉE DE CHARGE Ce chargeur ajuste la durée de charge afin Il faut bien garder à l’esprit certains de charger complètement, efficacement faits lorsqu’on recharge une batterie : et en toute sécurité la batterie. Le •... -
Page 32: Dépannage
16. TABLEAU DE DÉPANNAGE ET CODES D’ERREUR Codes d’erreur CODE DESCRIPTION RAISON / SOLUTION La tension de batterie est toujours en La batterie pourrait être mauvaise; faites-la vérifier ou dessous de 10 V (pour une batterie remplacer. de 12V) or 5V (pour une batterie de 6V) après 2 heures de chargement. -
Page 33: Avant De Retourner Pour Les Réparations
Pour RÉPARATION OU RETOUR, contactez le service téchnique au 1-800-621-5485. NE PAS ENVOYER L’UNITÉ jusqu’à ce que vous receviez une AUTORISATION DE RETOUR DE MARCHANDISE (RMA) auprès du service clientèle au Schumacher Electric Corporation. 18. SPÉCIFICATIONS Entrée ....................120V CA 60Hz, 12,5A max. -
Page 34: Garantie Limitée
ACHETEUR DE CE PRODUIT. CETTE GARANTIE LIMITÉE N’EST PAS TRANSFÉRABLES NI CESSIBLES. Schumacher Electric Corporation (le « Fabricant ») garantit ce unité pour un (1) an à compter de la date d’achat au détail contre les défauts de matériaux ou de fabrication qui peuvent se produire dans des conditions normales d’utilisation et de soins. -
Page 35: Warranty Card / Tarjeta De Garantía
ORIGINAL receipt because it will be required for any warranty claims. This warranty is not transferable. Send warranty card only. DO NOT SEND UNIT TO THIS ADDRESS FOR REPAIR. Mail this card to: Schumacher Electric Corporation 801 Business Center Drive Mount Prospect, IL 60056-2179 Name ______________________________________________________________... -
Page 36: Carte De Garantie
éventuelle réclamation au titre de la garantie. Cette garantie n’est pas transférable. Envoyer la carte de garantie seulement. NE PAS ENVOYER L’UNITÉ À CETTE ADRESSE POUR RÉPARATION. Envoyer cette carte à : Schumacher Electric Corporation 801 Business Center Drive Mount Prospect, IL 60056-2179 (É.-U ) Nom _______________________________________________________________...
Need help?
Do you have a question about the DSR PROSERIES DSR125 and is the answer not in the manual?
Questions and answers