Table of Contents
Advertisement
Advertisement
Table of Contents

Related Manuals for Schumacher DSR123


Summarization of Contents
Important Safety Instructions
Save These Instructions
Manual contains important safety and operating instructions.
Keep Out of Reach of Children
Keep the charger out of reach of children.
Avoid Rain or Snow Exposure
Avoid exposing the charger to rain or snow.
Use Manufacturer Recommended Attachments
Using unapproved attachments may pose risks of fire, shock, or injury.
Disconnect by Pulling the Plug
Disconnect the charger by pulling the plug, not the cord, to prevent damage.
Extension Cord Usage Precautions
Avoid using extension cords unless necessary; use proper cords if required.
Do Not Use Damaged Cords or Plugs
Do not operate the charger with damaged cords or plugs.
Do Not Operate Damaged Charger
Do not use a damaged charger; seek professional service.
Do Not Disassemble Charger
Do not disassemble the charger; refer to qualified service personnel.
Unplug Before Maintenance
Unplug the charger before maintenance or cleaning to prevent electric shock.
Risk of Explosive Gases Warning
Warning about explosive gases near lead-acid batteries.
Personal Safety Precautions
Have Assistance Nearby
Have someone nearby when working near a lead-acid battery.
Keep Cleaning Supplies Ready
Keep water and soap accessible for acid spills.
Wear Protective Gear
Wear eye and clothing protection when working near batteries.
Handle Acid Spills
Wash skin or clothing immediately if contacted by battery acid.
No Smoking or Sparks Near Battery
Never smoke or allow sparks near batteries.
Avoid Dropping Tools on Battery
Avoid dropping metal tools on batteries to prevent sparks.
Remove Metal Personal Items
Remove metal items to prevent burns from short circuits.
Use Only Specified Battery Types
Use charger only for specified lead-acid battery types and capacities.
Never Charge Frozen Battery
Never attempt to charge a frozen battery.
Preparing to Charge
Disconnect Grounded Terminal First
When removing a battery, disconnect the grounded terminal first.
Ensure Good Ventilation
Ensure the area around the battery is well ventilated.
Clean Battery Terminals
Clean battery terminals carefully to avoid contact with eyes.
Add Distilled Water
Add distilled water to battery cells to the specified level.
Review Manufacturer Precautions
Review battery manufacturer’s precautions and charging rates.
Determine Battery Voltage
Verify battery voltage using the owner's manual before charging.
Charger Location
Position Charger Away from Battery
Position the charger away from the battery as cable length allows.
Avoid Placing Charger Above Battery
Do not place the charger directly above a charging battery.
Prevent Acid Dripping on Charger
Prevent battery acid from dripping onto the charger.
Ensure Adequate Ventilation
Avoid operating the charger in confined or poorly ventilated areas.
Do Not Place Battery on Charger
Never place a battery on top of the charger.
DC Connection Precautions
Disconnect Clips with Switches Off
Connect/disconnect DC clips only when charger switches are off.
Attach Clips as Indicated
Attach clips to battery and chassis as per sections 6 and 7.
Charging Battery Installed in Vehicle
Spark Warning Near Battery
Warning about sparks near batteries causing explosions.
Position Cords Safely
Route cords to prevent damage from moving engine parts.
Stay Clear of Moving Parts
Avoid contact with moving engine parts like fans and belts.
Check Polarity of Battery Posts
Identify positive and negative battery posts correctly.
Determine Grounded Battery Post
Determine which battery post is grounded to the chassis.
Connect Positive Terminal (Neg-Grounded)
Connect red clip to positive terminal on negative-grounded vehicles.
Connect Negative Terminal (Pos-Grounded)
Connect black clip to negative terminal on positive-grounded vehicles.
Disconnect Charger Sequence
Disconnect the charger by reversing connection steps.
Refer to Operating Instructions for Charge Duration
Refer to operating instructions for charge duration details.
Charging Battery Outside Vehicle
Spark Warning Near Battery
Warning about sparks near batteries causing explosions.
Check Polarity of Battery Posts
Identify positive and negative battery posts correctly.
Connect Cable to Negative Post
Connect a 24-inch, 6-gauge cable to the negative battery post.
Connect Positive Charger Clip
Connect the red charger clip to the positive battery post.
Position Away from Battery
Position yourself and the cable end away from the battery.
Avoid Facing Battery During Connection
Avoid facing the battery during final connection.
Disconnect Charger in Reverse Sequence
Disconnect the charger in reverse order of connection.
Marine Battery Charging Note
Marine batteries must be charged on shore.
Grounding and AC Power Cord Connections
120 Volt Circuit Operation
The charger operates on a 120-volt AC circuit.
Do Not Alter AC Cord or Plug
Never alter the AC cord or plug; use a qualified electrician for outlet issues.
Extension Cord Usage Guidelines
Guidelines for using extension cords with the charger.
Assembly Instructions
Uncoil Cables Before Use
Uncoil cables before using the charger.
Extend Handle
Extend the handle by pulling it upwards until it locks.
Clamp Cleat Installation
Instructions for installing the clamp cleat.
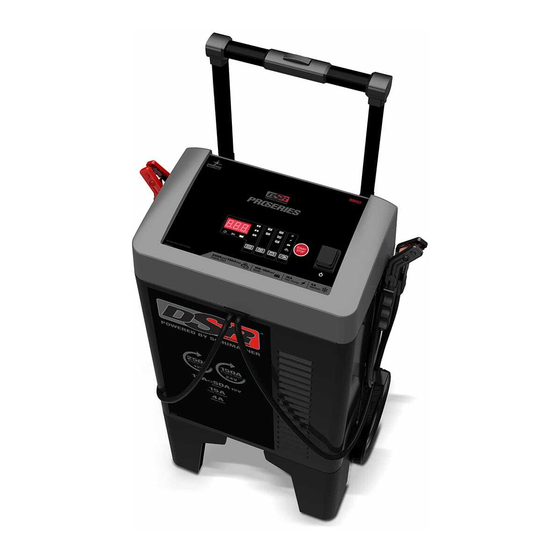
Control Panel Overview
12V Memory Saver Port
Port for memory saver function on specific models.
Digital Display Functionality
Indicates voltage, percentage, or amperage based on mode.
Display Mode Button
Button to select digital display function (Volts, Amps, %).
Charging Status LEDs
LEDs indicating charging status and clamp connection.
Flash Button
Button for entering Flash Reprogramming mode.
Up/Down Arrow Buttons
Buttons to adjust variable settings on the display.
Battery Voltage/Memory Saver Button
Selects battery voltage (6V, 12V, 24V) or memory saver function.
Battery Type Button
Button to select battery type (STD, AGM, GEL).
Output Rate Button Functions
Maintain (4A)
For small batteries and maintaining charged large batteries.
Fast Charge (15A)
For automotive, marine, and light truck batteries.
Boost Mode
Provides a quick burst of energy for deeply discharged batteries.
Engine Start Mode
Provides additional amps for cranking engines.
Operating Instructions
Spark Warning Near Battery
Warning about sparks near batteries causing explosions.
Important: Do Not Start Vehicle With Charger Connected
Do not start the vehicle with charger connected, except during Engine Start mode.
Charging a Battery in the Vehicle
Step-by-step guide for charging a battery while it is in the vehicle.
Caution: Confirm Battery Voltage Visually
Caution to visually confirm battery voltage to prevent damage.
Charging a Battery Outside of the Vehicle
Step-by-step guide for charging a battery removed from the vehicle.
Using Boost Mode
Caution: Confirm Battery Voltage Visually
Caution to visually confirm battery voltage to prevent damage.
Note on Additional Safety Settings
Note on additional safety settings for 24V mode.
Using Engine Start Mode
Warning: Do Not Use Engine Start Without Battery
Warning against using Engine Start mode without a battery.
Note: Do Not Use Engine Start if Vehicle Still Won't Start
Do not use Engine Start if the vehicle still won't start after charging.
Flash Reprogramming
Note: Do Not Flash Reprogram Discharged Batteries
Do not flash reprogram discharged or defective batteries.
Note: Clamps Are Live During Reprogramming
Note that clamps are live during flash reprogramming.
Using a Memory Saver
Note: 12V Port and OBDII Cable Fuse Rating
Note on 12V port and OBDII cable fuse rating.
Important: Check Manufacturer Compatibility
Warning that some manufacturers prohibit OBDII memory savers.
Maintenance and Care
Clean Clamps After Charging
Clean charger clamps after each use to prevent corrosion.
Clean Charger Case
Clean the charger case with a soft cloth for maintenance.
Coil Cords for Storage
Coil cords neatly for storage to prevent damage.
Store Charger Unplugged and Upright
Store the charger unplugged and upright.
Store in Cool, Dry Place
Store the charger indoors in a cool, dry environment.
Error Codes and Troubleshooting
Error Codes Explained
List of error codes and their descriptions/solutions.
General Troubleshooting
Common problems, possible causes, and solutions.
No Display Reading Troubleshooting
Troubleshooting steps for no display reading.
Boost/Charging ON LED Stays On
Explains why the Boost/Charging ON LED may stay illuminated.
Specifications
DSR121 Specifications
Specifications for the DSR121 model.
DSR122 Specifications
Specifications for the DSR122 model.
DSR123 Specifications
Specifications for the DSR123 model.
DSR124 Specifications
Specifications for the DSR124 model.
Need help?
Do you have a question about the DSR123 and is the answer not in the manual?
Questions and answers