Motorola MG8702 User Manual
Docsis 3.1 cable modem plus ac3200 wifi router
Hide thumbs
Also See for MG8702:
- Quick start manual (18 pages) ,
- Quick start manual (21 pages) ,
- Quick start manual (21 pages)
Table of Contents
Advertisement
Advertisement
Table of Contents

Related Manuals for Motorola MG8702


Summary of Contents for Motorola MG8702
- Page 1 DOCSIS 3.1 cable modem plus AC3200 WiFi router Model MG8702 User Manual...
- Page 2 NOTICE This document contains proprietary information protected by copyright, and this Manual and all the accompanying hardware, software, and documentation are copyrighted. No part of this document may be photocopied or reproduced by mechanical, electronic, or other means in any form. The manufacturer does not warrant that the hardware will work properly in all environments and applications, and makes no warranty or representation, either expressed or implied, with respect to the...
- Page 3 CAUTION: These precautions help protect you and your MG8702. • Do not put the MG8702 or its power adapter in water, since this is a shock hazard. • The MG8702 should normally be installed indoors. If you use it outdoors, protect it from moisture and be careful about temperature.
-
Page 4: Table Of Contents
Setting up a smart TV, streaming media device, or other device Accessing the Configuration Manager by Using a Browser Configuring your MG8702 to support devices and applications with special requirements 33 ......33 OR GAMES PLAYED ON GAME CONSOLES AND AND SECURITY CAMERAS .................... - Page 5 Changing your MG8702’s Username and Password, and Resetting to Factory Defaults MG8702’ ..............68 HANGING YOUR SERNAME AND ASSWORD ..................... 69 ESETTING TO ACTORY EFAULTS Configuring Alternate WiFi Security Settings WPA2-WPA, RADIUS ................70 LTERNATIVES TO Troubleshooting Tips ’ ? ....... 73...
-
Page 6: Introduction
Introduction The Motorola Model MG8702 is a DOCSIS 3.1 cable modem with a built- in AC3200 WiFi router that has 4 Gigabit Ethernet ports. This model connects to standard cable company Internet service. Model MG8702 can provide shared Internet access to Ethernet-capable and WiFi devices including computers, smartphones, tablets, Smart TVs, game consoles, security cameras, and streaming media devices. -
Page 7: Quick Start
Quick Start Packaged with your MG8702 modem/router Power Adapter Coax Wrench Ethernet Cable Velcro ® Cable Organizer Para una Guía de Inicio Rápido en español, por favor vaya a www.motorolanetwork.com/MG8702ir... - Page 8 MG8702 to a “live” coax cable. Sometimes a cable will already be available. Sometimes there’s a coax wall jack available, and you connect to the jack with a coax cable. Your MG8702 can also share a coax cable attached to a TV by using a coax splitter.
- Page 9 USB 3.0 Port WPS button WLAN button WiFi on/off button RESET If pressed for ten seconds all settings will revert to factory defaults. ETHERNET (LAN 1-4) You can connect a computer, smart TV, game station, or other Ethernet-capable device to any of these 4 LAN ports.
- Page 10 In that case, you’ll need the unique WiFi Network Name (SSID) and WiFi Password printed on the bottom of your MG8702. You’ll use these in setting up your wireless device to wirelessly connect to the MG8702. Once you’ve...
- Page 11 For Comcast XFINITY Users Only If the activation page does not appear, please go to xfinity.com/activate or call 1 (800) 934-6489 to activate your modem. Here is a list of phone numbers for some major cable service providers. (Note that this list is subject to change.) Comcast Xfinity 1 (800) 934-6489 1 (877) 206-4210...
- Page 12 MG8702 service. This usually takes less than five minutes, but sometimes takes 30 minutes or longer. Once the MG8702 is fully activated, try to browse the Web using a device connected via Ethernet or WiFi to the MG8702. (See the section Wireless Router below for information on connecting via WiFi).
- Page 13 2 Open the app and create an account. 3 Scan the QR code on the bottom of your MG8702 (or scan it from the photo you printed) to join your device’s WiFi network. 4 Now enjoy the app. You can easily elect to keep your original name and password, as we recommend.
- Page 14 Plus you can easily monitor your Internet usage and WiFi signal strength, get security alerts that help protect your network, control Internet access by devices, or set up some basic parental controls. Note that your MG8702 must be online for the app to communicate with it.
- Page 15 You might need to use the Configuration Manager if: • You want to set up special Internet gaming settings. • You want to get performance information about the MG8702 modem and/or built-in router. This can be helpful in diagnosing DOCSIS performance issues and optimizing wireless performance.
- Page 16 NOTE: To reduce the risk of unauthorized access, your MG8702 is designed to accept access via secure http (https) only. To support secure access, your MG8702 includes a self-signed certificate.
- Page 17 Please note that if your previous network name was 5 or less characters or the wireless password was 7 or less characters, you cannot change the Motorola password to match your previous network. If you need to do this WiFi setup by using your smartphone or...
- Page 18 Reset button on the back of the modem/router for 10 seconds (a paperclip helps). Those names and passwords are printed on the bottom label of your MG8702 (and on the photo you took with your phone).
- Page 19 Note that wireless performance depends on a number of factors. Please keep these things in mind: • Where possible, put the MG8702 in a central place so that it’s not too far away from your other wireless devices. For example, in a two story house, an ideal location may be towards the middle of the first floor close to the ceiling.
- Page 20 USB 3.0 Port A USB 3.0 port is located on the back of the MG8702. You can choose to use this port for File Sharing by the devices on your local network. Log in to the Configuration Manager (see Configuration Manager section above) Navigate to Advanced >...
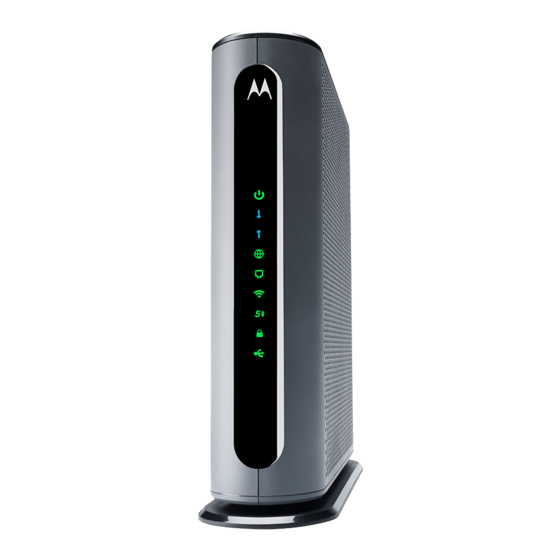
- Page 21 Front Panel Lights During power up, the lights will blink for about a minute. LIGHT COLOR DESCRIPTION MG8702 power on Green OFF: MG8702 power off Power Green Scanning for DS channel Blinking: Green ON: Connected on 1 channel Green or...
- Page 22 Blinking: Ethernet data is flowing Rear Panel Green or Green: Connected at 1 Gbps Ethernet Amber Amber: Connected at 10 or 100 Mbps LAN port(s) OFF: No connection † If a blue light blinks continuously, this indicates partial service, which means that at least one designated channel has not completed bonding.
-
Page 23: Connecting A Device Via Ethernet
Connecting devices to your cable modem/router You can connect computers, smartphones, tablets, game consoles, security cameras, streaming media devices (like Roku, Chromecast & AppleTV), Smart TVs and other devices to your cable modem/router. You can connect these devices either with an Ethernet cable (a wired connection), or via WiFi (a wireless connection). -
Page 24: Connecting A Smartphone, Tablet Or Other Wireless Device Via Wifi
Wireless devices vary, but they all have a Wireless Settings area. There you should first select the wireless network you want, namely the wireless SSID or Guest SSID of the MG8702. Now enter the password for your wireless network. Make sure to Enable the Wireless on your... -
Page 25: Setting Up A Smart Tv, Streaming Media Device, Or Other Device
Input or Setup section. Within that section there’s normally a Network section. In that section you may need to specify that you have an Ethernet connection if that’s how you connect to the MG8702. If you want to connect wirelessly to the MG8702, you’ll need to select its wireless and then enter its wireless password. -
Page 26: Accessing The Configuration Manager By Using A Browser
Accessing the Configuration Manager by using a browser Model MG8702 has a Configuration Manager that provides a lot of technical information and tells you how to do some useful things. Please note that some users will never need to use the Configuration Manager. - Page 28 3. You should see this page: Type admin in the Username field. 4. Type the unique password printed on your device’s bottom label in the Password field.
- Page 29 NOTE: To reduce the risk of unauthorized access, your MG8702 is designed to accept access via secure http (https) only. To support secure access, your MG8702 includes a self-signed certificate.
- Page 30 After you have completed the first time wireless setup screen, you should see the Basic Status and Settings page shown below. The Basic Status and Settings page gives you information about your Internet connection, lets you view and modify your WiFi privacy settings, and shows you basic information about your cable modem’s addresses and software version.
- Page 31 You can return to the Basic Status and Settings page from any Advanced page by clicking the Motorola stylized M Logo in the upper left-hand corner of the page. Note the circled (i) ‘information’ icons to the right of the page. You can...
- Page 32 Click the Advanced button. Note the Menus and Submenus on the left of the page. The currently selected menu item is highlighted, and submenu items corresponding to the selected menu item are indented below. The currently selected submenu item is highlighted in blue.
-
Page 33: Configuring Your Mg8702 To Support Devices And Applications With Special Requirements
Configuring your MG8702 to support devices and applications with special requirements For games played on game consoles and PCs, and security cameras Devices including game consoles and security cameras often require special router settings to work correctly. This may also be true of games that you play on a PC or another device. - Page 34 You can create forwarding rules for both IPv4 and IPv6 environments. These rules determine how data flows from the address to specified LAN addresses and ports. In this document we will describe how to create a rule for an IPv4 network. The steps are similar for IPv6. To create an IPv4 Forwarding Rule, first click the Add_IPv4 button.
- Page 35 Review your game or device documentation to find the port or ports that need to be forwarded. Also, determine the IP Address that your device is using. Your game or device documentation should show you where to find this information. You can create Port Forwarding Rules to support the requirements of your game or device.
-
Page 36: To Create A Port Forwarding Rule
To create a Port Forwarding rule Under Internal IP Address, enter the address of the game station, PC or other device. In the case of a security camera, enter the address of the camera’s DVR. Under Internal Port, enter the starting port that your device or game needs. - Page 37 For games and game consoles, you may also need to enable UPnP and to set the Firewall to OFF.
- Page 38 Select Options under Advanced Router in the left pane. Then, click the UPnP Enable box, and click Save at the top of the Router Selections box.
- Page 39 Select Firewall Basic under Protection & Parental Control in the left pane. Then, select Off in the IPv4 Firewall Protection pulldown, and click Save.
-
Page 40: Changing Wireless Settings
Changing wireless settings The MG8702 comes set up for wireless-N (2.4 GHz band) and wireless- AC (5 GHz band) with WPA2 security, with unique wireless network names (SSIDs) for each band, and a unique password. Both bands use this password. There’s a good chance that you’ll want to use these settings. -
Page 41: To Change The Network Name And Password
To change the Network Name and Password In the Basic Status and Settings section, go to Wi-Fi Privacy Settings. In band-steering mode (the default mode), for both bands: 1 First click the Show Key box to display the characters for the Password. - Page 42 4 Click the Save button. Network Name can be from 6 - 32 characters long. You can use the upper and lower case letters (a – z and A – Z), numbers (0 - 9) and special characters (e.g. $_/& etc.) except the single quote ‘ . Password can be from 8 - 63 characters long.
- Page 43 If band-steering is disabled (each band has its own SSID): For the 5 GHz band: 1 First click the Show Key box to display the characters for the Password. 2 Select and delete the old Network Name, then type in the new Network Name.
- Page 44 3 Next, select and delete the old Password, then type in the new Password. 4 Click the Save button. For the 2.4 GHz band: 1 First click the Show Key box to display the characters for the Password. 2 Select and delete the old Network Name, then type in the new Network Name.
-
Page 45: Wireless Guest Networks
4. In summary, you type 192.168.0.1 in the address bar of your browser, go to that address, enter the Username admin and your MG8702’s unique password, then click the Login button. This will bring you to the Basic Status and Settings page. Click the Advanced button in the upper right. - Page 46 To configure and enable a Guest Network on the 2.4 GHz band, first select the 2.4 GHz tab, and then: 1 Select Enabled and click Save to enable the selected Guest Network. The following steps are optional. Follow them if you want to change the default Guest Network Name and Password: 2 Select and delete the old Guest Network Name, then type in the new Guest Network Name and click Save.
- Page 47 To configure and enable a Guest Network on the 5 GHz band, first select the 5 GHz tab, and then repeat the steps above. Network Name can be from 6 - 32 characters long. You can use the upper and lower case letters (a – z and A – Z), numbers (0 - 9) and special characters (e.g.
-
Page 48: Changing Firewall Settings
Changing firewall settings A Firewall helps protect your Model MG8702 and the devices attached to it from harm from outsiders connecting via the Internet. Model MG8702 comes with reasonable firewall settings. The firewall allows all normal traffic to pass, but protects against well-known attacks. - Page 49 The firewall lets you set your protection level through IPv4 Firewall Protection, for example. By default, with the Low setting, all services are allowed. If you select Medium or High protection, the firewall will block all services except those listed in the List of Allowed Services at the bottom of the page.
-
Page 50: Tuning Wireless Performance
Remember that you can go back to the Basic Status and Settings page at any time by clicking the Motorola ‘M’ logo at the upper left of the page. To optimize wireless performance, check channel usage of neighboring devices. - Page 51 Select the Wireless Scan/Bridge page. Select the Wireless menu item to bring the Wireless submenu options into view, then click the Scan submenu option. This brings you to the Wireless Scan page:...
- Page 52 Select the tab for the band you want to scan, 2.4 GHz or 5 GHz. Then click the “Scan Wireless APs” button at the bottom of the page. This will pop up the wireless Scan Results table: Note that you may need to scroll down to see all neighboring networks. For the 2.4 GHz band: Look at the Channel column.
- Page 53 If there are very few neighboring wireless devices in your location, you should follow the rule of choosing a channel separated by 5 from all other channels. For example, if there are two neighboring networks using channels 6 and 11, you should choose channel 1. If there are many neighboring networks, you may find that most use channels 1, 6 and 11.
- Page 54 Select the tab for the band you want to change. Then select the desired channel from the Channel pulldown, and click Save. Wait for a minute or so for client devices to resynchronize to the new channel. Check to see whether wireless performance has improved. If not, you can try another channel selection.
-
Page 55: Wifi Multimedia (Wmm)
WiFi Multimedia (WMM) Another possible way to improve performance is to change WiFi Multimedia (WMM) settings. From the Wireless menu, click the WMM submenu:... - Page 56 WMM is designed to provide Quality of Service (QoS) support for multi-media traffic on your network. The multi-media applications must also support WMM. When they do, WMM facilitates smoother traffic flow for these traffic types. WMM cannot be turned off. If you find wireless traffic is not flowing well, you can turn on No- Acknowledgement.
-
Page 57: Parental Control
Configuration Manager as described in chapter 6. In summary, you type 192.168.0.1 in the address bar of your browser, go to that address, enter the Username admin and your MG8702’s unique password, then click the Login button. This will bring you to the Basic Status and Settings page. Click the Advanced button in the upper right. -
Page 58: Setting Up Times When Internet Access Is Allowed And Not Allowed
MG8702. Use the Select Device pulldown to select this device. The pulldown will show the MAC Addresses of devices connected to your MG8702. You may find the MAC Address of the device you want to control from the device itself. Follow instructions for the device and operating system to do this. - Page 59 Now set the start and end times of when you want to allow the device to have Internet access. Here is an example of entries to allow Internet access in an after-school period from 5:00 pm to 10:00 pm. Note that we enter the blocked time starting at 10:00 pm overnight to the time access is allowed at 5:00 pm the next day.
-
Page 61: Vpn (Virtual Private Network)
When a computer provisioned for this type of VPN connection is connected behind the MG8702, the MG8702 must pass through the VPN traffic. The MG8702 is configured by default for VPN pass-through. (The IPsec and PPTP Pass-through settings on the Advanced ... - Page 62 To summarize, the MG8702 supports: • VPN Pass-through (for clients connected behind the device that need to access for example a corporate network)
- Page 63 • Termination of VPN clients via PPTP & L2TP (The MG8702 can be configured as a VPN server in a small office or similar environment. Clients located on the Internet can connect to the small office network through VPN tunnels terminated at the MG8702.) The L2TP/PPTP page allows you to configure server and security settings.
- Page 64 Make sure to click Save as you complete each field.
- Page 65 • Site-to-Site VPN via IPsec (the MG8702 can be configured to create a tunnel for all devices on the MG8702's LAN side to connect to a corporate network). • The MG8702 will NOT support termination of client VPN connections via IPsec.
- Page 66 To configure an IPSec tunnel, navigate to the IPSec page (VPNàIPSec) and click the Create a New Tunnel button. Then, enter the required information, following the descriptions in the Info Text (i) fields. Make sure to click Save when you have completed the entries.
- Page 67 PPTP or L2TP. You may find the Event Log useful to determine what has gone wrong if you have trouble setting up a VPN. For details on how to configure a VPN on the MG8702, follow the help available through the information icons on the configuration manager pages.
-
Page 68: Changing Your Mg8702'S Username And Password, And Resetting To Factory Defaults
Password, and Resetting to Factory Defaults Changing your MG8702’s Username and Password To change your MG8702’s Username and Password, first log into the Configuration Manager as described in chapter 6. In summary, you type 192.168.0.1 in the address bar of your browser, go to that address, enter the Username admin and your MG8702’s unique password, then click... -
Page 69: Resetting To Factory Defaults
Z), numbers (0 - 9) and special characters (e.g. $_/& etc.) except the single quote ‘. Caution: Once you make this change, you will not be able to log into the modem/router if you forget the new Username and Password . To recover, you will have to reset the modem to factory defaults. -
Page 70: Configuring Alternate Wifi Security Settings
To do this, first log into the Configuration Manager. In summary, you type 192.168.0.1 in the address bar of your browser, go to that address, enter the Username admin and your MG8702’s unique password, then click the Login button. This will bring you to the Basic Status and Settings page. Click the Advanced button in the upper right. - Page 71 About Wireless Security There are two versions of WPA: WPA and WPA2. When configured as part of a typical home or small office network, WPA and WPA2 require a Pre-Shared Key, or PSK. These modes are typically called WPA-PSK and WPA2-PSK, respectively, though sometimes they’re just called WPA and WPA2.
- Page 72 How to Tell if Your Clients Support WPA2 You can check to see if all other clients that you plan to put on the network support WPA2. You can do this by checking the manual that came with each device or by checking the configuration software for the installed device.
-
Page 73: Troubleshooting Tips
What if I can’t make an Internet connection right after installation? • First turn your MG8702 off for at least 8 seconds, then on, to see if that fixes the problem. • Check the connections you’ve made to your MG8702. Power and coax connections are required, and up to 4 Ethernet connections are optional. -
Page 74: What If I'm Getting Internet Service But My Speed Is Disappointing
This lets you see whether your home’s cabling is a problem. • If you’re using a splitter with your MG8702, try the MG8702 without the splitter to see if that helps. If it does, you may need to get a better splitter, one with a top frequency of at least 1,675 MHz. -
Page 75: What If Idon
Bluetooth transmitters and neighbors’ WiFi routers. 2. To try to pick a less used wireless channel for your MG8702. First go in to your MG8702’s Configuration Manager. 3. Click the Advanced button at the top of the page, then click the Wireless and Scan/Bridge menu items at the top of the page. -
Page 76: Support
Support We like to help. Please visit our support Website or call our support specialists. Our Website has our Motorola Mentor information, and also provides returns and warranty information. www.motorolanetwork.com/support Email: support@motorolanetwork.com Phone: 800-753-0797 or 617-753-0562 Limited Warranty MTRLC LLC warrants this product against defects in material and workmanship for a warranty period of 2 years. -
Page 77: Compliance
Compliance FCC Statement This equipment has been tested and found to comply with the limits for a Class B digital device, pursuant to part 15 of the FCC Rules. These limits are designed to provide reasonable protection against harmful interference in a residential installation. This equipment generates, uses, and can radiate radio frequency energy and, if not installed and used in accordance with the instructions, may cause harmful interference to radio communications. - Page 78 MTRLC LLC PO Box 121147 Boston, MA 02112-1147 ©MTRLC LLC 2020. MOTOROLA and the Stylized M Logo are trademarks or registered trademarks of Motorola Trademark Holdings, LLC. and are used under license. All other trademarks are the property of their respective owners. All rights reserved.
Need help?
Do you have a question about the MG8702 and is the answer not in the manual?
Questions and answers