Advertisement
Quick Links
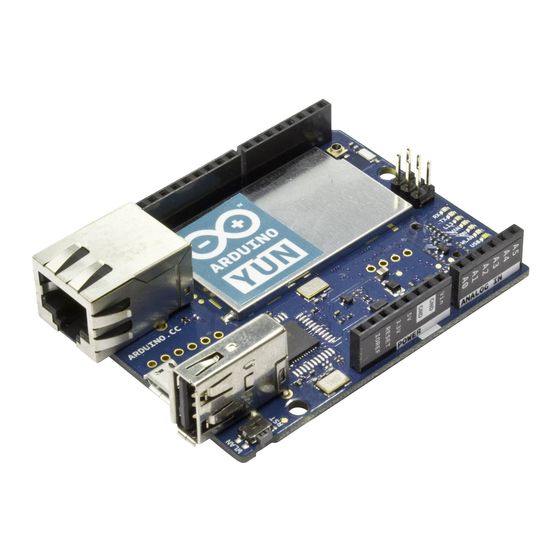
Guide to the Arduino Yún
The Arduino Yún is an Arduino board unlike any other. While programming it is very similar to
the Arduino Leonardo and uses the same processor, the Atmel ATmega32U4, it also has an
additional processor, an Atheros AR9331, running Linux and the OpenWrt wireless stack.
Programming the 32U4 via USB is identical to the
the Yún to connect to your WiFi network, you can program the 32U4 via WiFi as well.
To connect the Arduino Yún to your computer, you'll need a Micro-B USB cable. This USB
cable provides power and data to the board. When programming the Yún, you must choose
Arduino Yún from the Tools > Board menu in the Arduino IDE. The Yún is only supported
by Arduino IDE 1.5.4 and later.
Differences from the Arduino Leonardo
Linino
Python
External storage on the Yún
Web services
Resetting the processors (AR9331, WiFi, and 32U4)
Serial re-enumeration on reset.
No reset when you open the serial port.
Installing Drivers for the Yún
OSX
o
Windows
o
Linux
o
Configuring the onboard WiFi
Programming the 32U4 over WiFi
Using the onboard Ethernet
Communicating with Linino via Bridge
The Console
Process
Using Bridge to pass information between processors
Connecting to internet services with Temboo
Spacebrew
Install additional software on Linux
Next Steps
Differences from the Arduino Leonardo
Arduino
Leonardo. Once you've configured
Advertisement

Related Manuals for Arduino Yún


Summary of Contents for Arduino Yún
- Page 1 Guide to the Arduino Yún The Arduino Yún is an Arduino board unlike any other. While programming it is very similar to the Arduino Leonardo and uses the same processor, the Atmel ATmega32U4, it also has an additional processor, an Atheros AR9331, running Linux and the OpenWrt wireless stack.
- Page 2 In addition to the 32U4 chip, the Yún has an additional processor, an Atheros AR9331, which runs a distribution of Linux for embedded systems named Linino, based on OpenWrt. A full install of Python 2.7 is included as well. The Yún has a number of different physical characteristics and connectors than the Leonardo. There is an on-board SD slot, Ethernet jack, and a USB-A Host connector.
- Page 3 There are several status LEDs on the Yún, indicating power, WLAN connection, WAN connection and USB. Additionally pin 13 is connected to one of the status lights. Linino...
- Page 4 When interfacing with the Linino system, you have to use a command line, either accessing it through the Arduino's Bridge library, or via SSH. If you are unfamiliar with the command line, you may want to read about some basics about it and some of the programs that are frequently used.
- Page 5 To restart the AR9331, which reboots Linino, press the "YÚN RST" reset button that is close to the analog inputs pins and the LEDs of the board. To restart the the 32U4 and restart the currently installed Arduino sketch, tap the button next to the Ethernet port two times.
- Page 6 ATmega8U2 or ATmega16U2 processor). This difference has implications for driver installation, uploading, and communication. No reset when you open the serial port. The Yún won't restart your sketch when you open a serial port on the computer. That means you won't see serial data that's already been sent to the computer by the board, including, for example, most data sent in setup().
- Page 7 Wind dows now c comes with an installer r for the IDE E and driver Downloa ad Arduino IDE 1.5.4 i installer or l later, and do ouble click the installe r icon. Once yo u've read th...
- Page 8 By default all available components are selected. These include the IDE, drivers, and shortcuts Select the location you wish to install the IDE.
- Page 9 The installer will display its progress as it extracts the files to the proper locations if you chose to install the drivers, a pop-up window will confirm your selection...
- Page 10 XXXXXXXXXXXX. Connect your computer to this network. Once you've obtained an IP address, open a web browser, and enter http://arduino.local 192.168.240.1 in the address bar. After a few moments, a web page will appear asking for a password. Enter "...
- Page 11 You will find a page with some diagnostic information about the current network connections. The first is your WiFi interface, the second is your ethernet connection. Press the Configuration button to proceed.
- Page 12 On the new page, you will configure your Yún, giving it a unique name and identifying what network you want to connect to. In the Yún NAME field, give your Arduino a unique name. You'll use this to refer to it in the future.
- Page 13 When you press the Configure & Restart button, the Arduino will reset itself and join the specified network. The Arduino network will shut down after a few moments.
- Page 14 NB: the ethernet interface is eth1, not eth0 Communicating with Linino via Bridge The Bridge library enables communication between Arduino and Linino. There are several different utility classes that facilitate different kinds of communication between the two, described below, and more in depth on the Bridge library reference pages.
- Page 15 The WiFi and Ethernet interfaces, USB host, and SD card are all connected to the AR9331. The Bridge library allows you to work with these devices, as well as run scripts and communicate with web services. The Console The Console, based on Bridge, enables you to send information from the Yún to a computer just as you would with the serial monitor, but wirelessly.
- Page 16 Type 'H' to turn the LED on pin 13 on and type 'L' to turn it off. Process The Process commands allow you to run Linux processes on Linino through the Arduino. In the following example, The Linino will connect to a server with...
- Page 17 // Do nothing here. void runCurl() { // Launch "curl" command and get Arduino ascii art logo from the network // curl is command line program for transferring data using different internet protocols Process p; // Create a process and call it "p"...
- Page 18 [Get Code] Instantiate a server enabling the the Yun to listen for connected clients. YunServer server; , start serial communication for debugging purposes, and turn the built-in LED on pin setup() 13 high while Bridge begins. is blocking, and should take about 2 seconds to Bridge.begin() complete.
- Page 19 void process(YunClient client) { String command = client.readStringUntil('/'); if (command == "digital") { digitalCommand(client); if (command == "analog") { analogCommand(client); if (command == "mode") { modeCommand(client); [Get Code] Create a function to deal with digital commands. Accept the client as the argument. Create some local variables to hold the pin and value of the command.
- Page 20 String key = "D"; key += pin; Bridge.put(key, String(value)); [Get Code] Set up a function to handle analog calls in the same fashion, except setting the key to A instead of D when working with the analog input pins : void analogCommand(YunClient client) { int pin, value;...
- Page 21 Check to make sure the URL is valid if (client.read() != '/') { client.println(F("error")); return; [Get Code] If it's a valid URL, store the URL as a string. If the mode is an , configure the input output pin and report it to client. If the string doesn't match those values, return an error. String mode = client.readStringUntil('\r');...
- Page 22 You can also check out the Yún hardware page for additional technical information. The text of the Arduino getting started guide is licensed under a Creative Commons Attribution- ShareAlike 3.0 License. Code samples in the guide are released into the public domain.
Need help?
Do you have a question about the Yún and is the answer not in the manual?
Questions and answers