Arduino UNO Application Note
Arduino uart interface to telaire t6613 co2 sensor
Hide thumbs
Also See for UNO:
- Quick start manual (311 pages) ,
- User manual (28 pages) ,
- Manual (11 pages)
Advertisement
Application Note AN‐157:
Arduino UART Interface to TelAire T6613 CO2 Sensor
Introduction
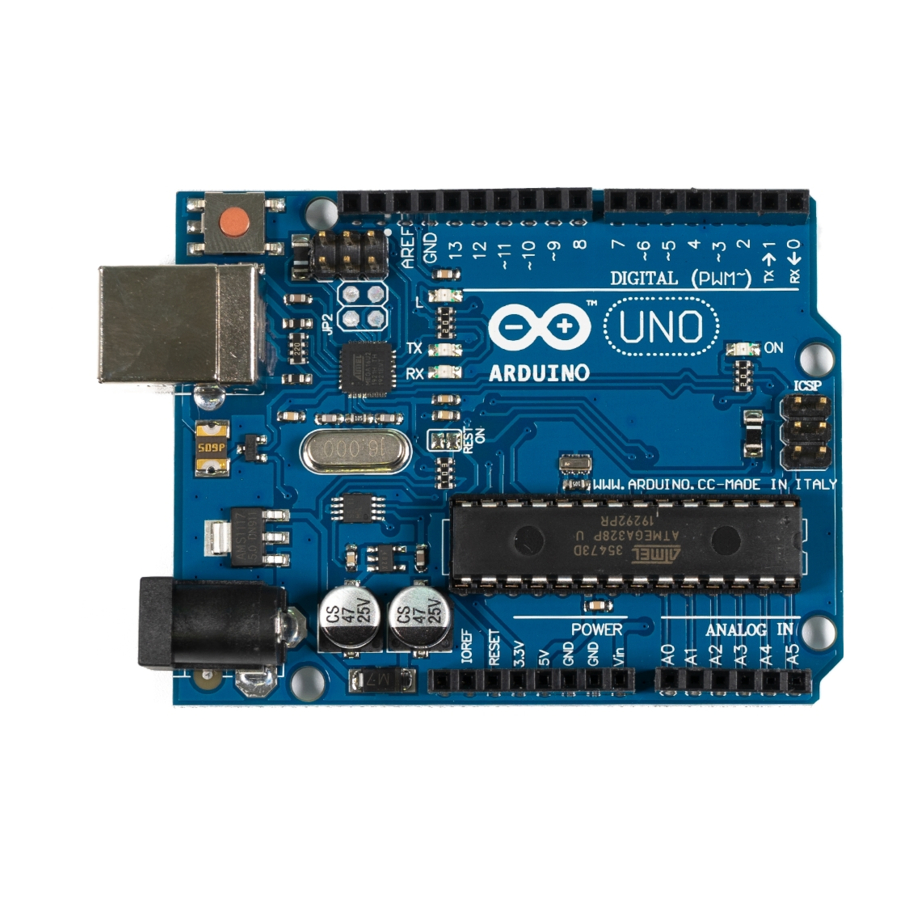
The Arduino UNO, Mega and Mega 2560 are ideal microcontrollers for
reading CO2 sensors. Arduino boards are useful for a beginner level
project up to integration into a complete sensor product. The Arduino to
sensor interface is via 19,200 BAUD serial TXD‐RXD connection.
If you are new to Arduino, these low cost development boards are
available from many sources. We recommend you start with authentic
Arduino products.
The Amphenol TelAire T6613 CO2 Sensor is a non‐dispersive infrared
(NDIR) carbon dioxide sensor factory calibrated to measure CO2 levels
up to 2,000ppm (0.2%). It is one of the most popular C02 sensors ever
produced. The dual channel design eliminates the need for calibration
in most applications. Its flexible interface is designed to be easily
connected to an Arduino or similar microcontroller. The sensor
requires 5VDC, 180mA peak current and 33mA average current.
Run the Arduino Blink Example
The best way to become familiar with the Arduino Graphical User's Interface (GIU) is to create an
Arduino project and run the example Blink. This simple test program confirms that a number of
connection details and that the GUI are working properly.
Caution: Do not connect your Arduino board to your computer's USB port until the Arduino software
is installed. Otherwise Windows would install a generic driver, not desired here.
Step 1: Install Arduino software on your computer. From this page select the Windows Installer.
https://www.arduino.cc/en/Main/Software
Step 2: To run the Blink example follow these instructions: https://www.arduino.cc/en/Tutorial/Blink
Note that the MEGA Arduinos have a LED on board.
The Arduino UNO may require a LED and resistor
be added as specified in the tutorial.
Once Blink runs properly, you can connect the sensor.
1
© 16 March 2017 CO2Meter, Inc. All Rights Reserved
Advertisement
Table of Contents

Related Manuals for Arduino UNO


Summary of Contents for Arduino UNO
- Page 1 Application Note AN‐157: Arduino UART Interface to TelAire T6613 CO2 Sensor Introduction The Arduino UNO, Mega and Mega 2560 are ideal microcontrollers for reading CO2 sensors. Arduino boards are useful for a beginner level project up to integration into a complete sensor product. The Arduino to sensor interface is via 19,200 BAUD serial TXD‐RXD connection. If you are new to Arduino, these low cost development boards are available from many sources. We recommend you start with authentic Arduino products. The Amphenol TelAire T6613 CO2 Sensor is a non‐dispersive infrared (NDIR) carbon dioxide sensor factory calibrated to measure CO2 levels up to 2,000ppm (0.2%). It is one of the most popular C02 sensors ever produced. The dual channel design eliminates the need for calibration in most applications. Its flexible interface is designed to be easily connected to an Arduino or similar microcontroller. The sensor requires 5VDC, 180mA peak current and 33mA average current. Run the Arduino Blink Example The best way to become familiar with the Arduino Graphical User’s Interface (GIU) is to create an Arduino project and run the example Blink. This simple test program confirms that a number of connection details and that the GUI are working properly. Caution: Do not connect your Arduino board to your computer’s USB port until the Arduino software is installed. Otherwise Windows would install a generic driver, not desired here. Step 1: Install Arduino software on your computer. From this page select the Windows Installer. https://www.arduino.cc/en/Main/Software Step 2: To run the Blink example follow these instructions: https://www.arduino.cc/en/Tutorial/Blink Note that the MEGA Arduinos have a LED on board. The Arduino UNO may require a LED and resistor be added as specified in the tutorial. Once Blink runs properly, you can connect the sensor. 1 ...
- Page 2 Connecting the T6613 Sensor Refer to the wiring diagram below for the Arduino Uno or Arduino Mega. The connections for the Arduino MEGA are identical to the Mega2560. 2 © 16 March 2017 CO2Meter, Inc. All Rights Reserved ...
- Page 3 Creating an Arduino Project This Arduino project uses the Software.Serial driver which is built into the Arduino software. This statement SoftwareSerial T66_Serial(12,13) Sets up a virtual serial port using pin 12 for Rx and pin 13 for Tx on both UNO and MEGA boards. Demo file download instructions 1. Click on the following link or copy this URL to download the example code: http://co2meters.com/Documentation/AppNotes/AN157-T6613-Arduino-uart.zip 2. Save the example code to your hard drive. Inside the .zip file, navigate to the AN157‐Arduno‐T6613‐ uart.ino file in the example folder. Extract it from the .zip file. 3. Double‐click the K30_basic.ino file to open it in the Arduino GUI. It will start and ask the following: 4. Click on OK. Observe the Arduino project code is displayed. 5. Click on Sketch >> Verify/Compile. The project should compile without errors. 6. Verify that your Arduino board is recognized correctly: a. Click on Tools. Set Board to Arduino Uno or MEGA. b. Confirm that Processor matches your Arduino: UNO, MEGA or MEGA 2560. 7. Click on Upload. When done uploading, your project is now running in the Arduino board. 8. To view program operation, click on Tools >> Serial Monitor. 9. Observe the following: 3 © 16 March 2017 CO2Meter, Inc. All Rights Reserved ...
- Page 4 Note Appendix A contains the .txt version of Arduino code. It is also available in the .zip file. 4 © 16 March 2017 CO2Meter, Inc. All Rights Reserved ...
- Page 5 Appendix A: Ardunio code runs on UNO, MEGA OR MEGA2560 /* AN-157 Demo of T-66 using Software Serial Arduino example for t6613 CO2 sensor 0-2000 PPM 19200 BPS 2/2017 by Marv Kausch @ Co2meter.com #include "SoftwareSerial.h" SoftwareSerial T66_Serial(12,13); //Sets up a virtual serial port //Using pin 12 for Rx and pin 13 for Tx byte readCO2[] = {0xFF, 0XFE,2,2,3};...
- Page 6 int timeout=0; //set a timeoute counter while(T66_Serial.available() < 5 ) //Wait to get a 7 byte response timeout++; if(timeout > 10) //if it takes to long there was probably an error Serial.print("Timeout"); while(T66_Serial.available()) //flush whatever we have T66_Serial.read(); break; //exit and try again delay(50);...
Need help?
Do you have a question about the UNO and is the answer not in the manual?
Questions and answers