Table of Contents
Advertisement
Quick Links
DV8 Quick Start
VIEWSIZE THE WORLD
DVI signal distribution, each DVI input can be
distributed to 2 DVI outputs
Compatible with all kinds of sending cards, 8
install full-color LED sending card slot
System integration, ingeniously designed, which
adopts board pluggable structure
Adopts air cooling processing, energy
conservation and environmental protection
Signal adaptive matching design to solve the
problem of high resolution interference and out
of sync when distribute signal
Point-to point correction technology allows the
manufacturers to relax the requirements in LED
brightness and color, which reduce the
purchasing cost
Advertisement
Table of Contents

Related Manuals for RGBlink DV8


Summary of Contents for RGBlink DV8
- Page 1 VIEWSIZE THE WORLD DV8 Quick Start DVI signal distribution, each DVI input can be distributed to 2 DVI outputs Compatible with all kinds of sending cards, 8 install full-color LED sending card slot System integration, ingeniously designed, which ...
-
Page 2: Table Of Contents
CONTENT Product Introduction ..........................2 Packing Configuration ..........................3 Hardware Orientation ..........................4 Back Panel ............................4 Operating Instruction ..........................5 How to Connect ..........................5 How to Work ............................5 Sending Card Installation ........................6 Contact Information..........................12... -
Page 3: Product Introduction
Product Introduction DV8 sending card install case supports DVI MSD600, Mooncell, Colorlight signal distribution, each DVI input can be DBstar Q2011, etc. distributed to 2 DVI outputs. The signal adaptive matching design can DV8 is ingeniously designed, adopts board solve... -
Page 4: Packing Configuration
Packing Configuration Power Cord Certification Antistatic Bag Note: Chinese Standard, American Standard or European Standard power cord is option. -
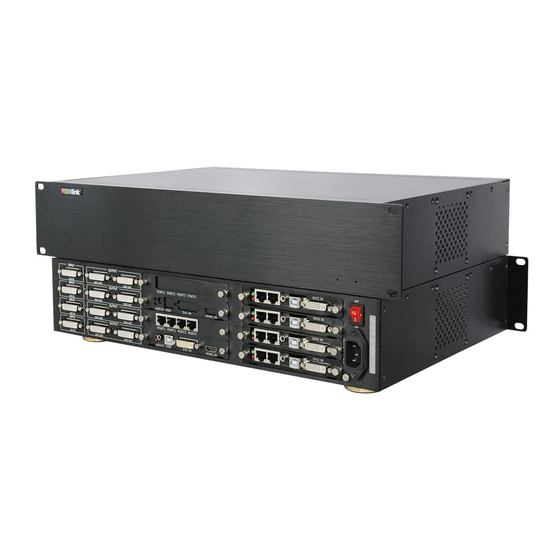
Page 5: Hardware Orientation
Hardware Orientation Back Panel Input Interface DVI Input DVI-I port Output Interface DVI Output DVI-I port Other Interface 3. 5 Outputs of Sending Card 4. 6 DVI Input Port of Sending Card Power IEC-3 Port Switch... -
Page 6: Operating Instruction
How to Connect Operation steps are as follows: 1. Connect the device or computer with DVI interface to the DVI input interface in the first row of DV8 with the DVI cable. 2. Connect each DVI output interface to the corresponding DVI input interface of sending card with the DVI cable. -
Page 7: Sending Card Installation
Sending Card Installation DV8 supports the sending cards include the following: Sending Card Type Sending Card Model Linsn 801, 802 Nova MSD300、MSD600 Mooncell VCMA7-V30 Colorlight DBstar Q2011 We will introduce the sending card installation in the following parts. The installation steps of... - Page 8 2. Untie the power cords, and unscrew the fixed screws on sending card block, as shown in figure 2: (Figure 2) 3. Put Linsn 801 sending card into the sending card block and fix it with 2 fixed screws, as shown in figure 3:...
- Page 9 (Figure 3) 4. Plug the power cord into the sending card, and push the sending card into the device along the slide rail, then screw the captive screws, as shown in figure 4: (Figure 4) Note: It needs the power adapter when install the Mooncell sending cards, as shown in figure 5, the install steps are the same as above.
- Page 10 Power adapter Power interface (Figure 5) The install steps for Nova MSD600 are the same as above, but the following 3 points need to be noted: 1. Before install the Nova MSD600 sending card, user should unscrew the 12 fixed screws on the side panels (6 pieces each side), and remove the top panel, as shown in figure 6: (Figure 6) Then move the unilateral fixed groove on the base panel from position 1 to position 2 (As the circuit...
- Page 11 Position 1 Position 2 (Figure 7) 2. It needs the Nova MSD600 block (Customers are advised to purchase the Nova MSD600 block as we will not provide it, and the salesman must list it explicitly in the order. Should you have any further queries, please contact our salesman.), and fix the Nova MSD600 sending card to the block with fixed screws, as shown in figure 8:...
- Page 12 Power interface (Figure 9) The picture after install can be seen in figure 10: (Figure 10)
-
Page 13: Contact Information
All video products are designed and tested to the highest quality standard and backed by full 3 years parts and labor warranty. Warranties are effective upon delivery date to customer and are non-transferable. RGBlink warranties are only valid to the original purchase/owner. Warranty related repairs include parts and labor, but do not include...
Need help?
Do you have a question about the DV8 and is the answer not in the manual?
Questions and answers