Table of Contents
Advertisement
HYDROMASSAGE BATH HEATER
INSTALLATION INSTRUCTIONS
This Manual Covers:
PRESSURE MODELS
5 1/2" Models
PH101-15UP-S - 120V, 1500W
7" Models
PH101-15UP - 120V, 1500W
PH101-10UP - 120V, 1000W
PH101-65UP - 120V, 650W
PH301-15UP - 120V, 1500W
PH203-20UP - 240V, 2000W
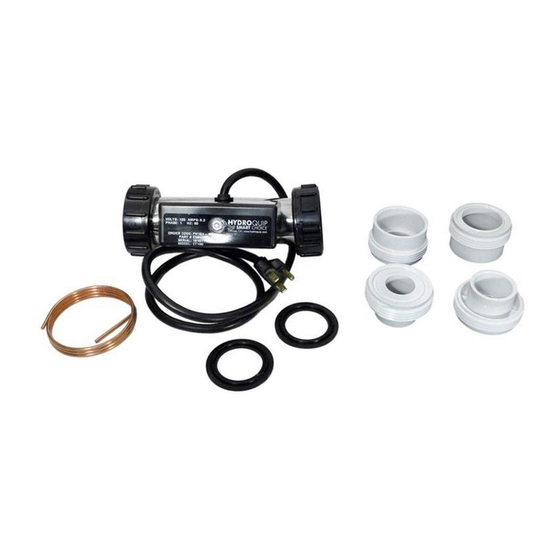
CARTON CONTENTS (Fig. 1):
A - One (1) Pure Heat heater
B - Two (2) 1.5" X 1" SPIG Tailpieces *
C - Two (2) 1.5" X 1" SOC Tailpieces
D - Two (2) 1.5" X 1.5" SOC Tailpieces
E - Two (2) 2.0" X 2.0" tailpieces **
F - Two (2) heater gaskets
G - One (1) #8AWG bonding wire
*Not included with vacuum models
**Only this set of tailpieces with PH301-15UP/V
Designed to maintain bath water temperature and is not meant to heat water from cool or cold.
UNIVERSAL INLINE
VACUUM MODELS
5 1/2" Models
PH101-15UV-S - 120V, 1500W
7" Models
PH101-15UV - 120V, 1500W
PH101-10UV - 120V, 1000W
PH101-65UV - 120V, 650W
PH301-15UV - 120V, 1500W
PH203-20UV - 240V, 2000W
A
B
C
D
E
G
F
Fig. 1
TM
Advertisement
Table of Contents

Related Manuals for HydroQuip Pure Heat Pressure Series


Summary of Contents for HydroQuip Pure Heat Pressure Series
- Page 1 UNIVERSAL INLINE HYDROMASSAGE BATH HEATER INSTALLATION INSTRUCTIONS This Manual Covers: PRESSURE MODELS VACUUM MODELS 5 1/2” Models 5 1/2” Models PH101-15UP-S - 120V, 1500W PH101-15UV-S - 120V, 1500W 7” Models 7” Models PH101-15UP - 120V, 1500W PH101-15UV - 120V, 1500W PH101-10UP - 120V, 1000W PH101-10UV - 120V, 1000W PH101-65UP - 120V, 650W...
-
Page 2: Safety Instructions
IMPORTANT SAFETY INSTRUCTIONS INSTRUCTIONS PERTAINING TO RISK OF FIRE, ELECTRICAL SHOCK OR INJURY TO PERSON WARNING - When using this unit, basic precautions should always be followed, including the following: READ AND FOLLOW ALL INSTRUCTIONS 2. The heater must be connected only to a supply circuit that is protected by a ground-fault-circuit- interrupter (GFCI). -
Page 3: Table Of Contents
Reading all instructions prior to beginning the installation of your Pure Heat heater will ensure that you have: A) Purchased the correct heater B) Identified the best installation location C) The necessary electrical connection has been provided CONTENTS SAFETY INSTRUCTIONS CONTENTS &... -
Page 4: Model Identification
MODEL IDENTIFICATION HEATER READY FITTING INSTALLED If your hydromassage bathtub has been equipped at the factory with a Heater Ready fitting, the manufacturer has already chosen the best place for your Pure Heat heater to be installed. (See figures 2 & 3 below for common heater location.) Note: these instructions do not cover the Tee Style hydromassage bathtub heater. - Page 5 MODEL IDENTIFICATION NO HEATER READY FITTING If your hydromassage bathtub did not come equipped with a Heater Ready fitting you will need to choose an appropriate location to install the Pure Heat heater. Be sure you choose a location that will be accessible if a need for service should arise.
-
Page 6: Pressure Installation
-UP SERIES Heater Ready Fitting Installed PRESSURE INSTALLATION PRESSURE 1 - Power to the hydromassage bathtub must be turned OFF and all water must be drained from the bathtub before proceeding. 2 - Loosen nuts and remove Heater Ready fitting and existing gaskets (see Fig. 8). ASSURE YOU ARE INSTALLING HEATER READY A PRESSURE MODEL FOR THIS... -
Page 7: Vacuum Installation
-UV SERIES Heater Ready Fitting Installed VACUUM INSTALLATION VACUUM 1 - Power to the hydromassage bathtub must be turned OFF and all water must be drained from the bathtub before proceeding. 2 - Loosen nuts and remove Heater Ready fitting and existing gaskets (see Fig. 11). ASSURE YOU ARE INSTALLING A VACUUM MODEL FOR THIS LOCATION... -
Page 8: Pressure Installation
-UP SERIES -UP SERIES No Heater Ready Fitting PRESSURE INSTALLATION PRESSURE PRESSURE 1 - Power to the hydromassage bathtub must be turned OFF and all water must be drained from the bathtub before proceeding. 2 - Locate the hydromassage jet pump and “pressure” plumbing in the system. Remember, the water enters the pump through the front or “vacuum”... - Page 9 -UP SERIES No Heater Ready Fitting PRESSURE INSTALLATION PRESSURE (continued) 7 - You are now ready to install the tailpieces onto the bathtub plumbing. Apply PVC glue to one end of the plumbing. Spread glue evenly over a 1-1/4” area from the end of the cut. Quickly apply glue to the inside socket of the tailpiece.
-
Page 10: Vacuum Installation
-UV SERIES No Heater Ready Fitting VACUUM INSTALLATION VACUUM 1 - Power to the hydromassage bathtub must be turned OFF and all water must be drained from the bathtub before proceeding. 2 - Locate the hydromassage jet pump and “vacuum” plumbing in the system. Remember, the water enters the pump through the front or “vacuum”... - Page 11 -UV SERIES No Heater Ready Fitting VACUUM INSTALLATION VACUUM (continued) 7 - You are now ready to install the tailpieces onto the bathtub plumbing. Apply PVC glue to one end of the plumbing. Spread glue evenly over a 1-1/4” area from the end of the cut. Quickly apply glue to the inside socket of the tailpiece.
-
Page 12: Electrical Requirements
ELECTRICAL REQUIREMENTS NOTE: Read both the “Dedicated Circuit” and “Single Circuit” sections to determine the electrical requirements of your heater before proceeding. DEDICATED CIRCUIT INSTALLATION A qualified and licensed electrician in accordance with the National Electric Code (NEC) Article 680, Canadian Electric Code, and with any local codes must accomplish the electrical installation. - Page 13 SINGLE CIRCUIT INSTALLATION** In certain cases you may be able to plug the heater and the pump into the same single circuit outlet. This generally requires that one or both of the components have a very low amperage rating. See the chart below to determine if your components are sized to allow this type of installation.
-
Page 14: Test Your Installation
TEST YOUR INSTALLATION 8 - After allowing the glue joints to dry for 24-hours, a STATIC leak test must be performed. You can accomplish this by SLOWLY filling the tub with COLD WATER until the water level is at least 2” above the highest jet. -
Page 15: Troubleshooting
TROUBLESHOOTING THERE ARE NO SERVICEABLE PARTS INSIDE HEATER - DO NOT OPEN NOTHING WORKS! Main Breaker is OFF - Set to On GFCI Tripped - Press Reset Power Cord not plugged in - Plug in power cord (if plugged in, is plug lit?) HEATER “ON”... -
Page 16: Installation Notes
PURE HEAT TWO YEAR LIMITED WARRANTY Hydro-Quip, the manufacturer, warrants its Pure Heat whirlpool bathtub heaters to be free from defects in material and workmanship for a period of two (2) years from the date of manufacture. This warranty extends only to the original purchaser for non commercial product usage. Products determined to be defective within the warranty period will be repaired or replaced at the manufacturer’s option with the following exclusions: Damage or defect as a result of freezing, water chemistry, negligence, abuse,... -
Page 17: Template Illustration
Note: Identify you heater by part number 7” Heater (Part numbers PH101-15UP/V, PH101-10UP/V, PH101-65UP/V, PH301-15UP/V, & PH203-20UP/V) Fig. A - Mark PVC cut area Fig. B - Mark PVC cut area... - Page 20 510A N. Sheridan St. Corona, CA 92880 Email: info@bathheaters.com Internet: http://www.bathheaters.com Telephone: 951.273.7575 Fax: 800.332.7190 85-0049PH REV.8 05/14...
Need help?
Do you have a question about the Pure Heat Pressure Series and is the answer not in the manual?
Questions and answers