
Subscribe to Our Youtube Channel
Related Manuals for Heyer Narkomat+


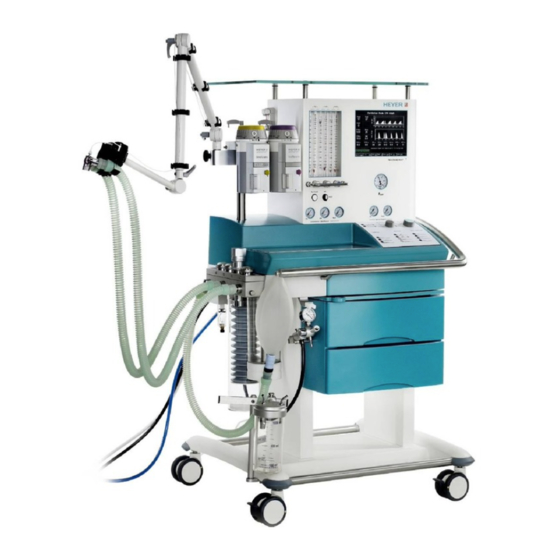
Summary of Contents for Heyer Narkomat+
- Page 1 + H E Y E R Narkomat Anesthesia System Service Manual Rev.2.1.0 Software version Service software: 1.8.3...
- Page 2 HEYER MEDICAL AG Carl-HEYER-Strasse 1-3 56130 Bad Ems Germany Tel. +49 - 2603 – 791 - 3 Fax. +49 - 2603 – 791 - 209 E-mail: info@HEYERmedical.de...
-
Page 3: Table Of Contents
Table of Contents 0 Table of Contents Table of Contents ....................3 Table of Figures ........................6 General Information.................... 7 Guidelines ..........................7 Product improvements ......................7 Manufacturer’s Liability ......................7 Manufacturer’s specification ..................... 8 Updating status ......................... 8 Warning, Precautions and Notes ....................9 1.6.1 WARNINGS ........................ - Page 4 Table of Contents 2.15.4.3 absorber......................38 2.15.4.4 Inspiratory and expiratory valves................38 2.15.4.5 Airway pressure relief valve ..................38 2.15.4.6 Room Air valve ......................38 2.15.4.7 Diaphragm valves....................38 2.15.2.7.1 Status of the diaphragm valves:............... 39 2.15.2.7.2 Machine OFF or Ventilator in Standby ............. 39 2.15.2.7.3 Manual / Spontaneous Mode, INSPIRATION And EXPIRATION....
- Page 5 Table of Contents 5.5.4 Temperature Sensor Calibration..................78 5.5.5 Calibration Of Proportional Valve ADC................80 5.5.6 Calibration Of Internal Flow Sensor................. 82 5.5.7 Fixing Of Calibration Characteristic Proportional Valve........... 84 5.5.8 Calibration Of External Flow Sensor................86 5.5.9 Test Menu Routines......................89 5.5.10 Test Characteristics Proportional Valve ...............
-
Page 6: Table Of Figures
Table of Contents 0.1 Table of Figures Fig. 1 Line Terminal Block, 120/230V AC Supply ................. 15 Fig. 2 Overview electrical components....................16 Fig. 3 Power supply module ......................... 17 Fig. 4 Module 1 File-PC........................21 Fig. 5 View on module 2 ........................23 Fig. -
Page 7: General Information
IEC, NFPA, and UL. In no event will HEYER be liable for any special, incidental, or consequential damages, including loss of profits, whether or not foreseeable and even HEYER has been advised of the possibility of such loss or damage. -
Page 8: Manufacturer's Specification
General Information 1.4 Manufacturer’s specification Product: HEYER NARKOMAT Manufacturer: HEYER Medical AG Carl-HEYER-Strasse 1-3 56130 Bad Ems Germany Tel. + 49 2603 / 791-3 Fax. +49 2603 / 791-209 E-mail: info@HEYERmedical.de 1.5 Updating status State of this service manual: Rev. 2.1.0 of March 2004... -
Page 9: Warning, Precautions And Notes
General Information 1.6 Warning, Precautions and Notes Warnings alert the user to potential serious outcomes (death, injury or serious adverse events) to the patient or user. Precautions alert the reader to exercise special care necessary for the safe and effective use of the device Notes are a general information statement concerning the Narkomat Please read adhere to all warning, precautions and notes listed here and in the appropriate areas... -
Page 10: Precautions
General Information 1.6.2 PRECAUTIONS CAUTION: Refer to the maintenance intervals in the preventive maintenance section for guidance on which steps are preformed when. CAUTION: Use surgical gloves whenever touching or disassembling valves or other internal components of the patient module. CAUTION: If possible, always connect the output of the APL valve to the anesthetic removal line, usually installed in the operation theater. -
Page 11: Notes
1.6.3 NOTES NOTE: Unauthorized servicing may void the remainder of the warranty. Check with the factory or with a local authorized HEYER dealer to determine the warranty status of a particular instrument. - Page 12 General Information THIS PAGE INTENTIONALLY LEFT BLANK...
-
Page 13: Theory Of Operation
Theory of Operation 2 Theory of Operation The anesthesia system HEYER NARKOMAT represents a flexible employable workstation to apply and monitor anesthesia inhalation in semi-closed and almost closed circuits in low flow techniques for minimized consumption of gas and anesthetics. -
Page 14: Fresh Gas Decoupling
Theory of Operation 2.5.1 P limiting on alarm violation Exceeding the P alarm limit automatically halts the inspiratory phase preventing airway pressure from exceeding the high alarm setting. in the CMV mode, the setting of the p peak pressure provides pressure limitation. when reaching this pressure limit, a warning (alarm) “peak greater than ”... -
Page 15: Electrical Supply
Theory of Operation 2.8 Electrical supply The line cord of the Narkomat is connected to an internal terminal block. Directly connected to this terminal are convenience receptacles and the unit itself. Line supply to the receptacles is available with the line cord connected. Line supply for the unit is switched by the main switch at the right side of the unit. -
Page 16: Electrical Components
Theory of Operation 2.8.1 Electrical components floppy drive hard disc module 1 flow meter backlight RS 232 interface ventilator control panel transformer power supply main switch battery module 2 PT 100 motor AVM 3-1 heat blanket I²C interface oxygen ext. flow module 2 sensor sensor... -
Page 17: Power Supply Module
Theory of Operation 2.9 Power supply module The power supply module is located in the frame behind the drawers. This module serves for the voltage supply of the ventilator modules 1 and 2, the flow meter block illumination, the patient circuit heating blanket and the charging / discharging control for the battery. -
Page 18: Connectors On Power Supply Board Avm 2-1
Theory of Operation 2.9.1 Connectors on power supply board AVM 2-1 Connector connected to Pin. def. Func. / Signal Color / No. Module 1 X1-1 yellow X1-2 X1-3 green X1-4 +12V blue Connector connected to Pin. def. Func. / Signal Color / No. -
Page 19: Fuses On Power Supply Board Avm 2-1
Theory of Operation Connector connected to Pin. def. Func. / Signal Color / No. int. connection X12-1 AC, N 110V/230V blue AC IN terminal X12-2 AC , L 110V/230V black Connector connected to Pin. def. Func. / Signal Color / No. Module 2 X13-1 +12V... -
Page 20: Charging / Discharging Control For The Battery
Theory of Operation 2.9.3 Charging / discharging control for the battery: The charging / discharging control for the battery is also located on the power supply board AVM 2-1. Status indicators as red, green and yellow LEDs are located on the board to show functions like check or charging of the battery. -
Page 21: Module 1
Theory of Operation 2.10 Module 1 Ventilator module 1 consists of a File-PC with an I/O card, memory card and 3,5” floppy drive. This module serves for the operation of the user surface with different menus displayed on a 10.4” color TFT display in combination with the settings from the control panel. -
Page 22: Connectors On Module 1
Theory of Operation 2.10.1 Connectors on module 1 Connector connected to Plug conf. Func. / Signal Module 2 10 pole Communication with module 2 Connector connected to Plug conf. Func. / Signal EL Display 20 pole Connected to the display Connector connected to Plug conf. -
Page 23: Ventilator Module 2, Avm 3-1 And Avm 3-2
Theory of Operation 2.11 Ventilator Module 2, AVM 3-1 and AVM 3-2 Ventilator module 2 serves for the active ventilator control. Module 2 consists of two CPU boards, the CPU board AVM3-1 with µP1 serves for a continuous validation of control actions generated by CPU board AVM3-2 and for the communication between module 2 and module 1. -
Page 24: Parts List Module 2
Theory of Operation 2.11.1 Parts list module 2 Pos. No. Description Order No. Ventilator module 2, complete 460-1150 2.11.2 Connectors on module 2 2.11.2.1 Plug connectors on board AVM 3-1 Connector connected to Plug conf. Func. / Signal Module 1 28 pole communication with module 1... -
Page 25: Plug Connectors On Board Avm3-2
The battery is a maintenance free seal lead acid type. The recharging time is a maximum of 7 hours with a fully depleted battery. The backup time is about 30 minutes with a fully charged battery. To prevent unintended loss of battery operation, it is recommended to replace it with a new HEYER battery every 3 years. -
Page 26: Ventilator Pneumatic
Theory of Operation 2.14 Ventilator pneumatic HP-pressure regulator Proportional valve Flowsensor (internal) AIR or O2 P = 3.5 - 6.5 bar Flowdivider LP-pressure regulator assembly p = 3.5 - 6.5 bar Solenoid valve bank Freshgas CPU-BOARD AVM 3-2 Connecting block patient module Fig. -
Page 27: Ventilator Pneumatic Drive
Theory of Operation 2.14.1 Ventilator pneumatic drive Air or Oxygen serves as driving gas for the ventilator. In addition to the flow meter block, a pressure reducer, reducing the supply pressure to 200kPa (2 bar; 29 PSI), is supplied by the Air or oxygen connection. -
Page 28: Pneumatic Driving Module
Theory of Operation 2.14.5 Pneumatic driving module The driving module consists of the proportional valve and flow divider with an internal flow sensor. The proportional valve supplied by the HP pressure reducer generates a driving gas flow of 0-75 l/min in relation to the control voltage of the proportional valve of 0 - 5V DC . -
Page 29: The Patient Module (Circle System)
Theory of Operation 2.15 The patient module (circle system) 2.15.1 Top and back side view on the patient module Fig. 7 Top and backside view on the patient module Pos. Description 1. Expiratory valve (passive) 2. Airway pressure limiting valve (APL) 3. -
Page 30: Bottom And Back Side View On The Patient Module
Theory of Operation 2.15.2 Bottom and back side view on the patient module Fig. 8 Bottom and backside view on the patient module Pos. Description Fixing screws for locking bolt Exhaust for driving gas Driving gas in- and outlet to bellows dome Thread for CO absorber canister fixing, outlet from patient module to absorber Inlet for re-breathing gas from absorber to patient module... -
Page 31: Functional Representations Of The Patient Module
Theory of Operation 2.15.3 Functional representations of the patient module gas- monitoring Fig. 9 Survey of the patient module Pos. Description Patient's y-piece Side stream gas monitor Inspiratory bacterial filter Expiratory bacterial filter Airway pressure monitor connection Inspiratory valve (passive) Expiratory valve (passive) Spirometry sensor Airway pressure limiting valve (APL) -
Page 32: Cmv Mode, Inspiration
Theory of Operation 2.15.3.1 CMV mode, inspiration gas monitoring decoupling valve expiratory valve when reservoir pressure bellows valve is > 2 mbar MV3 ="1" MV2 ="1" MV4 ="1" MV1 ="1" Fig. 10 Survey of the patient module, CMV mode, inspiration... -
Page 33: Cmv Mode, Expiration
Theory of Operation 2.15.3.2 CMV mode, expiration gas monitoring decoupling valve expiratory valve bellows valve when reservoir pressure is > 2 mbar MV3 ="0" MV2 ="0" MV4 ="0" MV1 ="0" Fig. 11 Survey of the patient module, CMV mode, expiration... -
Page 34: Manual Mode, Inspiration
Theory of Operation 2.15.3.3 Manual mode, inspiration gas monitoring decoupling valve expiratory valve when the set respiratory bellows valve pressure is attained MV3 ="0" MV2 ="0" MV4 ="0" MV1 ="0" Fig. 12 Survey of the patient module, Manual mode, inspiration... -
Page 35: Manual Mode, Expiration
Theory of Operation 2.15.3.4 Manual mode, expiration gas monitoring decoupling valve expiratory valve bellows valve MV3 ="0" MV2 ="0" MV4 ="0" MV1 ="0" Fig. 13 Survey of the patient module, Manual mode, expiration... -
Page 36: Spontaneous Mode, Inspiration
Theory of Operation 2.15.3.5 Spontaneous mode, inspiration gas monitoring decoupling valve emergency air valve opens at p < - 3 mbar expiratory valve when reservoir pressure bellows valve is > 2 mbar MV3 ="0" MV2 ="0" MV4 ="0" MV1 ="0" Fig. -
Page 37: Spontaneous Mode, Expiration
Theory of Operation 2.15.3.6 Spontaneous mode, expiration gas monitoring decoupling valve expiratory valve waste gas bellows valve MV3 ="0" MV2 ="0" MV4 ="0" MV1 ="0" Fig. 15 Survey of the patient module, Spontaneous mode, expiration... -
Page 38: Components Of The Patient Module
Theory of Operation 2.15.4 Components of the patient module 2.15.4.1 Ventilation bellows system The ventilator’s driving system can be characterized as a constant flow generator. The driving gas of this generator fills the bellows dome to compress the bellows. The breathing gas is pressed out of the bellows into the circuit. -
Page 39: Status Of The Diaphragm Valves
Theory of Operation 2.15.2.7.1 Status of the diaphragm/membrane valves: The diaphragm valves are pneumatically operated by solenoid valves. The following list shows the correspondence between diaphragm valve, solenoid valve and pressure port. Valve Bellows valve Exp. valve Decoupling valve controlled by MV 1 MV 2 MV 4... -
Page 40: Compliance Test Patient Module
Theory of Operation 2.15.2.7.7 Compliance Test Patient Module The compliance test patient module is divided in 3 phases. Phase 1. Flow into the re-breathing system and test of flow sensors. Valve MV 1 Activity Pressure on port 5, Yes 1, No 6, Yes no sup. -
Page 41: Repair Information
Repair Information 3 Repair Information 3.1 Introduction This chapter of the service manual provides the necessary technical information to perform repairs to the instrument. The most important perquisites for effective troubleshooting are a trough understanding of the instruments functions, as well as understanding the principals of operation. 3.2 Warnings and precautions In the event the instrument covers are removed, observe the following warnings and guidelines 3.2.1 Precautions... -
Page 42: Troubleshooting Guidelines
Repair Information 3.3 Troubleshooting Guidelines 1. Identify the problem – Due to the wide variety of potential symptoms, certain problems may be more subtle than others. Following the guidelines of the tests will help determine the problem if one exists. 2. - Page 43 Repair Information Corrective action Display message Cause Corrective action User Service technician AVM3-2 CMV/ PCV Finish the case with manual Recalibrate proportional Valve Error: Use Manual ventilation; valve, internal flow sensor and Ventilation The actual internal flow value Take the machine out of use; characteristic Call Service should be 0 during expiration...
- Page 44 Repair Information Corrective action Display message Cause Corrective action User Service technician EEPROM is checked during the Take the machine out of use; Recalibrate complete System Error start up and during the sensor Call Service system. If that does not solve Cal Required test for CRC errors problem...
- Page 45 Repair Information Corrective action Display message Cause Corrective action User Service technician AVM3-1 Battery mode Restore the line supply 1. Charge the battery 10 min. remaining 10 minutes of battery use left 2. Check the capacity of the battery, if necessary, exchange AVM3-1 Battery mode Restore the line supply 1.
-
Page 46: Alarm Messages During The Compliance Test, Leak Test And O2 Calibration
Repair Information 3.4.2 Alarm messages during the compliance test, leak test and O2 calibration Corrective action Display message Cause Corrective action User Service technician AVM 3-2 Repeat the compliance test Check the breathing circuit for System Resistance If with in 1 sec. after a flow of obstructions too high 12 l/min has been generated, a... -
Page 47: Messages During The System Tests
Repair Information Corrective action Display message Cause Corrective action User Service technician AVM 3-2 Vent the system by opening the Relieve the system pressure, System not pressure A pressure larger than 10 mbar Breathing circuit. Monitor recalibrate pressure less is measured before the start of sensors system pressure the compliance test... - Page 48 Repair Information Result Compliance Test Compliance Test Leak Test O2 calibration Start Up O2Sensor calibration successful O2 too high O2 concentration too high Expose Sensor to room air Press Enter to Start O2 Sensor too old O2 Sensor is out of rage Replace O2 Sensor Press Enter to Start...
-
Page 49: Symptoms Of Fuse Failures
Repair Information 3.4.2.2 Symptoms of Fuse Failures The following table shows the reaction to a failed fuse on the power supply board. The fuses F2, F3, F4, F5 and F6 have been removed from the power supply module and are therefore subject of the production date. -
Page 50: Required Tools
Repair Information 3.5 Required Tools Item Part Description Specification Number Number Operation manual HEYER specification Service manual HEYER specification 900-4726 Calibration pump, Pressure sensors 0 – 80 cmH Safety analyzer For electrical tests according to IEC- 601-1,B Digital Volt Meter... -
Page 51: Removing The Patient Module
Repair Information 3.6.3 Removing the Patient Module 1. Remove the CO absorber dome. 2. Remove the bag in bottle system. 3. Remove the O cell cable from the O cell, if present. 4. Remove the scavenger hose. 5. Remove the breathing circuit. 6. -
Page 52: Inspecting/Replacing The Decoupling, Bellow And Expiratory Valves
Repair Information 3.6.7 Inspecting/replacing the Decoupling, Bellow and Expiratory Valves 1. To replace the Patient modules rear side valves’ membrane, undo the coupling nut. 2. After removing the valve assembly, undo the black nut securing the valve. 3. Inspect and /or replace the valve, ensuring no hole or deformity that would cause a leak. 4. -
Page 53: Removing The Pressure Gauges
Repair Information 3.6.11 Removing the pressure gauges 1. Remove the Gas Block Module 2. Remove the metal compression fittings from the gauge. 3. Remove the gauges from the front panel enclosure. 4. Reinstall in reverse order 5. Connect gas supplies at each gauge. Observe and test compression fittings for leaks. 3.6.12 Removing the Module 2 Circuit Board Set 1. -
Page 54: Removing Internal Regulators, Proportional Valve And Flow Divider
Repair Information 3.6.15 Removing Internal Regulators, Proportional Valve and Flow Divider 1. Disconnect all sources of pressurized gas. 2. Remove vaporizers. 3. Remove the screws of pneumatic drawer and pull it out. 4. Disconnect each gas hose and electric cable running through each section. 5. -
Page 55: Maintenance And Calibration
Possible fire hazard. Fuses (i.e., additional sockets) must only be replaced by fuses of the same type with the same rating. WARNING: Possible electrical shock hazard. The machine may only be opened by HEYER authorized service personnel. CAUTION: Refer to the maintenance intervals in the preventive maintenance section for guidance on which steps are preformed when. -
Page 56: Test Procedure
Maintenance and Calibration CAUTION: The spring in the top of the APL valve may not be stressed. After removal, ensure that the APL valve is in position “CMV” and place to one side, taking care that the spring is not unduly loaded. CAUTION: Use cleaning agent sparingly. - Page 57 Maintenance and Calibration valve inlet 40° turned drawn insp. port reservoir / exp. port bag port Fig. 16 Patient module, front view...
- Page 58 Maintenance and Calibration bellows control diaphragm valve expiratory decoupling diaphragm diaphragm valve valve Fig. 17 Patient module, top view (diaphragm version) Pos. No. Description Order No. Airway pressure relief valve, cpl. 323-0095 Emergency air valve, cpl. 323-0098 Inspiratory valve, cpl. 323-0096 Expiratory valve, cpl.
- Page 59 Maintenance and Calibration Ensure that the O-ring (323-0147) and the packing ring (980-1170) of the CO absorber are intact. Ensure that the O-ring (323-0147) on the ventilator bellow is intact. Ensure that the O-ring (049-3182) on each vaporizer mount is intact. Check O-rings (049-3052) of the docking station ports (located between the patient module and its docking station).
- Page 60 Maintenance and Calibration 15 Turn off the Narkomat power switch. 16 Verify O and N O tank check valves. * Connect and open a full gas tank on each yoke Withdraw the gas connecting coupling from the supply outlet. Verify the check valves prevent gas from escaping through the open supply outlets. Verify there is no external damage to the gas connecting coupling 17 Verify O O and AIR supply check valves.
-
Page 61: Power Supply Checks
Maintenance and Calibration 4.3.3 Power supply checks Remove the screws from the lower panel and keep the panel at it’s position. Carefully remove the panel. Warning: AC voltage is present Adjust P1 on the power supply board for +5.2 VDC. Use the ground pin located to the right as meter ground. -
Page 62: Functional Tests
Maintenance and Calibration 4.3.4 Functional Tests 4.3.4.1 Pneumatic tests Perform automatic compliance test. Turn on the Narkomat and ensure adequate drive gas is present Attach a breathing circuit the patient module. Seal the Y-piece by attaching the open port to the parking place on the side of the patient module. -
Page 63: Alarm Tests
Maintenance and Calibration Verify APL Valve accuracy. Attach a breathing circuit the patient module. Connect the y-piece to the hose end where the reservoir bag normally is connected. Set a fresh gas flow of 5 l/min. Set the APL valve to each pressure graduation (10, 20, 30, 40 and 50 Pa x 100 (mbar; Compare the valves on the pressure gauge with the valve settings. - Page 64 Maintenance and Calibration Verify O2 pressure loss alarm (whistle) and N2O cutoff. Ventilate a test lung in the CMV mode. Set the AIR/N O switch to N Flow 1 l/min O and 1 l/min N O using the flow meter spindle valves. Interrupt the O supply to the Narkomat Verify the O...
-
Page 65: Electrical Tests
Maintenance and Calibration Verify N ratio system. Set the O and N O valves to minimum. Rotate the N O valve throughout its range from 0.5 to 10 l/min. Using the readings from the flow tube, verify that no less than 25% ± 5% O can be achieved at any N O flow rate. -
Page 66: Service Software
Maintenance and Calibration 5 Service Software How To Start The Service Software Turn off the main switch. The ”INSP. PAUSE” and ”EXP. PAUSE” control panel keys must be pressed while turning on the main switch, the keys have to keep pressed 3 seconds longer than the LED’s are lit. -
Page 67: Identity Check
Maintenance and Calibration 5.1 Identity Check Fig. 2 Identity Check • Enter a valid key-code to execute the service software. • Leave this window with ”Enter”. -
Page 68: Main Menu
Maintenance and Calibration 5.2 Main Menu Fig. 3 Main Menu • Choose the next application by operating one of the buttons. -
Page 69: Set Date And Time
Maintenance and Calibration 5.3 Set Date and Time Fig. 4 Set Date and Time • First check the date and time, if it is necessary, set the clock. • Change date or time by moving the display pointer to the corresponding button, change the value by turning the encoder knob to the right or to the left. -
Page 70: Choose Service
Maintenance and Calibration 5.4 Choose Service Fig. 5 Choose Service • Press the ”Start” button at the main menu to open the calibration routines window. -
Page 71: Calibration Routines
Maintenance and Calibration 5.5 Calibration Routines Fig. 6 Calibration Routines • Choose from the service menu the sensor to calibrate. In case of a complete calibration it’s recommended to perform the calibration step by step in order of the menu. •... -
Page 72: O 2 Sensor Adc Calibration
Maintenance and Calibration 5.5.1 O 2 Sensor ADC Calibration* Fig. 7 O 2 Sensor ADC Calibration 1 • Place oxygen sensor into the test adapter in ambient air. ± 1 • Turn offset potentiometer screw O OFFS (P5, AVM3-2) until the pointer at the screen shows 20 •... - Page 73 Maintenance and Calibration Sensor ADC Calibration , cont.* Fig. 8 O 2 Sensor ADC Calibration 2 • Put the oxygen sensor into 100% O • Open the Y-piece and apply an oxygen flow of 5 l/min for some minutes. ± 1 •...
-
Page 74: Pressure Sensor #1 Adc Calibration
Maintenance and Calibration 5.5.2 Pressure Sensor #1 ADC Calibration Fig. 9 Pressure Sensor #1 ADC Calibration 1 • Connect a pressure gauge and a pressure applicator to the pressure gauging line. • Apply ambient pressure. • Turn offset potentiometer screw P1 OFFS (P11, AVM3-2) until screen pointer shows 20. •... - Page 75 Maintenance and Calibration Pressure Sensor #1 ADC Calibration , cont. Fig. 10 Pressure Sensor #1 ADC Calibration 2 • Apply a pressure of 80 mbar to the gauging tube. • Turn gain potentiometer screw P1 GAIN (P10, AVM3-2) until screen pointer shows 80 and operate ”MAX”...
-
Page 76: Pressure Sensor #2 Adc Calibration
Maintenance and Calibration 5.5.3 Pressure Sensor #2 ADC Calibration Fig. 11 Pressure Sensor #2 ADC Calibration 1 Perform the same calibration procedure like in case of pressure sensor P1. • Apply ambient pressure. • Turn offset potentiometer screw P2 OFFS (P8, AVM3-2) until screen pointer shows 20 and operate the ”MIN”... - Page 77 Maintenance and Calibration Pressure Sensor #2 ADC Calibration , cont. Fig. 12 Pressure Sensor #2 ADC Calibration 2 • Apply a pressure of 80 mbar to the gauging tube. • Turn gain potentiometer screw P2 GAIN (P7, AVM3-2) for gain calibration until screen pointer shows 80 and operate ”MAX”...
-
Page 78: Temperature Sensor Calibration
Maintenance and Calibration 5.5.4 Temperature Sensor Calibration Fig. 13 Temperature Sensor Calibration 1 • Connect a Pt-100 simulator to the connector of the docking station, or directly to the board AVM3-1 of ventilation module 2 (X7). • Apply a simulated temperature of 0 ° C. •... - Page 79 Maintenance and Calibration Temperature Sensor Calibration , cont. Fig. 14 Temperature Sensor Calibration 2 • Apply a simulated temperature of 60 °C. • Turn the gain offset potentiometer screw (P2, AVM3-1) until the screen pointer show 80 and operate the “MAX” button. •...
-
Page 80: Calibration Of Proportional Valve Adc
Maintenance and Calibration 5.5.5 Calibration Of Proportional Valve ADC Caution: The three procedures “Proportional Valve Calibration”, “Internal Flow Sensor Calibration” and “Characteristic of The Proportional Valve” must always be performed together in the order as in the manual, never individually. Fig. - Page 81 Maintenance and Calibration Calibration Of Proportional Valve ADC , cont. Fig. 16 Calibration Of Proportional Valve ADC 2 • Operate the ”MAX” button to open the proportional valve. ± 2 • Turn the gain potentiometer screw PV GAIN (P2, AVM3-2) until the screen pointer shows 97 •...
-
Page 82: Calibration Of Internal Flow Sensor
Maintenance and Calibration 5.5.6 Calibration Of Internal Flow Sensor Caution: The three procedures “Proportional Valve Calibration”, “Internal Flow Sensor Calibration” and “Characteristic of The Proportional Valve” must always be performed together in the order as in the manual, never individually. Fig. - Page 83 Maintenance and Calibration Calibration Of Internal Flow Sensor , cont. Fig. 18 Calibration Of Internal Flow Sensor 2 • Operate the “GAIN” button to apply a maximum flow. • Change the gain value until pointer shows 80, a typically value is about 108 for the gain setting. •...
-
Page 84: Fixing Of Calibration Characteristic Proportional Valve
Maintenance and Calibration 5.5.7 Fixing Of Calibration Characteristic Proportional Valve Caution: The three procedures “Proportional Valve Calibration”, “Internal Flow Sensor Calibration” and “Characteristic of The Proportional Valve” must always be performed together in the order as in the manual, never individually. Fig. - Page 85 Maintenance and Calibration Tolerance range for the flow values: 1 l/min: +0 / - 0.1 35 l/min: +0 / - 0.4 2 l/min: +0 / - 0.1 40 l/min: +0 / - 0.4 4 l/min: +0 / - 0.1 45 l/min: +0 / - 1 6 l/min: +0 / - 0.1...
-
Page 86: Calibration Of External Flow Sensor
Maintenance and Calibration 5.5.8 Calibration Of External Flow Sensor Calibration routine for ventilator software AVM3nVer. 1.3.n: Fig. 20 Calibration Of External Flow Sensor 1 • Connect the patient block to unit, if necessary. Disconnect the breathing tube from breathing gas inlet at the patient block to ensure that there is no flow via external flow sensor. - Page 87 Maintenance and Calibration Calibration Of External Flow Sensor, cont. Calibration routine for ventilator software AVM3nVer. 1.4.1: Fig. 21 Calibration Of External Flow Sensor 2 • Calibration with warmed-up patient module. Disconnect the breathing tube from breathing gas inlet at the patient block to ensure that there is no flow at external flow sensor. •...
- Page 88 Maintenance and Calibration Calibration Of External Flow Sensor, cont. Fig. 22 How to measure the voltages U1 and U2...
-
Page 89: Test Menu Routines
Maintenance and Calibration 5.5.9 Test Menu Routines For testing the sensor calibrations or check different functional tests open test menu and choose the wanted application. Fig. 23 Test Menu Routines... -
Page 90: Test Characteristics Proportional Valve
Maintenance and Calibration 5.5.10 Test Characteristics Proportional Valve Fig. 24 Test Characteristics Proportional Valve • By operating a flow button the chosen flow is set by the proportional valve. The measured flow values of proportional valve at the internal flow sensor are shown and can be checked with an external flowmeter. -
Page 91: Pressure, Oxygen And Temperature-Sensors
Maintenance and Calibration 5.5.11 Pressure, Oxygen and Temperature-Sensors Fig. 25 Pressure, Oxygen and Temperature-Sensors • Measured values of the oxygen sensor are shown in %O2. • Pressure sensor values of the transducers P1 and P2 are shown in mbar. • The measured temperature sensor value is shown in C. -
Page 92: Keyboard Test
Maintenance and Calibration 5.5.12 Keyboard Test Fig. 26 Keyboard Test • Control panel keys and the rotary mouse may be tested. • To close the application operate the ”confirm” function of encoder, rotary mouse. -
Page 93: Miscellaneous Functions
Maintenance and Calibration 5.5.13 Miscellaneous Functions Fig. 27 Miscellaneous Functions • The ”unlock”, ”lock” and ”STOP” buttons may be operated to test the patient module draw-in facility(if available). • By operating the Heat ”Off” button heating is switched on and off when operating button again. •... -
Page 94: Solenoid Valves Mv1 - Mv4
Maintenance and Calibration 5.5.14 Solenoid Valves MV1 - MV4 Fig. 28 Solenoid Valves MV1 - MV4 • This application enables the test of the solenoid valves. • Result of this test are the messages ”ON” , ”OFF” or “Faulty” for each of the four solenoid valves. -
Page 95: Preventive Maintenance
Certain calibration adjustments are only required only after replacing one or both of the active devices. HEYER is not responsible for component failure or loss resulting from the use of stated consumables beyond their recommended replacement interval. -
Page 96: Month Service Interval
Preventive Maintenance Replace O-rings on the docking station (4 x 049-3052) Replace O-rings between tanks and yokes (N O 800-5947; O : 800-5946)* Replace the O-ring of the CO absorber (323-0147) Replace the flat seal of the CO absorber (980-1170) Replace the O-ring of the Patient dome (323-0147) Replace the O-rings of the O Cell (609-3021 + 049-3074) -
Page 97: Cleaning
3. Ensure the new battery is electrically connected and secured in the same manner as the original one. 4. Close battery access door 5. Use only HEYER Battery (340-2020) 6.5.2 Battery Maintenance Due to the self-discharging characteristics of this battery type. It is imperative that it is charged after three months of storage (or when not in use). -
Page 98: Order Information
Preventive Maintenance 7 Order information Ord. No. Description 606-2400 Suction set universal (includes bacteria filter and finger tip) 016-2410 Finger tip 022-3645 Plastic adapter, angled, for secretion collecting Silicone tube φ 6 x 2 for suction 034-2950 556-2955 Bacteria filter for suction set 323-0094 Bacteria filter 603-3240... - Page 99 Preventive Maintenance Order information, cont. Ord. No. Description 800-5191 Connector for breathing bag 800-4853 M-Connector 800-4854 Y-piece, right angled 323-0092 Respiratory tube, silicone, 1.5m 323-0091 Respiratory tube, silicone, 1.2 m 323-0084 Respiratory tube, silicone, 1.1 m 323-0093 Respiratory tube, silicone, 0.9 m 323-0089 Respiratory tube, silicone, 0.6 m 323-0096...
- Page 100 Preventive Maintenance Order information, cont. Ord. No. Description 323-0095 Ventilation pressure valve (APL valve), cpl. 323-0310 Ventilation pressure valve membrane 323-0099 Emergency air valve membrane 323-0313 Sealing set valve body, cpl. 323-0159 Coupling ring valve body 610-4020 Valve cover 610-4000 Metal basket 610-3156 Valve plate (Silicone)
- Page 101 Preventive Maintenance Order information, cont. Ord. No. Description 323-0100 Diaphragm valve 323-0101 Sealing set diaphragm valve, cpl. 323-0168 Membrane for expiration diaphragm valve 323-0110 Coupling nut for diaphragm valve 323-0220 Flow sensor external, cpl. 800-5091 fuel cell, CR 1, incl. diffuser 605-1791 Valve cover for O cell CR 1...
- Page 102 Preventive Maintenance Order information, cont. Ord. No. Description 323-0158 Bellows, silicone 323-0045 Patient dome 323-0147 O-ring for patient dome 323-0046 Absorber canister 323-0337 Threaded insert of absorber holding device 323-0104 Sealing set absorber, cpl. 323-0044 Connecting pipe for absorber 323-0333 Sieve plate for absorber...
- Page 103 Preventive Maintenance Order information, cont. Ord. No. Description 323-0314 Heating blanket, cpl. 323-0142 Suction glass ´94 323-0143 Cover for suction glass ´94 323-0144 Gasket for suction glass ´94 323-0166 O-ring 82,22 x 2,62 suction glass ´94 323-0309 Tube connector, straight 043-3005 Tube connector, angled 660-0252...
- Page 104 Order information, cont. Ord. No. Description 323-0363 Set of gaskets and adapters 022-2960 Anesthetic gas exhaust plug 45° HEYER 022-2970 Anesthetic gas exhaust plug 45° Dräger 531-2990 Tube autoclavable 1m 605-2900 Hose connector, diam. = 22 mm / diam. = 22 mm...
- Page 105 Preventive Maintenance Order information, cont. Ord. No. Description 046-4146 Tube clamp 980-1161 DGAI-screwing O 980-1164 DGAI-screwing N 980-1167 DGAI-screwing AIR 980-1162 Tube connector N 980-1162 Tube connector O 980-1168 Tube connector AIR 980-1174 Flat gasket O 980-1174 Flat gasket N 980-1170 Flat gasket AIR...
- Page 106 Preventive Maintenance Order information, cont. Rod. No. Description 323-0362 Tube / cable holder (for holding device) 800-5484 Restrictor valve AIR, cpl 800-5480 Restrictor valve O , cpl 026-1900 Fixing screw M8 x 16 535-1900 Catheter cup without picture 556-2910 Holding device for catheter cup...
- Page 107 Preventive Maintenance...
- Page 108 Preventive Maintenance In case of queries or faults please contact our customer service department: HEYER MEDICAL AG Carl-HEYER-Strasse 1-3 56130 Bad Ems Germany Tel. + 49-2603 / 791-3 Fax. +49-2603 / 791-209 E-mail: info@heyermedical.de...
Need help?
Do you have a question about the Narkomat+ and is the answer not in the manual?
Questions and answers