
Related Manuals for Heyer Pasithec


Summary of Contents for Heyer Pasithec
- Page 1 A n e s t h e s i a S y s t e m Operator’s Manual Rev. 0.2 Draft – 12/09 NNOVATION IN ESIGN AND ECHNOLOGY...
-
Page 3: Table Of Contents
Connecting Gas and Electricity ..........................57 6.3.1 AC Inlet ................................. 58 6.3.2 Aux. Mains Outlet ............................58 6.3.3 Communication Port ............................59 6.3.4 Gas Inlet Module ............................59 Cleaning and Disinfecting ..............................60 Rev. 0.2 Draft – 12/09 HEYER Pasithec, Operator’s manual 3 / 106... - Page 4 Zeroing Procedure ..........................100 10.10.5 Alarms ..............................101 10.10.6 Cleaning ..............................101 10.10.7 Preventive Maintenance Instructions....................... 101 10.10.8 Warnings ..............................101 10.10.9 Cautions ..............................101 Warranty ................................... 102 4 / 106 HEYER Pasithec, Operator’s manual Rev. 0.2 Draft - 12/09...
-
Page 5: Statement
All instructions in this manual are considered to be correct. HEYER is not legally responsible for damages caused by incorrect installation or operation. HEYER does not supply privileges endowed by patent law to any other parties. HEYER is not legally responsible for the consequences of breaking the patent law or of a third party violation. -
Page 6: Return
H E Y E R P a s i t h e c Return In the event a product needs to be returned to HEYER, please follow these steps: 1. Obtain the right of return. Contact our customer service department with the product number and type. The number is marked on the surface of the product and is required for a return. -
Page 7: Introduction
2.1.1 Range of Use Pasithec is applicable for patients of over 2 kg with standard configuration. Pasithec is for use in the Operating Room and/or Emergency Room of a hospital, drug addiction treatment center, or other medical facilities where anesthesia is used. - Page 8 Inspiration flow Expiration flow Serial Number flush Do not dispose in garbage Reservoir bag port basket. View the reading on the top Fuse of the float. Recyclable Battery 8 / 106 HEYER Pasithec, Operator’s manual Rev. 0.2 Draft - 12/09...
- Page 9 Address of manufacturer △!! The system, with this label 0 0 0 0 under the stipulations in the EC Representative operating manual, complies PENDING with the requirements related from 93/42/EEC. Rev. 0.2 Draft – 12/09 HEYER Pasithec, Operator’s manual 9 / 106...
-
Page 10: Definition, Abbreviation
Tidal Volume Watch Dog Timer ∆P Differential Pressure Enf. Enflurane Hal. Halothane Iso. Isoflurane Sev. Sevoflurane Des. Desflurane ETCO End-Expiratory CO Concentration INSCO Inspiratory CO Concentration Minimum Alveolar Concentration 10 / 106 HEYER Pasithec, Operator’s manual Rev. 0.2 Draft - 12/09... -
Page 11: System Components
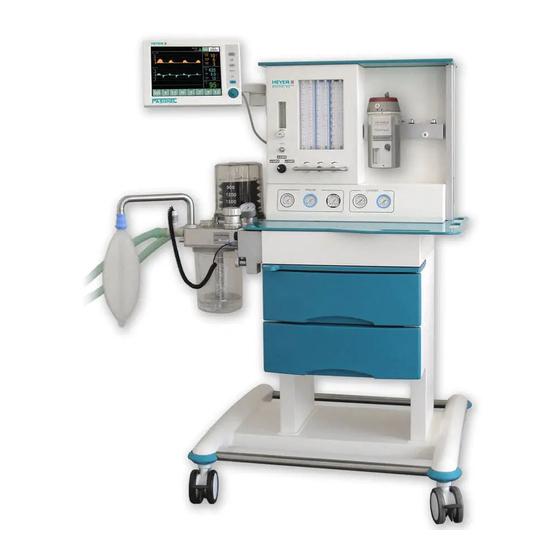
Contact with a liquid, such as anesthetic agent, results in damage within the device. WARNING: The incline angle should not exceed 10 degrees whenever the anesthetic system is in use. Rev. 0.2 Draft – 12/09 HEYER Pasithec, Operator’s manual 11 / 106... - Page 12 Aux. O Outlet Breathing System Flexible Top Light Top Board Flowmeter Vaporizer Mount Pneumatic and Electronic Switch Main tray Cylinder Pressure Gauges Pipeline Pressure Gauges Pull-out Writing Board Drawers 12 / 106 HEYER Pasithec, Operator’s manual Rev. 0.2 Draft - 12/09...
- Page 13 H E Y E R P a s i t h e c Descriptions of each control function at the front of Pasithec: Item Description Aux. O Flowmeter Provides O with a maximal flow of 15 L/min to Aux. O Flowmeter with Flow Turn the knob counterclockwise to increase the flow;...
- Page 14 Figure 3-2 Side view Legend: GCX Mounting Rail UI Signal Cable Power Cable Bellows Assembly Absorber Circle Assembly Flush (O Sensor Socket Driving Gas Outlet – Switch Driving Gas Outlet (CGO) 14 / 106 HEYER Pasithec, Operator’s manual Rev. 0.2 Draft - 12/09...
- Page 15 H E Y E R P a s i t h e c Descriptions of each control function at the side view of Pasithec: Item Description Flush (O Press the O Flush (O +) button to supply the breathing system with O at a high flow rate.
- Page 16 H E Y E R P a s i t h e c 25 26 Figure 3-3 Rear View Legend: Fuses Aux. Power Sockets Power Cable Pipeline Gas Inlet Module Gas Cylinder Yokes 16 / 106 HEYER Pasithec, Operator’s manual Rev. 0.2 Draft - 12/09...
-
Page 17: Breathing System
ISO 8835-2. Figure 3-4 Breathing System Legend: Absorber Canister Inspiratory Port Inspiratory Valve Expiratory Port Expiratory Valve Bellows Airway Pressure Gauge Handle Bag Arm APL valve Test Block Rev. 0.2 Draft – 12/09 HEYER Pasithec, Operator’s manual 17 / 106... -
Page 18: Bellows Assembly Ports
WARNING: Never connect exhaust gas port with sub-atmospheric system directly, as it results breathing system leakage. Do not block exhaust gas port. 18 / 106 HEYER Pasithec, Operator’s manual Rev. 0.2 Draft - 12/09... -
Page 19: Ventilating Circulation
Rev. 0.2 Draft – 12/09 HEYER Pasithec, Operator’s manual 19 / 106... -
Page 20: Front Panel
If the “Spirometry” and all other windows are already closed when the NORMAL SCREEN key is pressed again, no action shall occur. 20 / 106 HEYER Pasithec, Operator’s manual Rev. 0.2 Draft - 12/09... -
Page 21: Indicator
See Fig. 3-7. The screen has three areas: information area, monitoring area, and parameter setup area. Figure 3-7 Display screen layout Rev. 0.2 Draft – 12/09 HEYER Pasithec, Operator’s manual 21 / 106... - Page 22 STANDBY, IPPV, PCV, SIMV, PS and MANUAL. Rotating the navigator knob counterclockwise allows the user to scroll through the settings in the reverse order. The default mode when the machine is powered up is standby. 22 / 106 HEYER Pasithec, Operator’s manual Rev. 0.2 Draft - 12/09...
- Page 23 TARGET SLOPE SIMV Freq. PEEP ∆P Trigger INSP SLOPE Blank Freq Blank Blank PEEP ∆P Trigger SLOPE MANUAL / Blank Blank Blank Blank Blank Blank Blank Blank AUTO Rev. 0.2 Draft – 12/09 HEYER Pasithec, Operator’s manual 23 / 106...
-
Page 24: Rear Panel
COM B Interface Communication extension interface is used for connecting external communication equipment (RS232 interface). SIGNAL Interface Signal interface is used for connecting display screen to main unit. 24 / 106 HEYER Pasithec, Operator’s manual Rev. 0.2 Draft - 12/09... -
Page 25: Menu
The following example illustrates how to operate the settings. Step 2 Turn the knob to select the Paw-Low option; the selected option will appear as black text on a green background. Rev. 0.2 Draft – 12/09 HEYER Pasithec, Operator’s manual 25 / 106... - Page 26 Step 4 Turn the knob to select the setting. Step 5 Press the knob to save the setting; the background will appear as black text on a green background. 26 / 106 HEYER Pasithec, Operator’s manual Rev. 0.2 Draft - 12/09...
- Page 27 Press the MENU key to exit the screen. The default alarm setting in the manual mode is “Enabled”. To adjust the setting: Step 1: Select “Manual Mode.” Step 2: Press the knob. Rev. 0.2 Draft – 12/09 HEYER Pasithec, Operator’s manual 27 / 106...
-
Page 28: Menu Diagram
Menu window. Some functions are optional. 3-13 When you press the MENU key, the “Menu” window is displayed on the screen. Turn the knob to select a submenu. 28 / 106 HEYER Pasithec, Operator’s manual Rev. 0.2 Draft - 12/09... - Page 29 H E Y E R P a s i t h e c Figure 3-9 Alarm submenu (Page 1) Figure 3-10 Alarm submenu (Page 2) Figure 3-11 System submenu Rev. 0.2 Draft – 12/09 HEYER Pasithec, Operator’s manual 29 / 106...
- Page 30 Figure 3-12 Calibrate submenu Figure 3-13 Service submenu CAUTION: A password is needed for the Service submenu. Only an authorized engineer can access this submenu. Figure 3-14 Gas submenu 30 / 106 HEYER Pasithec, Operator’s manual Rev. 0.2 Draft - 12/09...
- Page 31 The Gas Sensor settings can be adjusted by following these instructions: Step 1: Turn the knob to select “Gas Sensor.” Step 2: Press the knob, and then turn it to change the settings. Rev. 0.2 Draft – 12/09 HEYER Pasithec, Operator’s manual 31 / 106...
- Page 32 To adjust Wave Display settings, follow these instructions: Step 1: Turn the knob to select “Wave Display.” Step 2: Press the knob, and then turn it to change the setting. 32 / 106 HEYER Pasithec, Operator’s manual Rev. 0.2 Draft - 12/09...
- Page 33 H E Y E R P a s i t h e c Step 3: Press the knob to save the setting. Rev. 0.2 Draft – 12/09 HEYER Pasithec, Operator’s manual 33 / 106...
-
Page 34: Operating Guide
When the UI is powered on, the startup interface is displayed, followed by the LOGO interface. Figure 4-1 LOGO Interface The System Self Test interface will appear after the LOGO interface. Figure 4-2 System Self Test Interface 34 / 106 HEYER Pasithec, Operator’s manual Rev. 0.2 Draft - 12/09... - Page 35 Figure 4-3 System Self Test Complete interface Select the “Continue” option to perform the Leak Test procedure. Select “Bypass” to enter the STANDBY interface. If the self test fails, please contact a service representative. Rev. 0.2 Draft – 12/09 HEYER Pasithec, Operator’s manual 35 / 106...
-
Page 36: Manual Leak Test
3. If bellows moved during step 1, turn off Power Supply and contact manufacturer. 4. Select “Continue” if Paw gauge index is between 25 cmH O and 35 cmH 36 / 106 HEYER Pasithec, Operator’s manual Rev. 0.2 Draft - 12/09... -
Page 37: Safety Valve Test
Click the “Continue” to perform Safety Valve Test as shown in Figure 4-6: Figure 4-6 Safety Valve Test in progress. When test is complete, screen will display the following: Figure 4-7 Safety Valve Test Pass interface Rev. 0.2 Draft – 12/09 HEYER Pasithec, Operator’s manual 37 / 106... -
Page 38: Automatic Leak Test
Click “Continue” to perform the Leak Test. Figure 4-9 Automatic Leak Test in progress When the leak test is complete, the following is displayed: Figure 4-10 Automatic Leak Test Pass interface 38 / 106 HEYER Pasithec, Operator’s manual Rev. 0.2 Draft - 12/09... -
Page 39: Compliance Test
2. Select “Continue” to start test or select “Bypass” to proceed to Normal Screen. Click “Continue” option to perform the Compliance Test. Figure 4-12 Compliance Test in Progress Rev. 0.2 Draft – 12/09 HEYER Pasithec, Operator’s manual 39 / 106... - Page 40 Complete the Compliance Test according to the instructions shown in Figure 4-13: 1. Set O flowmeter to zero. 2. Select “Continue” to proceed to Normal Screen. Click “Continue” and the STANDBY screen will appear: Figure 4-14 STANDBY interface 40 / 106 HEYER Pasithec, Operator’s manual Rev. 0.2 Draft - 12/09...
-
Page 41: Ventilation Mode Setup
Step 2: Select “Auto Ventilation”. To adjust settings, refer to section 4.1.6. Step 3: If necessary, push the O flush button to inflate the bellows. 4.2.1 Stop Mechanical Ventilation Set ventilation mode to Manual or STANDBY mode. Rev. 0.2 Draft – 12/09 HEYER Pasithec, Operator’s manual 41 / 106... -
Page 42: Start Manual Ventilation
Flow scale: -90~90 L/min. Time-Axis: Positive inspiratory direction above 0 L/min level; minus expiratory direction below 0 L/min level; no gas flow on 0 L/min level. Figure 4-16 Flow-t waveform 42 / 106 HEYER Pasithec, Operator’s manual Rev. 0.2 Draft - 12/09... - Page 43 3 . . . . - t Waveform Y-Axis: CO ; X-Axis: time. Figure 4-17 CO - t waveform Pressure-Volume Loop Y-Axis: tidal volume; X-Axis: pressure. Figure 4-18 Pressure-Volume Loop Rev. 0.2 Draft – 12/09 HEYER Pasithec, Operator’s manual 43 / 106...
- Page 44 Pressure-Volume loop and Flow-Volume loop and preserves the two new reference loops. When a user exits the loop function, the preserved loops are saved. When the working mode is STANDBY, the two function loops are deleted. 44 / 106 HEYER Pasithec, Operator’s manual Rev. 0.2 Draft - 12/09...
-
Page 45: Pre-Use Check List
If the indicator does not glow, power is not being supplied to the machine. Plug the power cord into a different socket, close the breaker, or replace the power cord. Rev. 0.2 Draft – 12/09 HEYER Pasithec, Operator’s manual 45 / 106... -
Page 46: Main Failure Alarm Test
The gas flow control valve should be adjusted slowly. Do not turn it quickly when the reading of the flowmeter goes beyond the maximum or minimum flow rate; the control valve could be damaged and/or break. 46 / 106 HEYER Pasithec, Operator’s manual Rev. 0.2 Draft - 12/09... - Page 47 AIR to ensure that the flowmeter float moves smoothly. 13. Adjust the knob of the N O flowmeter and ensure that there is no gas in the flowmeter. 14. Turn off the Pneumatic and Electronic Switch. Rev. 0.2 Draft – 12/09 HEYER Pasithec, Operator’s manual 47 / 106...
-
Page 48: Monitoring With Oxygen
11 Turn all flow control valves completely clockwise to the close. 12 Reconnect O pipeline supplies or open the O cylinder valve slowly. 13 Turn off the Pneumatic and Electronic Switch. 48 / 106 HEYER Pasithec, Operator’s manual Rev. 0.2 Draft - 12/09... -
Page 49: Installing And Testing Vaporizer
Then perform step 1 to step 5. 5.4.2 Testing Vaporizer CAUTION: Refer to relevant instructions for use regarding the performance testing of the vaporizer. Rev. 0.2 Draft – 12/09 HEYER Pasithec, Operator’s manual 49 / 106... -
Page 50: Alarm Test
Set ventilation mode to Manual Mode and auto ventilation should stop. • Block patient end and press O + button. • “Continuous Pressure!!!” alarm should sound after 15 seconds. 12 Turn off the Pneumatic and Electronic Switch. 50 / 106 HEYER Pasithec, Operator’s manual Rev. 0.2 Draft - 12/09... -
Page 51: Breathing System Test
Turn off main supply and close all gas cylinder valves if not using the system. Ensure that the following items are complete: Apparatus: Airway maintenance Manual ventilation Organ cannula Applicable anesthesia and emergent drugs. Rev. 0.2 Draft – 12/09 HEYER Pasithec, Operator’s manual 51 / 106... - Page 52 WARNING: Anesthesia equipment must be connected to the waste gas scavenging system to prevent the bodily injury. This must be followed during testing and clinical application. 52 / 106 HEYER Pasithec, Operator’s manual Rev. 0.2 Draft - 12/09...
-
Page 53: Installation And Connection
• Ensure that the backup manual ventilator can be used immediately if the electrical surgical equipment fails. • Never use masks or hoses that can conduct electricity. Rev. 0.2 Draft – 12/09 HEYER Pasithec, Operator’s manual 53 / 106... -
Page 54: Install The Absorber Canister
100% accurate. To decide whether to replace the absorbent, use the CO monitoring machine. Immediately remove absorbent that has changed color. Soda lime sometimes reverts to its original color several hours after use. 54 / 106 HEYER Pasithec, Operator’s manual Rev. 0.2 Draft - 12/09... -
Page 55: Disassembling Absorber
Step 3: Connect oxygen sensor. Connect the oxygen sensor between the inspiratory port of the breathing system and patient system. Turn and insert the oxygen sensor vertically in the connector. Rev. 0.2 Draft – 12/09 HEYER Pasithec, Operator’s manual 55 / 106... -
Page 56: Connect Co 2 Monitor
Step 2 Plug the data connecter into the COM A port at the back of ventilator. 56 / 106 HEYER Pasithec, Operator’s manual Rev. 0.2 Draft - 12/09... -
Page 57: Connect Anesthetic Agent Monitor
Only the medical gas supply should be used. Other types of gas supply may contain water, oil or other pollutants. WARNING: Note that all gas supply connectors have different dimensions and structures. Rev. 0.2 Draft – 12/09 HEYER Pasithec, Operator’s manual 57 / 106... -
Page 58: Ac Inlet
CAUTION No more than four auxiliary mains socket outlets should be used when HEYER Pasithec in use. This label displays the voltage of the power supply and the rated ampere value of the circuit breaker. Fuse: 250V / 2A, ∅5X20 (F) Maximum current outlet: 1.5A (each);... -
Page 59: Communication Port
The Gas Inlet Module includes pipeline gas supply and standby gas supply. The pipeline connector and standby gas supply connector all adopt DISS (Diameter-indexed safety system), which can prevent wrong connections. Rev. 0.2 Draft – 12/09 HEYER Pasithec, Operator’s manual 59 / 106... -
Page 60: Cleaning And Disinfecting
Sterilize main unit with ultraviolet radiation. Do not use acetic hydro peroxide or formaldehyde steaming. Breathing system components Refer to section 7.2. Breathing System Wash, refer to section 7.3. Bellows Wash, refer to section 0. 60 / 106 HEYER Pasithec, Operator’s manual Rev. 0.2 Draft - 12/09... -
Page 61: Cleanable Breathing System Components
Soap water autoclave (° F/° C) Absorber canister Airway pressure gauge APL valve Valve cover and valve patch Absorber circuit integration (without the 273° F/134° C above mentioned) Rev. 0.2 Draft – 12/09 HEYER Pasithec, Operator’s manual 61 / 106... -
Page 62: Disassembling Absorber Circle
The red part of the supplying board is a heater. Do not touch it! 62 / 106 HEYER Pasithec, Operator’s manual Rev. 0.2 Draft - 12/09... - Page 63 Steam (not more than 50° C) or immersion disinfectio n can be used. In case of immersion, all sterilized parts must be dried with high pressure air or oxygen before reuse. Rev. 0.2 Draft – 12/09 HEYER Pasithec, Operator’s manual 63 / 106...
-
Page 64: Bellows Assembly
This section covers disassembling, assembling, cleaning and sterilizing the bellows assembly. Read all parts of this section before disassembling, assembling, cleaning and sterilizing to avoid equipment damage and/or patient injury. CAUTION: Only the folding gasbag is made of latex. 64 / 106 HEYER Pasithec, Operator’s manual Rev. 0.2 Draft - 12/09... - Page 65 3. Detach the top plate from the folding gasbag, and remove inner ring from the top of folding gasbag. 4. Turn counter-clockwise and remove the three black handles from the rim. Rev. 0.2 Draft – 12/09 HEYER Pasithec, Operator’s manual 65 / 106...
- Page 66 4) Check the components if they are broken or damp, and then perform the assembling and function test. 5) Connect the bellow assembly, ventilator and breathing system. 6) Perform the preoperative check. 66 / 106 HEYER Pasithec, Operator’s manual Rev. 0.2 Draft - 12/09...
- Page 67 Scrub and rinse the components that had indirect contact with patients with 1-3% phenol solution or soap-and-water solution and water. Irradiate them by using the ultraviolet ray for 30 minutes if necessary. Rev. 0.2 Draft – 12/09 HEYER Pasithec, Operator’s manual 67 / 106...
-
Page 68: Regular Maintenance
Check each component carefully to check for cracks, distortion, dissolution, inflation and other physical changes. Replace them if necessary. Assemble the bellows assembly, and then perform the leak test. 68 / 106 HEYER Pasithec, Operator’s manual Rev. 0.2 Draft - 12/09... -
Page 69: User Maintenance
It is recommended that damaged parts be replaced with components manufactured or sold by HEYER. After any repair work, test the unit to ensure it complies with the manufacturer’s published specifications. Contact the nearest HEYER Service Center for service assistance. In all cases, other than where our warranty is applicable, repairs will be made at current list price for the replacement part(s) plus a reasonable labor charge. -
Page 70: User Maintenance
Maintaining the Breathing System Parts that are broken, crushed, worn or distorted must be replaced immediately when cleaning the breathing system. Refer to the sections corresponding to reassembly and testing. 70 / 106 HEYER Pasithec, Operator’s manual Rev. 0.2 Draft - 12/09... -
Page 71: Replace O 2 Sensor
Before performing 100% O sensor calibration, 21% O sensor calibration must be finished. Step 1 Press MENU key and a menu window appears on the screen. Rev. 0.2 Draft – 12/09 HEYER Pasithec, Operator’s manual 71 / 106... - Page 72 Perform the operation in accordance with the prompt on the screen. Disassemble O sensor from the Y-piece and place it in the air for more than 3 minutes. 72 / 106 HEYER Pasithec, Operator’s manual Rev. 0.2 Draft - 12/09...
- Page 73 If 21% calibration fails, the word “Calibration failed” is displayed in the window. If calibration fails: • Repeat these steps to calibrate it again. • If it fails again, replace the O sensor and recalibrate it. Rev. 0.2 Draft – 12/09 HEYER Pasithec, Operator’s manual 73 / 106...
-
Page 74: Calibrate Co Sensor
Disconnect the Gas sensor from the Y-piece, and place it in the air for no less than 15 minutes. Remove the airway adapter (or a new one) until the light turns green. Wait 1 minute till the State-Area turns green (OK) and select it. 74 / 106 HEYER Pasithec, Operator’s manual Rev. 0.2 Draft - 12/09... - Page 75 “Calibration successful” will be displayed on the window after the calibration is completed successfully. Reinstall the Gas Sensor to the breathing system. Select “Finish” to complete the calibration. Rev. 0.2 Draft – 12/09 HEYER Pasithec, Operator’s manual 75 / 106...
-
Page 76: Calibrate Agents
Disconnect the Gas Sensor from the Y-piece and place it in the air for no less than 15 minutes. Remove the airway adapter (or a new one) until the light turns green. Wait 1 minute till the State-Area turns green (OK) and select NEXT. 76 / 106 HEYER Pasithec, Operator’s manual Rev. 0.2 Draft - 12/09... -
Page 77: Maintaining O Sensor
Typically a 10° C change of temperature doubles the output signal from the sensor. Solid membrane sensors require temperature compensation as a result, and many have thermistors in them. Rev. 0.2 Draft – 12/09 HEYER Pasithec, Operator’s manual 77 / 106... -
Page 78: Replace The Fuses
Only an authorized services representative can replace the battery. If the battery will not be used, contact a service representative to disconnect the battery. Dispose used batteries in accordance with local laws. 78 / 106 HEYER Pasithec, Operator’s manual Rev. 0.2 Draft - 12/09... -
Page 79: The Irma Probe
Never sterilize or immerse the IRMA airway adapters in liquid. They can be cleaned using a cloth moistened with ethanol or isopropyl alcohol. Replace every two weeks. Figure7-1:IRMA child adapter Figure 7-2:IRMA adult adapter Figure 7-3:IRMA CO gas module Figure 7-4:IRMA AX+gas module Rev. 0.2 Draft – 12/09 HEYER Pasithec, Operator’s manual 79 / 106... -
Page 80: Alarm And Troubleshooting
Alarm Message List CAUTION: Patient safety comes first during an operation. Repair the problem once the operation is finished. CAUTION: Operation instruction is not included in the alarm message list. 80 / 106 HEYER Pasithec, Operator’s manual Rev. 0.2 Draft - 12/09... -
Page 81: Technical Alarm
0.5s. ventilate patient. Monitoring still available. Speaker Failure Lack of Main alarm Startup Ventilator Please contact Feedback only working eligible service normally. Abort representative. or ignore. Rev. 0.2 Draft – 12/09 HEYER Pasithec, Operator’s manual 81 / 106... - Page 82 Sensor Failure incorrect. only Representative needed. Inspiration Inspiration sensor Startup Ventilator failure; Sensor Failure data incorrect only switch to bag mode and manually ventilate patient. Monitoring is not available. 82 / 106 HEYER Pasithec, Operator’s manual Rev. 0.2 Draft - 12/09...
-
Page 83: Functional Alarm
Over-compensation of air or limit of FiO Reduce sensor non-calibrated. compensation. sensor failure. Perform the calibration. Replace O sensor. High FiO greater than upper limit. Reset upper ---- limit of FiO Rev. 0.2 Draft – 12/09 HEYER Pasithec, Operator’s manual 83 / 106... - Page 84 APNEA condition shall not restart the apnea timing. Breathing circuit disconnects during automatic ventilation shall cause an apnea alarm. APNEA FreqMIN in PS mode triggers N.A. Backup the ventilator. 84 / 106 HEYER Pasithec, Operator’s manual Rev. 0.2 Draft - 12/09...
- Page 85 PEEP in pressure support mode for more than 30 seconds. Negative High Negative Airway Pressure of - Pressure 2 cmH O or less for greater than 4 seconds. Rev. 0.2 Draft – 12/09 HEYER Pasithec, Operator’s manual 85 / 106...
-
Page 86: Troubleshooting
The folding gasbag Gas scavenging port is occluded Remove the occlusion is inflated Malfunctioning waste gas scavenging Repair waste gas scavenging excessively system created excessive resistance or system vacuum 86 / 106 HEYER Pasithec, Operator’s manual Rev. 0.2 Draft - 12/09... -
Page 87: Specifications And Operation Theory
Physical Specification All specifications are approximate and may be changed without notice. CAUTION: Do not use the Pasithec in a volatile environment. CAUTION: Do not place heavy objects on the top of the machine or in the draws. The top board and working table can bear 25kg, and the drawer can bear 10kg. -
Page 88: System's Technical Specifications
Nitrous oxide proportionally to ensure the O concentration is no less than 25%. Accuracy: ±10% of full scale under the condition of 20°C, 101.3 kPa, 10.3.3 Classification According to IEC60601-1, HEYER Pasithec belongs to the following classifications: • Class I equipment • Type B equipment •... -
Page 89: Input/Output
10.5 Electromagnetic Compatibility Changing or reassembling this equipment without authorization may cause electromagnetic compatibility problems. Contact HEYER for assistance. Designing and testing this equipment is in accordance with the following stipulations. WARNING: Using cell phones or other radio equipment near this product may cause malfunctions. -
Page 90: Operation Theory
10.6 Operation Theory The HEYER Pasithec is a continuous flow anesthetic system. It is equipped with an airway which can transfer O O, AIR and inhalation anesthetic drugs. Airway parts can use O O and AIR, and the O and AIR which is needed reduce to 280 kPa~600 kPa can enter into the machine through a high pressure pipeline. -
Page 91: Pneumatic System
H E Y E R P a s i t h e c 10.6.1 Pneumatic System Figure 10-1 Operation principle diagram of system Rev. 0.2 Draft – 12/09 HEYER Pasithec, Operator’s manual 91 / 106... -
Page 92: Breathing System Technical Specification
Meet requirements for Class I, type B equipment specified in EN60601-1 Medical Electrical equipment: Part one: General requirement for safety. Minute volume: Max 20 L/min Inspiratory flowrate: Max 75 L/min Pressure transmission 5~80 cmH range: 92 / 106 HEYER Pasithec, Operator’s manual Rev. 0.2 Draft - 12/09... -
Page 93: Ventilation Mode Settings
400 kPa Inlet pressure range 280 kPa ~ 600 kPa Flow valve range 5~75 L/min Output Pressure range: 0 ~ 6 kPa; Flow range: 0 ~ 75 L/min Rev. 0.2 Draft – 12/09 HEYER Pasithec, Operator’s manual 93 / 106... -
Page 94: Setting Alarm Parameters
The operator should check that the current alarm preset is appropriate prior to use on each patient. Do not set alarm limits to extreme values that can render the alarm system useless. 94 / 106 HEYER Pasithec, Operator’s manual Rev. 0.2 Draft - 12/09... -
Page 95: Monitoring Performance
Y-Axis: tidal volume; fixed range: 0 to 1500 ml; gain: 250 ml. Flow-Volume loop: X-Axis: tidal volume; fixed range: -1400 to 0 ml/min; gain: 700 ml. Y-Axis: flow; fixed range: -90 to 90 ml; gain: 45 ml. Rev. 0.2 Draft – 12/09 HEYER Pasithec, Operator’s manual 95 / 106... -
Page 96: O 2 Monitoring Specification
It may be used in the operating suite, intensive care unit, patient room and emergency medicine settings for adult, pediatric and infant patients. 96 / 106 HEYER Pasithec, Operator’s manual Rev. 0.2 Draft - 12/09... -
Page 97: Technical Specification
O @ 10 LPM Note1: After being in a condensing atmosphere, the unit shall be stored for more than 24h in an environment equivalent to the operating humidity. Rev. 0.2 Draft – 12/09 HEYER Pasithec, Operator’s manual 97 / 106... - Page 98 “Interfering gas and vapor effect” below. Note2: The accuracy specification for IRMA AX+ is not valid if more than two agents are present in the gas mixture. 98 / 106 HEYER Pasithec, Operator’s manual Rev. 0.2 Draft - 12/09...
-
Page 99: System Assembly Instruction
3. A green LED indicates that the IRMA probe is ready for use. 4. Connect IRMA/airway adapter 15mm male connector to the breathing circuit Y-piece. 5. Connect IRMA/airway adapter 15mm female connector to the patient’s endotracheal tube. Rev. 0.2 Draft – 12/09 HEYER Pasithec, Operator’s manual 99 / 106... -
Page 100: Zeroing Procedure
Allow 1 minute for warm up of the IRMA AX+ probes after powering on the machine and after changing the IRMA airway adapter before proceeding with the Zeroing. The green LED on the probe will blink for approximately 5 seconds while Zeroing is in progress. 100 / 106 HEYER Pasithec, Operator’s manual Rev. 0.2 Draft - 12/09... -
Page 101: Alarms
Never sterilize or immerse the IRMA probe in liquid. Do not apply tension to the probe cable. Do not operate the IRMA probe outside the specified operating temperature environment. Rev. 0.2 Draft – 12/09 HEYER Pasithec, Operator’s manual 101 / 106... -
Page 102: Warranty
Warranty declaration by HEYER Medical AG In addition to the legal warranty acc. to HBG §377, HEYER MEDICAL AG shall grant a warranty of 12 months for the purchase of a new apparatus from the HEYER product range. The warranty period begins with the date of invoice and is subject to the following conditions: 1. - Page 103 H E Y E R P a s i t h e c NOTES Rev. 0.2 Draft – 12/09 HEYER Pasithec, Operator’s manual 103 / 106...
- Page 104 H E Y E R P a s i t h e c NOTES 104 / 106 HEYER Pasithec, Operator’s manual Rev. 0.2 Draft - 12/09...
- Page 106 C a r l - H e y e r - S t r . 1 / 3 D - 5 6 1 3 0 B a d E m s T e l . : + 4 9 ( 0 ) 2 6 0 3 / 7 9 1 - 3 F a x : + 4 9 ( 0 ) 2 6 0 3 / 7 0 4 2 4 E - M a i l : i n f o @ h e y e r m e d i c a l .
Need help?
Do you have a question about the Pasithec and is the answer not in the manual?
Questions and answers