Table of Contents
Advertisement
Available languages
Available languages
CHRONOTHERMOSTAT SANS FIL
ÉQUIPÉ D'UN ÉMETTEUR RADIO
Montage en saillie
WIRELESS CHRONOTHERMOSTAT
EQUIPPED WITH RADIO TRANSMITTER
Wall mounting
DU - DETXNN01
Attenzione:
inserimento delle istruzioni nella confezione del prodotto
1TXCRTX05 avviene su richiesta dell'ufficio export
Legenda / Caption legend
AS Astuccio / Box
ET Etichette Prodotto / Labels
FI Foglio Istruzioni / Instruction manual
IM Imballo / Package
LS Marcatura laser / Laser mark
NA Nastro adesivo / Adhesive tape
PT Pellicola Tampo/Serigrafica / Print
ST Specifica Tecnica / Tech - spec.
Descrizione / Description
Istruzioni FR/EN cronotermostato
9PR09
UNI-EN-ISO 9001
4
0 /1
2 8 FR/EN
B
---
A
---
Ind
Rif
Codice Prodotto / Product P/N
Scala / Scale
1TXCRTX05
+ PERSONALIZZATI
1:1
Pagina 1 di 53
Alimentation avec piles
Journalier / Hebdomadaire
Hiver /
Été
2 niveaux de température (Co fort et Economy)
+ 1 niveau de température Absence
Fonction MASTER
Entrée pour programmateur téléphonique
Power supply: alkaline batteries
Daily / Weekly
Winter /
Summer
2 temperature levels (Comfort and Economy)
+ 1 Absence temperature level
Master function
Telephone programmer input
Eliminato indirizzo Internet da dichiarazione UE semplificata
Aggiornamento: Banda di frequenza e
Dichiarazione conformità UE semplificata
Descrizione Modifica / Description
Codice Assieme / Assemblage P/N
Data / Date
05/07/13
FRANÇAIS
ENGLISH
m
Codice distinta base
Part list code
DETXNN014
09/02/18
30/08/17
Data / Date Firma / Sign
Cod. Partic. / Component P/N
-----
FI307
Disegn. / Desig.
Data / Date
05/07/13
L.Tettamanzi
L. Tettamanzi
L. Tettamanzi
Visto / Visa
G. Galli
Advertisement
Table of Contents

Related Manuals for Perry 1TXCRTX05


Summary of Contents for Perry 1TXCRTX05
- Page 1 2 8 FR/EN Attenzione: Codice distinta base inserimento delle istruzioni nella confezione del prodotto Part list code 1TXCRTX05 avviene su richiesta dell’ufficio export DETXNN014 Legenda / Caption legend AS Astuccio / Box ET Etichette Prodotto / Labels FI Foglio Istruzioni / Instruction manual...
-
Page 2: Table Of Contents
Pagina 2 di 53 FRANÇAIS INDEX AVERTISSEMENTS ..........pag. PROGRAMMATION DU CHRONOTHERMOSTAT .... pag. DONNÉES TECHNIQUES .......... pag. RÉGLAGES DES FONCTIONS SPÉCIALES ....pag. VUE GÉNÉRALE ET FONCTIONS DES TOUCHES ..pag. RÉGLAGES DES FONCTIONS D'UTILISATION ..... pag. LÉGENDE DE L'ÉCRAN ..........pag. MOT DE PASSE ............ -
Page 3: Avertissements
Pagina 3 di 53 AVERTISSEMENTS L'installation et le raccordement électrique du thermostat Utiliser uniquement des piles alcalines de 1,5 V type AA programmable ne doivent être effectués que par un électricien (LR6) ; l'utilisation de piles non conformes peut entraîner des qualifié... -
Page 4: Vue Générale Et Fonctions Des Touches
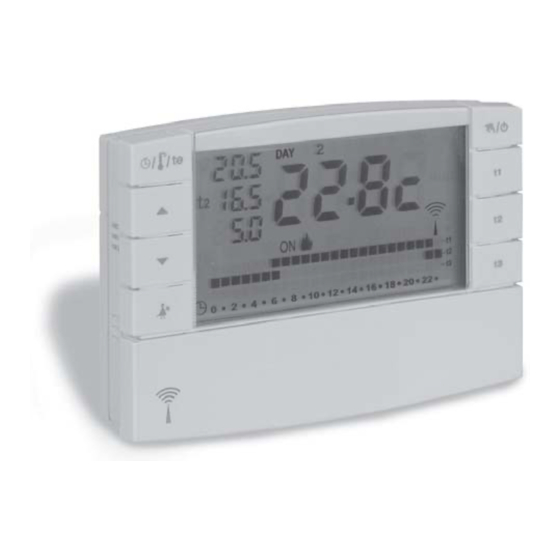
Pagina 4 di 53 2 - VUE GÉNÉRALE ET FONCTIONS DES TOUCHES D e s f o n c t i o n s p a r t i c u l i è r e s supplémentaires des touches sont décrites dans les paragraphes spécifiques d'utilisation. -
Page 5: Installation
Pagina 5 di 53 4 - INSTALLATION 4.1) DIMENSIONS D’ENCOMBREMENT 4.3) FIXATION DE LA BASE DANS UN MUR • Installer le chronothermostat à environ 1,5 ÷ 1,6 m de hauteur 10 12 14 16 18 20 22 h 1,5m 27,6 •... - Page 6 Pagina 6 di 53 4 - INSTALLATION 4.5) CONNEXION AU PROGRAMMATEUR TÉLÉPHONIQUE (en option) Sur les bornes et , il est possible de connecter un Ÿ Enclencher le chrono- programmateur téléphonique pour activer le thermostat sur la base chronothermostat à distance. murale en exerçant un légère pression jusqu'à...
- Page 7 Pagina 7 di 53 4 - INSTALLATION 4.8) COUPLAGE DU CHRONOTHERMOSTAT AVEC LE RÉCEPTEUR (auto-apprentissage) Pour effectuer cette opération, consulter attentivement le livret d'instructions du récepteur OPÉRATIONS PRÉPARATOIRES • Installer et alimenter le récepteur. • Programmer le chronothermostat comme indiqué dans le chapitre . 5 Cette fonction peut être protégée par un mot de passe (voir chapitre ).
-
Page 8: Programmation Du Chronothermostat
Pagina 8 di 53 5 - PROGRAMMATION DU CHRONOTHERMOSTAT Tous les réglages effectués doivent être confirmés en appuyant sur la touche , sinon, une fois passé 2 minutes, le chronothermostat revient au fonctionnement normal et les modifications ne seront pas conservées. Lors de l'insertion des piles ou après un reset général, l'écran affichera tous les segments allumés puis il se présentera comme sur la figure 1 avec les chiffres 10 12 14 16 18... - Page 9 Pagina 9 di 53 5 - PROGRAMMATION DU CHRONOTHERMOSTAT 5.2) PREMIER RÉGLAGE/MODIFICATION D'UN PROGRAMME HEBDOMADAIRE Les programmes disponibles sont 3 et ils sont tous librement programmables pour • chaque heure du jour sur trois niveaux différents de température ( confort, économie et absence) et de façon différente pour chaque jour de la semaine.
- Page 10 Pagina 10 di 53 5 - PROGRAMMATION DU CHRONOTHERMOSTAT • Après l'insertion de l'échelle thermique pour le Dimanche 7 ( ), appuyer sur (exemple sur la fig. 12) pour enregistrer et revenir sur l'affichage du Lundi (1) puis appuyer de nouveau sur la touche OK pendant 4 secondes (ex. sur la fig. 13) ; cette opération permettra d'enregistrer le programme hebdomadaire complet.
- Page 11 Pagina 11 di 53 5 - PROGRAMMATION DU CHRONOTHERMOSTAT 5.5) CHOIX DU PROGRAMME “HIVER ” OU “ÉTÉ ” • Les programmes P 01 P 02 sont destinés au fonctionnement “Hiver” affiché sur l'écran par le symbole (chauffage). Il faudra donc activer l'appareil branché (chaudière ou autre) comme dans l'exemple ci-dessous : Paramètre de température Chaudière en fonctionnement avec la température ambiante...
- Page 12 Pagina 12 di 53 5 - PROGRAMMATION DU CHRONOTHERMOSTAT 5.7) CHANGEMENT ANNÉE, MOIS, JOUR, HEURE ET MINUTES (EN COURS) • Appuyer sur la touche “ ” pendant environ 4 secondes jusqu'à ce que l'année ( ) clignote. - Modifier l'année (si besoin) en utilisant les touches (fig.
-
Page 13: Réglages Des Fonctions Spéciales
Pagina 13 di 53 5 - PROGRAMMATION DU CHRONOTHERMOSTAT 5.10) FONCTIONS D'ARRÊT DE L'ÉCRAN (STANDBY) POUR ÉCONOMISER LES PILES Voir paragraphe 7.9.5 5.11) RESET • Si vous désirez annuler les données activées, appuyer pendant (environ 2) sec. sur les touches PROG . - Page 14 Pagina 14 di 53 6 - RÉGLAGES DES FONCTIONS SPÉCIALES 6.1/b) DÉBLOCAGE DE LA LIMITE DE LA TEMPÉRATURE • Appuyer sur la touche du set de température que vous voulez débloquer ( le symbole sélectionné ( ) la valeur correspondant à côté et les digits au centre clignotent (exemple en fig.
- Page 15 Pagina 15 di 53 6 - RÉGLAGES DES FONCTIONS SPÉCIALES Exemple: - “SET” configurée : 20°C en modalité HIVER - Différentiel configuré : 0,3 °C 6.3) DIFFÉRENTIEL DE TEMPÉRATURE (ON/OFF) Le chronothermostat fonctionne (en usine) en mode différentiel ON/OFF avec comme valeur du différentiel thermique préfixée sur 0,3°C 20°...
- Page 16 Pagina 16 di 53 exemple sur la figure: 6 - RÉGLAGES DES FONCTIONS SPÉCIALES désactivation de la température Absence en modalité HIVER 6.5) EXCLUSION TOTALE DE LA TEMPÉRATURE t3 ABSENCE Cette fonction permet de désactiver la thermorégulation pendant les périodes de fonctionnement avec la température Absence configurée.
-
Page 17: Réglages Des Fonctions D'utilisation
Pagina 17 di 53 7 - RÉGLAGES DES FONCTIONS D'UTILISATION appuyer pendant 4 secondes 7.1/B) FONCTIONNEMENT MANUEL PERMANENT • Maintenir la touché “ ” appuyée (environ 4 sec.), le symbole “ ” devient fixe. Le niveau de température en cours est appliqué à toutes les heures du jour (ex. fig. 47). •... - Page 18 Pagina 18 di 53 7 - RÉGLAGES DES FONCTIONS D' U TILISATION • Avec les touches programmer l'heure à laquelle vous souhaitez activer le programme Holiday (laisser l'habitation) ; confirmer en appuyant sur la touche (fig. 53). Il est impossible de sélectionner une heure précédant l'heure en cours. 10 12 14 16 18 20 22 •...
- Page 19 Pagina 19 di 53 7 - RÉGLAGES DES FONCTIONS D'UTILISATION Pendant l'attente ou l'exécution du programme P04, il n'est pas possible d'exclure le chrono-thermostat « OFF » (voir le par. . ). Une fois que le compte à rebours du programme P04 Holiday est terminé, le chrono-thermostat adoptera la saison (hiver ou été) du programme sélectionné...
- Page 20 Pagina 20 di 53 7 - RÉGLAGES DES FONCTIONS D' U TILISATION 7.8) FONCTIONNEMENT AVEC PROGRAMMATEUR TÉLÉPHONIQUE Par ex. programmateur téléphonique Contact 10 12 14 16 18 20 22 10 12 14 16 18 20 22 Le programmateur téléphonique permet de commander à distance le chronothermostat, en fig.
- Page 21 Pagina 21 di 53 7 - RÉGLAGES DES FONCTIONS D' U TILISATION 7.9.3) AFFICHAGE NUMÉRO DE SÉRIE UTILISÉ POUR LA TRANSMISSION Sur la page-vidéo précédente (fig. 65) appuyer une autre fois sur la touche : le • numéro de série qui est transmis par le chronothermostat à chaque fois qu'une transmission de données a lieu s'affiche sur l'écran (exemple sur la fig.
-
Page 22: Mot De Passe
Pagina 22 di 53 8 - MOT DE PASSE 8.1) MOT DE PASSE Certaines fonctions peuvent être protégées par un mot de passe pour éviter de mauvaises configurations par du personnel non autorisé. Les fonctions protégées par mot de passe sont: •... -
Page 23: Fonction "Master
Pagina 23 di 53 9 - FONCTION “MASTER” 9.1) DESCRIPTION FONCTION MASTER La fonction “ Master ” permet de réaliser des installations multizones dans lesquelles en plus de la thermorégulation de chaque zone au moyen d'un thermostat ou d'un chronothermostat (via radio) associé, le chronothermostat peut, avec “Master”, effectuer la thermorégulation de toutes les zones couplées avec lui (selon les modes 10 12 14 16 18 20 22... - Page 24 Pagina 24 di 53 9 - FONCTION “MASTER” INSTRUCTIONS POUR L'INSTALLATEUR 9.3.1) COUPLAGE DES ZONES AUX “MASTER” (à effectuer après avoir réalisé les opérations de couplage des transmetteurs, voir par ex. le paragraphe 4.8) 10 12 14 16 18 20 22 Cette fonction peut être protégée par un mot de passe (voir chapitre ).
- Page 25 Pagina 25 di 53 9 - FONCTION “MASTER” INSTRUCTIONS D'UTILISATION POUR L'UTILISATEUR Désactivation de la fonction “Master”: • appuyer brièvement sur la touche “ Master ”; l'écriture Master disparaît sur l'écran: le chronothermostat reste en fonctionnement "manuel temporaire" et les zones 10 12 14 16 18 20 22 couplées au master retournent sous le contrôle de leurs transmetteurs respectifs...
- Page 26 Pagina 26 di 53 9 - FONCTION “MASTER” INSTRUCTIONS D'UTILISATION POUR L'UTILISATEUR 9.4.4) FONCTIONNEMENT AVEC PROGRAMMATEUR TÉLÉPHONIQUE (voir les détails au paragraphe Par ex. programmateur téléphonique Contact 10 12 14 16 18 20 22 En fermant le contact du programmateur téléphonique raccordé à un chronothermostat "MASTER" en fonctionnement: •...
- Page 27 Pagina 27 di 53 INDEX ENGLISH WARNINGS ............page 54 5 - CHRONOTHERMOSTAT PROGRAMMING ..page 64 1 - TECHNICAL SPECIFICATIONS ...... page 5 6 - SPECIAL FUNCTIONS SETTINGS ....page 75 2 - GENERAL VIEW AND KEY FUNCTIONS ..page 56 7 - USER FUNCTIONS SETTINGS......
- Page 28 Pagina 28 di 53 WARNINGS The installation and electrical connection of the only 1.5V type AA (LR6) alkaline batteries ; the use of programmable thermostat must be implemented only by a unsuitable batteries can cause malfunction and/or faulty qualified electrician and in conformity with current laws and viewing of the display.
- Page 29 Pagina 29 di 53 2 - GENERAL VIEW AND KEY FUNCTIONS More particular key functions are described in the specific paragraphs. Key combination to Reset (press simultaneously for 2 sec.) PROG Half-hour program (½ h) Key for viewing the current time or room temperature Key to confirm the operation - display of the current outdoor temperature only for models with this option...
- Page 30 Pagina 30 di 53 4 - INSTALLATION 4.1) OVERALL DIMENSIONS 4.3) FASTENING THE WALL-MOUNTED BASE Install the chronothermostat at approx. 1.5 ÷ 1.6 m. • 10 12 14 16 18 20 22 PROG Test Master h 1,5m 27,6 • Fasten to the wall, to the rounded or rectangular recessed box, via the relative paired holes “...
- Page 31 Pagina 31 di 53 4 - INSTALLATION 4.5) CONNECTION TO TELEPHONE PROGRAMMER (optional) To terminals it is possible to connect the telephone Ÿ programmer to activate the chronothermostat from a distance. Fasten the chronothermostat onto the wall-mounted base, pressing lightly until you hear the fastening teeth click into 3 2 1 place onto the base.
- Page 32 Pagina 32 di 53 4 - INSTALLATION 4.8) COUPLING THE CHRONOTHERMOSTAT TO THE RECEIVER (self-learning) For this operation, carefully consult the receiver instructions PRELIMINARY OPERATIONS • Install and power the receiver. • Program the chronothermostat as indicated in chapter . 5 This function can be protected by a password (see chapter ).
- Page 33 Pagina 33 di 53 5 - CHRONOTHERMOSTAT PROGRAMMING All settings must be confirmed by pressing , otherwise the chronothermostat returns to the previous settings after 3 minutes and any changes made will not be saved. Upon inserting the batteries or following a general reset, all sections that are on will appear on the display, after which, the blinking digits relative to the year will appear, 10 12 14 16 18 20 22...
- Page 34 Pagina 34 di 53 5 - CHRONOTHERMOSTAT PROGRAMMING 5.2) FIRST WEEKLY PROGRAM SETTING/CHANGING • 3 programs can be freely programmed to your needs for each hour of the day on three different temperature levels ( comfort, economy and absence) and differently for each day of the week.
- Page 35 Pagina 35 di 53 5 - CHRONOTHERMOSTAT PROGRAMMING • Once the temperature profile is set for Sunday 7 ( ), press (example in fig. 12) to save and return to Monday's (1) settings, then press the OK key again for 4 seconds (example in fig.
- Page 36 Pagina 36 di 53 5 - CHRONOTHERMOSTAT PROGRAMMING 5.5) SELECTING THE PROGRAM “WINTER ” OR “SUMMER ” • Programs P 01 P 02 are intended for "Winter" operation and are shown on the display by the symbol (heating). In these conditions the connected device (boiler or other) will be activated as described in the example: Temperature setting Boiler operation with the room temperature...
- Page 37 Pagina 37 di 53 5 - CHRONOTHERMOSTAT PROGRAMMING 5.7) CHANGING YEAR, MONTH, DAY, HOUR AND MINUTES (CURRENT) • Keep key “ ” pressed for approx. 4 seconds until the year ( ) blinks on the display. - Use the keys to change the year (if necessary)(fig. 22). Pressing repeatedly increases or decreases the time by one year and keeping the key pressed 10 12 14 16 18 20 22...
- Page 38 Pagina 38 di 53 5 - CHRONOTHERMOSTAT PROGRAMMING 5.10) DISPLAY OFF (STANDBY) FUNCTIONS FOR BATTERY SAVINGS Refer to paragraph 7.9.5. 5.11) RESET • To clear unwanted data, press keys PROG (approximately 2 seconds). All sections that are on will appear on the display (general autotest) (fig. 27/28). •...
- Page 39 Pagina 39 di 53 6 - SPECIAL FUNCTIONS SETTINGS 6.1/b) UNBLOCKING THE TEMPERATURE LIMITS • Press the set temperature key to be unblocked ( ). The selected symbol ( t2), the relative value to the side and the central digits will blink (example in fig. 32). •...
- Page 40 Pagina 40 di 53 6 - SPECIAL FUNCTIONS SETTINGS Example: - set “SET”: 20°C in WINTER mode - Set differential 0.3 6.3) TEMPERATURE DIFFERENTIAL (ON/OFF) °C The chronothermostat is set (in factory) to work Differential mode ON/OFF with a preset differential value of 0.3°C 20°...
- Page 41 Pagina 41 di 53 6 - SPECIAL FUNCTIONS SETTINGS example in figures: Absence temperature disabled in WINTER mode 6.5) TOTAL DISCONNECTION OF THE t3 ABSENCE TEMPERATURE This function allows temperature control to be deactivated when operating with Absence temperature selected This function can be protected by a password (see chapter ).
- Page 42 Pagina 42 di 53 7 - USER FUNCTIONS SETTINGS press for 4 seconds 7.1/B) PERMANENT MANUAL OPERATION • Keep key “ ” pressed (approx 4 sec.); the symbol “ ” will become fixed. The current temperature level will be applied to all hours of the day (e.g. fig. 47). •During manual operation, it is possible to set the desired temperature level by pressing keys , t1 t2...
- Page 43 Pagina 43 di 53 7 - USER FUNCTIONS SETTINGS • Using the keys, set the hour in which you want to activate the Holiday program (leave home). Confirm with (fig. 53). It is not possible to select an hour prior to the current one. 10 12 14 16 18 20 22 •...
- Page 44 Pagina 44 di 53 7 - USER FUNCTIONS SETTINGS While waiting or running the P04 program, you cannot exclude the chronothermostat "OFF" (see para. 7.7). Once the countdown of the P04 Holiday program ends, the chronothermostat will adopt the season (winter or summer) of the previously selected program.
- Page 45 Pagina 45 di 53 7 - USER FUNCTIONS SETTINGS 7.8) TELEPHONE PROGRAMMER OPERATION e.g. telephone programmer Contact 10 12 14 16 18 20 22 10 12 14 16 18 20 22 The telephone programmer allows you to control the chronothermostat from a fig.
- Page 46 Pagina 46 di 53 7 - USER FUNCTIONS SETTINGS 7.9.3) DISPLAY OF SERIAL NUMBER USED FOR TRANSMISSION • From the previous screen (fig. 65), press again: the display will show a serial number, which is transmitted by the chronothermostat each time data transmission is carried out (example in fig.
- Page 47 Pagina 47 di 53 8 - PASSWORD 8.1) PASSWORD Some functions can be protected by a password to avoid incorrect settings being entered by unauthorised personnel. Functions protected by a password are: • Coupling the chronothermostat to the receiver (paragraph 4.8) •...
- Page 48 Pagina 48 di 53 9 - “MASTER” FUNCTION 9.1) DESCRIPTION MASTER FUNCTION “Master” function allows you to create multi-zone installations in which, in addition to temperature control in each zone by means of a coupled thermostat or chronothermostat (via radio), the chronothermostat with “Master” can override other devices and control the temperature of all zones assigned to it (in accordance with the 10 12 14 16 18 20 22...
- Page 49 Pagina 49 di 53 9 - “MASTER” FUNCTION INSTRUCTIONS FOR THE INSTALLER 9.3.1) ASSIGNMENT OF ZONES TO THE "MASTERS” (to be performed after matching transmitters, see for example paragraph 4.8). 10 12 14 16 18 20 22 This function can be protected by a password (see chapter ). To assign "Master"...
- Page 50 Pagina 50 di 53 9 - “MASTER” FUNCTION INSTRUCTIONS FOR THE USER Deactivating the "Master" function: • briefly press the “Master” key; the message Master will disappear from the screen: the chronothermostat stays in "temporary manual" operation and the 10 12 14 16 18 20 22 zones assigned to the master will return under the control of their transmitters (example in fig.
- Page 51 Pagina 51 di 53 9 - “MASTER” FUNCTION INSTRUCTIONS FOR THE USER 9.4.4) MASTER OPERATION WITH THE TELEPHONE PROGRAMMER (see also paragraph e.g. telephone programmer Contact 10 12 14 16 18 20 22 When the telephone programmer contact connected to a "MASTER" chronothermostat in operation is closed: •...
- Page 52 Pagina 52 di 53...
- Page 53 Pagina 53 di 53 DÉCLARATION DE CONFORMITÉ UE SIMPLIFIÉE Le fabricant déclare que le type d’équipement radio indiqué ci-dessous est conforme à la Directive 2014/53 / UE (RED). Le texte intégral de la déclaration de conformité est disponible sur Internet à l’adresse indiquée ci-dessous. EU SIMPLIFIED CONFORMITY DECLARATION The manufacturer declares that the type of radio equipment listed below complies with Directive 2014/53/EU (RED).
Need help?
Do you have a question about the 1TXCRTX05 and is the answer not in the manual?
Questions and answers