Lennox M0STAT60Q-1 Operation Instructions Manual
Lennox mini-split systems wireless indoor unit controller
Hide thumbs
Also See for M0STAT60Q-1:
- Operation instructions manual (10 pages) ,
- Installation & user's instructions (20 pages)
Table of Contents
Advertisement
©2019 Lennox Industries Inc.
Dallas, Texas, USA
OPERATION
INSTRUCTIONS
Lennox Mini-Split Systems
Wireless Indoor Unit
Controller
(M0STAT60Q-1)
CONTROLS
507560-03
5/2019
Supersedes 8/2018
This manual must be left with the
owner for future reference.
Shipping and Packing List
Package 1 of 1 contains;
1 – Wireless Controller
2 – AAA batteries
1 – Remote controller holder with
mounting screw
IMPORTANT!
Frequent changes to operating mode
may
cause
Allow at least one minute between
mode changes to allow the system to
stabilize.
system
malfunction.
Advertisement
Table of Contents

Related Manuals for Lennox M0STAT60Q-1


Summary of Contents for Lennox M0STAT60Q-1
- Page 1 OPERATION INSTRUCTIONS Lennox Mini-Split Systems ©2019 Lennox Industries Inc. Wireless Indoor Unit Dallas, Texas, USA Controller (M0STAT60Q-1) CONTROLS 507560-03 5/2019 Supersedes 8/2018 This manual must be left with the owner for future reference. Shipping and Packing List Package 1 of 1 contains;...
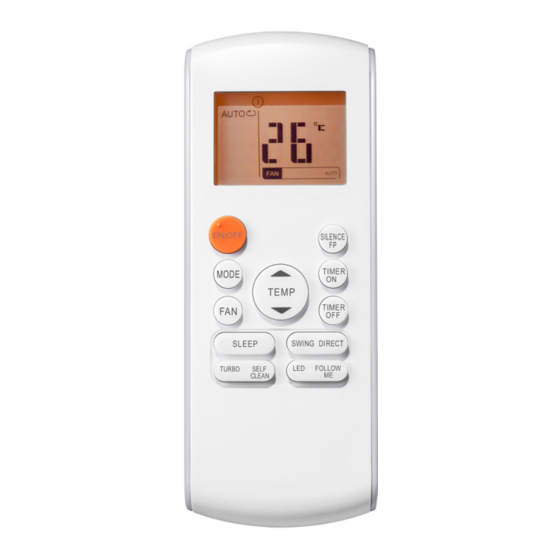
- Page 2 • Ensure that the remote controller is General pointed directly at the indoor unit. If the remote controller is pointed directly The M0STAT60Q-1 mini-split wireless toward the ceiling, it will not control controller is a wireless local controller for the indoor unit (except cassette units Lennox mini-split indoor units.
- Page 3 • Sleep button. Press to activate “night-mode”. This will automatically increase (cooling) decrease (heating) the setpoint 2°F (1°C) per hour for the first two hours. The modified setpoint will be set for five hours. After seven total hours the indoor unit will shut-off. The system will remain off until the “On”...
- Page 4 units with display). Press the button NOTE: Quiet mode operation may again to turn off the display. result in insufficient cooling or heating capacity. Press and • Follow Me button. Press to activate release the Silence button the wireless remote’s air temperature again to stop quiet mode sensor.
- Page 5 • . Display Timer ON Timer OFF Remote Controller ON Transmitting Signal Display Not Used Battery Charge Status Night Mode Operation Modes Follow Me Not Used Fan Speed Not Used Set Point or Room Temperature • Remote controller On. Icon displays •...
- Page 6 • Operation mode. These icons Operation Instructions show the current mode of operation. Press the mode button to scroll Batteries through operation modes: 1. Remove battery cover from back of Auto → Cool → Dry → Heat → Fan. remote. •...
- Page 7 NOTE: The use of Auto mode for multi- WARNING zone units is not recommend. All zones should be in the same mode of operation to Do not mix old and new batteries or ensure there is not a conflict batteries of different types. error mode.
- Page 8 3. Adjust temperature setpoint using Timer ON Operation up and down arrow buttons (range 1. Press the Timer ON button. The 62°F – 86°F). Timer ON icon, the last auto-on time, and “h” will display. NOTE: Fan speed is auto and is not adjustable.
- Page 9 Troubleshooting Fault Codes (indoor unit) Indoor unit EEPROM error Communication error between indoor unit and outdoor unit Indoor fan speed error Indoor return air temperature sensor error Indoor coil temperature sensor error Low refrigerant High water level alarm Outdoor current overload sensed Outdoor ambient temperature sensor error Outdoor coil temperature sensor error Compressor discharge temperature sensor error...
- Page 10 FCC Compliance Statement — PART 15.19 This device complies with Part 15 of the FCC Rules. Operation is subject to the following two conditions: This device may not cause harmful interference, and This device must accept any interference received, including interference that cause...
Need help?
Do you have a question about the M0STAT60Q-1 and is the answer not in the manual?
Questions and answers