Advertisement
Quick Links
Advertisement

Related Manuals for RC Lander T-33

Summary of Contents for RC Lander T-33
- Page 1 RCLander T-33 OPERATIONAL MANUAL...
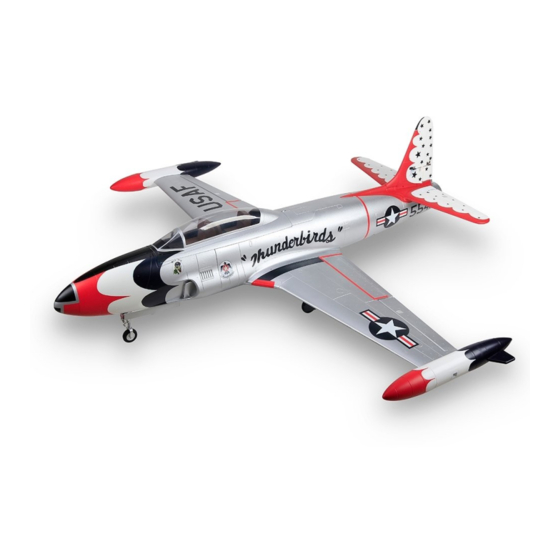
- Page 2 Please read before operating this system! e would like thank you for purchasing our new product T-33, designed for the hobby enthusiast. Based on its full - scale counterpart, this USA Jet can undertake loops, inverted flight, rolls and other aerobatics easily. It is a highly maneuverable model aimed at the intermediate to expert pilot.
-
Page 3: Specifications
Specifications: Wing Span : 1683mm Length: 1520mm AUW: 3.7kg EDF(Lander Metal DPS EDF): 90mm Power: 9S 4500mAh 25C or above Thrust: Up to 3.96kg Function: Flaps system-included Metal Electric retract & scale suspension struts included Gear doors system & Air-Brake (Option) ESC: 100A or above EDF SYSTEM... - Page 4 Main Fuselage Front Lower Fuselage Both side of Inlet Parts Inside Ducting plate Parts Upper Rear Fuselage Lower Rear Fuselage Both Side Main Wing Set Horizontal Stabilizer Vertical Stabilizer Canopy 90 & 120 EDF Bay Parts Both Side Fuel Tanks - 4 -...
- Page 5 Bombs& Missiles Parts PVC Wheel Cups parts PVC Gear Doors Parts PVC Air-Brake Set Plywood Block Set Remarks: 1) Operational Manual (included) 2) Extension cord x 7pcs & Y cord x 6pcs (included) except ARF version 3) Push rods for Elevator, Rudder, Aileron, Flaps, Air-Brake & Front Steering (included) 5) One plastic bag includes screws, Control Horns, Linkage Stoppers &...
-
Page 6: Assembling The Aircraft
Assembling the aircraft. For color images please go to www.rclander.com download. 1) Take one extension cord to connect the nose electric retract first. 2) The nose electric retract has been pre-installed by factory before shipment. 1)Suggest to find one piece 70-130mm anti-slip foam plate (not included) for the battery compartment. - Page 7 1) Use your Radio to gear down the nose gear first for preparation to glue up the front lower fuselage on the main fuselage. 1) Take enough epoxy to glue up the lower front fuselage on the main fuselage. 1) After finished the fixing of lower front fuselage, keep on the install the inside ducting plate.
- Page 8 1)According to the inside slot of main fuselage to take some epoxy to glue up the inside ducting plate set on the right position. 1) After glued up the inside ducting plate, pls cut out the cross foam bar as shown. 1) Prepare to install both side inlet parts on the main fuselage - 8 -...
- Page 9 1) Inside the main fuselage is already pre set some slot for fitting both of two side inlet parts. 2) Kindly use the enough the epoxy and work carefully to install the inlet parts one by one as shown. It is because glue up area so longer.
- Page 10 1) Make sure the guiding inlet plate to be able fitted on the right position before glue up. Pls be reminded the shorter side is out & longer side is in side. 2) The installing method is put it from inside to outside.
- Page 11 1) Pls use the cutter to open a small hole on the slot of the horizontal stabilizer for pass through rudder servo cable. 1) Pre-check the vertical stabilizer to be able well on the horizontal stabilizer slot before glue up action. 1) Use some epoxy to glue up the vertical stabilizer on the horizontal stabilizer.
- Page 12 1) Pre-check the whole set stabilizer can be well on the upper rear main fuselage and the rudder servo cable well pass through before glue up action. 1) Everything is correct then takes some epoxy to glue up as shown. 1) Prepare to install the main wing.
- Page 13 1) Gear down both side main gear first. 2) Glue up on side pre-cut wooden plate (shorter one) on one side maid wing (bottom) slot as shown. 1) Take enough epoxy to glue up both side main wings together. 2) Recommend to take some epoxy to fit up the gap or at lease on the upper of both of wooden plates for reinforcement purpose.
- Page 14 1) Install the Aileron & Flaps servos on the main wing servos bay and use the extension cables to extend the cable pass through into the main fuselage. 2) Pls be reminded that the joiner position of extension must be fully put into the cable slot by cut out some foam for gaining the space if necessary.
- Page 15 1) Pre check the related wooden plate to be able on the right position or not before glue 1) Take some epoxy to glue up the wooden plate on the main fuselage as shown. 1) Take some epoxy or hot melt glue to fit on the steering servo on the main fuselage and link up the related push rod as shown.
- Page 16 1) Prepare to install the upper rear fuselage to the main fuselage. Pls be reminded to check up the four reinforcement carbon tube able connect the right position on the main fuselage and make sue whole set stabilizer on the right angle before glue up.
- Page 17 1) Make sure the related extension cable on the right position then prepare to install the lower rear fuselage on the main fuselage. 1) Use some epoxy to glue up the lower rear fuselage on the main fuselage. Pls be reminded that the main rear edge wing bind nut wooden plate was pre-installed by factory.
- Page 18 1) Take the metal edf mount (included with the kit) to lock up the EDF set on the bay and lock up the ESC on the wooden plate as shown. 2) Pls be reminded to check the EDF set space is fully enough installed your EDF set (specially other brand name edf set).
- Page 19 1) Install the other side elevator & rudder control horns and link up the push rods with servos. 1) Install both side main wings control horns of Aileron & flaps and link up the push rods with servos. Then cover the related servos by provided pvc pre-painted servos sheet.
- Page 20 1) Pass through all related cables from main wing into the main fuselage RX compartment before lock up the main wing on the fuselage. 1) Use the provided 4mm screws & wooded plates and washers to lock up the main wing on the fuselage as shown.
- Page 21 1) Take some epoxy on the both side fuel tank pre set slot and put on both side main wing. Pls be reminded to make sure both side fuel tanks to be able fully insert on the main wing as shown. 1) Depend your request to install bombs &...
- Page 22 1) Competed canopy set. 1) Pls take the provided pre-cut pvc sheet to cover RX compartment closed to rear in order to reduce the air flow come from the front fuselage in order to let the nose gear door system well perform during the flight.
- Page 23 - 23 -...
- Page 24 Flight: To keep T-33 flying only need 50% of the maximum power, it is a good idea to fly with power for a while and glide for a while. In this way you can prolong the maximum flight time and familiarize yourself with landing approaches.
Need help?
Do you have a question about the T-33 and is the answer not in the manual?
Questions and answers