Table of Contents
Advertisement
Quick Links
Advertisement
Table of Contents

Subscribe to Our Youtube Channel
Related Manuals for Dashmate DSH-452


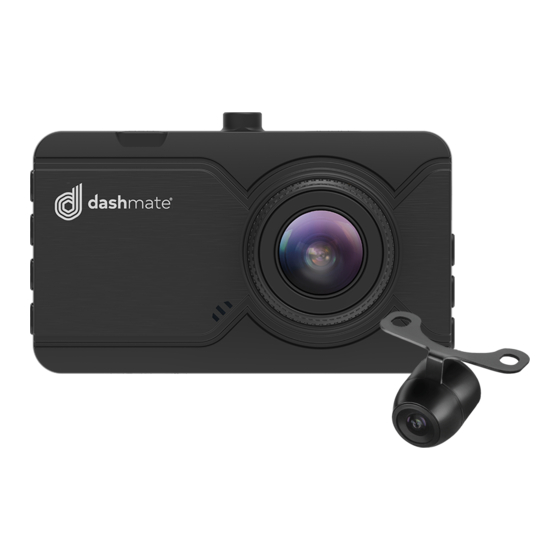
Summary of Contents for Dashmate DSH-452
-
Page 3: Table Of Contents
GETTING STARTED ......................11 Inserting a Micro SD Card ...................11 Removing a Micro SD Card ..................12 Installing the DSH-452 ....................13 Adjusting the Angle of the DSH-452 ................ 14 Installing the Rear Camera ..................14 3.5.1 Installation Guide ................... 14 3.5.2... - Page 4 3.5.3 Rear Camera Features ................. 17 Connecting to Power ....................18 LED Indicator ........................ 19 POWERING THE DSH-452 ON/OFF ................19 Auto Power On/Off ..................... 19 Manual Power On ......................19 Manual Power Off ...................... 20 Reset the Car DVR ...................... 20 INITIAL SETTINGS ......................
- Page 5 VIDEO MENU ........................25 10.0 PICTURE MODE ........................29 11.0 PLAYBACK ........................30 12.0 WARRANTY TERMS & CONDITIONS ................31 13.0 NOTES ..........................39...
-
Page 6: Caution
CAUTION • Ensure you are using your Car Dash Cam within your countries’ road laws. Please make sure you are familiar with your local road legislation before use. • Avoid leaving your Dash Cam in direct sunlight for extended periods of time in an unventilated space. -
Page 7: Battery Warning
BATTERY WARNING Always charge the Car Dash Cam using the provided charger. Improper charging of the Car Dash Cam and may result in failure of the internal battery. Never dismantle the Car Dash Cam or expose the internal battery. Do not dispose of the Car Dash Cam in fire. Dispose of the Car Dash Cam observing local regulations being mindful of the internal battery. - Page 9 Thank you for purchasing a Dashmate Dash Cam. Please read through instructions before attempting to install or use this product. This user guide is designed to assist with the day to day operation of the DSH-452. Before attempting to use or install your Dashmate DSH-452, please ensure you have read and understood all of the safety notes below.
-
Page 10: Package Contents
• Ensure you are using your DSH-452 within your countries’ road laws. Please make sure you are familiar with your local road legislation before use. -
Page 12: Button Functions
BUTTON FUNCTIONS MODE BUTTON When Device is not recording, press the M button to switch between Video Mode / Photo Mode / Play Back mode. OK BUTTON Press the OK Button to start/stop video recording in Video mode. Press the OK Button to take photo in Camera mode. Press the OK Button to play/pause current video on playback mode. -
Page 13: Getting Started
With the Car DVR turned off and the screen facing towards you insert your Micro SD Card (not included) in the slot on the right side of the DSH-452 with the text on the Micro SD card away from you. Push the memory card in until a click is heard. -
Page 19: 3.5.3 Rear Camera Features
3.5.3 REAR CAMERA FEATURES After successfully installing and connecting the rear camera into the main DVR, the rear camera will be displayed on the Dash Cam's 3.0" IPS Screen. Both Cameras will instantaneously start recording after the DVR is powered ON. Both Front and Rear Camera images will now be displayed on your Dash Camera's 3.0"... -
Page 21: Led Indicator
• Flashing blue light indicates recording is in progress. • Continuous red light indicates the internal battery is charging. POWERING THE DSH-452 ON/OFF AUTO POWER ON/OFF When the Car DVR is correctly installed and connected to your vehicle’s 12v power supply, the Car DVR will automatically power up and start recording when the vehicle accessories are activated. -
Page 22: Manual Power Off
MANUAL POWER OFF Make sure that recording has been stopped and then press the Power button on the lower right hand side of the car DVR. After powering down the device please wait for 10 seconds before turning the Car DVR back on. RESET THE CAR DVR If the Car DVR does not function normally, try restarting the car DVR. -
Page 26: Setup Menu
Park Mode: The highlighted bar indicates the sensitivity of Park mode with 1 Bar indicating Low Sensitivity. G-Sensor: The highlighted bar indicates the sensitivity of G-Sensor with 1 Bar indicating Low Sensitivity. 8. Microphone: Turns the Microphone on or off. Micro SD Card: Indicates inserted SD Card. -
Page 33: 12.0 Warranty Terms & Conditions
12.0 WARRANTY TERMS & CONDITIONS Our goods come with guarantees that cannot be excluded under the Australian & New Zealand Consumer Law. You are entitled to a replacement or refund for a major failure and for compensation for any other reasonably foreseeable loss or damage. - Page 34 The retailer will contact you when the product is ready for collection. All costs involved in claiming this warranty, including the cost of the retailer sending the product to Directed Electronics, will be borne by you. Email: service@dashmate.com.au...
- Page 35 WARRANTY AND WARRANTY DISCLAIMER DASHMATE HAS A LIMITED WARRANTY ON WHEREBY DASHMATE WARRANTS TO AND ONLY TO YOU THAT THE ON DASHMATE VEHICLE DASH CAMERAS, MIRROR DASH CAMERAS, FRONT, REAR AND REVERSING CAMERAS AND MIRROR MONITOR DEVICES WILL BE FREE FROM DEFECTS IN MATERIALS...
- Page 36 SERVICES ARE PROVIDED ON AN "AS IS" AND "AS AVAILABLE" BASIS. DASHMATE MAKES NO WARRANTY THAT THE DASHMATE SERVICES WILL MEET YOUR REQUIREMENTS OR THAT USE OF THE DASHMATE SERVICES WILL BE UNINTERRUPTED, TIMELY, SECURE OR ERROR-FREE NOR DOES DASHMATE...
- Page 37 YOU OR ANYONE ELSE. YOU RELEASE AND WAIVE FOR YOURSELF AND YOUR INSURER ALL SUBROGATION AND OTHER RIGHTS TO RECOVER AGAINST DASHMATE ARISING AS A RESULT OF THE PAYMENT OF ANY CLAIM FOR LOSS, DAMAGE OR INJURY. DASHMATE’S EQUIPMENT AND SERVICES DO NOT CAUSE AND CANNOT...
- Page 38 OR NONINFRINGEMENT OF THIRD PARTY RIGHTS. BECAUSE SOME JURISDICTIONS DO NOT PERMIT THE EXCLUSION OF IMPLIED WARRANTIES, THE LAST SENTENCE OF THIS SECTION MAY NOT APPLY TO YOU. DASHMATE HEREBY FURTHER EXPRESSLY DISCLAIMS ALL LIABILITY FOR ANY CLAIMS FOR SERVICE FAILURES THAT ARE DUE TO NORMAL PRODUCT WEAR, PRODUCT...
- Page 39 BE EXCLUDED. LIMITATIONS OF DASHMATE LIABILITY UNDER NO CIRCUMSTANCES WILL DASHMATE BE LIABLE IN ANY WAY FOR ANY CONTENT, INCLUDING, BUT NOT LIMITED TO, THE LOSS OF CONTENT, ANY ERRORS OR OMISSIONS IN ANY CONTENT, OR ANY LOSS OR DAMAGE OF...
- Page 40 THE PRECEDING PRECLUSION AND LIMITATION OF LIABILITY WILL ALSO NOT APPLY TO CLAIMS FOR DAMAGES ARISING OUT OF LOSS OF LIFE, BODILY INJURY OR HEALTH IMPACTS FOR WHICH DASHMATE MAY BE LIABLE, OR FOR NON-CONTRACTUAL LIABILITY. SOME STATES AND COUNTRIES DO NOT ALLOW THE EXCLUSION OR LIMITATION OF INCIDENTAL OR CONSEQUENTIAL DAMAGES, SO THE ABOVE LIMITATION OR EXCLUSION MAY NOT APPLY TO YOU.
-
Page 41: 13.0 Notes
13.0 NOTES...
Need help?
Do you have a question about the DSH-452 and is the answer not in the manual?
Questions and answers