
Subscribe to Our Youtube Channel
Related Manuals for ASROCK athena A2 Kit


Summary of Contents for ASROCK athena A2 Kit
- Page 1 A2 Kit User Manual Version 1.0 Published August 2020 Copyright©2020 ASRock INC. All rights reserved.
- Page 2 (including damages for loss of profits, loss of business, loss of data, interruption of business and the like), even if ASRock has been advised of the possibility of such damages arising from any defect or error in the documentation or product.
- Page 3 ® The terms HDMI and HDMI High-Definition Multimedia Interface, and the HDMI logo are trademarks or registered trademarks of HDMI Licensing LLC in the United States and other countries. CAUTION: RISK OF EXPLOSION IF BATTERY IS REPLACED BY AN INCORRECT TYPE. DISPOSE OF USED BATTERIES ACCORDING TO THE INSTRUCTIONS.
-
Page 4: Table Of Contents
Contents Chapter 1 Introduction Package Contents Specifications Motherboard Layout I/O Panel Expansion Slots (M.2 Slots) Jumper Setup Onboard Headers and Connectors Power and Reset Switch Chapter 2 Installation Hardware Setup Installing the Heatsink FAN Connecting with the SATA Power and SATA Data Cables Chapter 3 Software Settings Settings for the Ubuntu operating system IP Camera Settings... -
Page 5: Chapter 1 Introduction
A2 Kit Chapter 1 Introduction Thank you for purchasing ASRock Industrial athena A2 Kit, a reliable motherboard produced under ASRock INC. ’ s consistently stringent quality control. It delivers excellent performance with robust design conforming to ASRock INC. ’ s commitment to quality and endurance. -
Page 6: Specifications
1.2 Specifications athena A2 Form Factor Dimensions 6.5-in x 3.8-in Processor System Intel® Atom Apollo Lake J3455 processor Chipset BIOS AMI SPI 128 Mbit Memory Technology Onboard LPDDR4 2400 MHz Capacity 4 GB, up to 8GB Graphics Controller SoC integrated graphics HDMI HDMI 1.4b Max resolution up to 3840x2160@30Hz... - Page 7 A2 Kit eMMC Onboard eMMC 32GB Watchdog Timer Output From Super I/O to drag RESETCON# Interval 256 Segments, 0, 1, 2, ...255sec Power Requirements Input PWR 12V DC-In (DC Jack) PoE (PD) with 25.5W (LAN Port) (Optional) Power On...
-
Page 8: Motherboard Layout
1.3 Motherboard Layout USB2_2_3 BAT1 SATA_PWR1 FAN1 LPC1 PANEL1 USB2_4_5 BIOS SATA3_1 CLRMOS1 PWR_JP1 CAM_PWR1 HDMI1 USB 3.2 Gen1 T: USB3_1 B: USB3_0 ETH_PWR1 PWR_BTN1 RESET1 DC_JACK1... - Page 9 A2 Kit Description USB2.0 Connector (USB2_2_3) 40-pin General Purpose Bus Connector (PI1) FAN Connector (FAN1) Battery Connector (BAT1) LPC Debug Header (LPC1) System Panel Header (PANEL1) Power Button (PWR_BTN1) Reset Button (RESET1) IP Camera Power Connector (CAM_PWR1) ATX/AT Mode Jumper (PWR_JP1)
- Page 10 Back Side NUT1 M2_E1 NUT6 M2_M1 NUT_B2 NUT_B1 SIM1 M2_B1 Description M.2 Socket (Key E, Type 2230) M.2 Socket (Key M, Type 2280) M.2 Socket (Key B, Type 3042 / 3052) micro SIM Socket (SIM1)
-
Page 11: I/O Panel
A2 Kit 1.4 I/O Panel No. Description No. Description RJ-45 LAN (PoE, PD 25.5W, Micro SD Card Slot (SD1) Optional) (ETH_PWR1) HDMI 1.4b (HDMI1) 12V DC-in (DC_JACK1) USB 3.2 Gen1 Connector (USB3_0_1) -
Page 12: Expansion Slots (M.2 Slots)
1.5 Expansion Slots (M.2 Slots) There are 2 M.2 slots on this motherboard. M.2 for SSD: Key B (M2_B1) (3042 / 3052) PCIe x1 and USB 3.2 Gen1 and USB 2.0. M.2 for SSD: Key M (M2_M1) (2280) PCIe x2. M.2 for Wi-Fi: Key E (M2_E1) (2230) supports with PCIe x1 and USB 2.0 for Wireless. -
Page 13: Jumper Setup
A2 Kit 1.6 Jumper Setup The illustration shows how jumpers are setup. When the jumper cap is placed on the pins, the jumper is “Short”. If no jumper cap is placed on the pins, the jumper is “Open”. The illustration shows a 3-pin jumper whose pin1 and pin2 are “Short”... -
Page 14: Onboard Headers And Connectors
1.7 Onboard Headers and Connectors Onboard headers and connectors are NOT jumpers. Do NOT place jumper caps over these headers and connectors. Placing jumper caps over the headers and connectors will cause permanent damage to the motherboard. System Panel Header Connect the power (9-pin PANEL1) switch, reset switch and... - Page 15 A2 Kit LPC Debug Header This connector supports a (19-pin LPC1) Trusted Platform Module (see p.4, No. 5) system, which can securely store keys, digital certificates, passwords, and data. A TPM system also helps enhance network security, protects digital identities, and ensures platform integrity.
- Page 16 SATA Power Output Please connect a SATA +12V Connector (SATA_PWR1) power (4-pin SATA_PWR1) cable to this connector. (see p.4, No. 15) USB 2.0 Headers There are two USB USB_PWR (9-pin USB3_4) 2.0 headers on this DUMMY (see p.4, No. 21) motherboard.Each USB (9-pin USB5_6) 2.0 header can support...
-
Page 17: Power And Reset Switch
A2 Kit 1.8 Power and Reset Switch Power Button Press the Power button to turn (PWR_BTN1) on the deivce. Press it again to (see p.4, No. 7) turn if off. Reset Button Press the Reset button to (RESET1) repower on the device. -
Page 18: Chapter 2 Installation
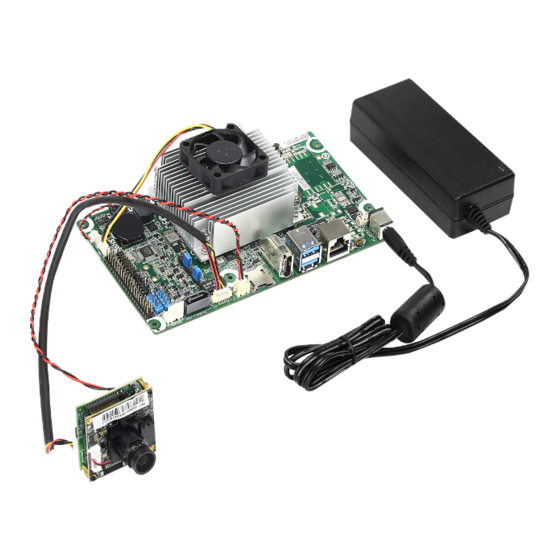
Chapter 2 Installation 2.1 Hardware Setup 1. Take the athena A2 Kit out of the box. 2. Flip the athena A2 motherboard and IP camera over. - Page 19 A2 Kit 3. Install four standoffs. 4. Plug the power cord into the athena A2 motherboard and into the electrical outlet. Connect the cables to the IP Camera. IP Camera address:192.168.1.200 Black Black...
- Page 20 5. Carefully place the athena A2 Kit into the box. 6. Press the power button.
-
Page 21: Installing The Heatsink Fan
A2 Kit 2.2 Installing the Heatsink FAN 1. Locate the FAN on the heatsink and use screws to secure the FAN to the heatsink. 2. Connect the FAN cable to the FAN connector (FAN1) on the athena A2 motherboard. -
Page 22: Connecting With The Sata Power And Sata Data Cables
2.3 Connecting with the SATA Power and SATA Data Cables 1. Insert the one ends of the provided SATA power and SATA Data cables into the connectors on the athena A2 motherboard. 2. Connect the other ends to a hard disk drive. -
Page 23: Chapter 3 Software Settings
Chapter 3 Software Settings 3.1 Settings for the Ubuntu operating system When your athena A2 Kit is ready and turned on for the first time, you need to set up the system configuration. 1. Select your language and click "Continue". - Page 24 3. Select your keyboard layout and click "Continue". 4. Create your account. Enter all required information and click "Continue".
- Page 25 A2 Kit 5. System will be ready for a few minutes. 6. Log in the system with the password you've set in Step 4.
-
Page 26: Ip Camera Settings
3.2 IP Camera Settings You can go to the IP Camera setting page for more configurations on the system, network, A/V setting, event and others. 1. Open your web browser, such as Firefox, type web browser 192.168.1.200 in the address bar, and then press "Enter". 2. - Page 27 A2 Kit 4. For example, if you want to adjust the video quality, select the "Video Setting" tab on the left panel, and then you can configure the Resolution, Video Frame Rate or other options. Click "Apply" to save the settings.
-
Page 28: Openvino™ Toolkit
3.3 OpenVINO™ Toolkit Before you use the athena A2 Kit with the Intel® OpenVINO Toolkit, make usre you have properly installed the Intel® Movidius Myriad X. 1. Go to search bar and search for "Terminal". 2. Double-click on the Terminal icon. - Page 29 A2 Kit 3. Enter the OpenVINO sample code command. Scan the QR Code below to go to the OpenVINO™ Toolkit official website to download the configuration guide for the Intel Distribution of Open- VINO™ Toolkit for Linux. Website: https://docs.openvinotoolkit.org/latest/_docs_install_guides_installing_...
-
Page 30: Aws Greengrass
3.4 AWS Greengrass 1. Go to "Terminal". 2. Enter the command for the AWS Greengrass. - Page 31 A2 Kit Scan the QR Code below to view the AWS Greengrass referenced document. Website: https://docs.aws.amazon.com/greengrass/latest/developerguide/what-is-gg.html...
Need help?
Do you have a question about the athena A2 Kit and is the answer not in the manual?
Questions and answers