Table of Contents
Advertisement
Advertisement
Table of Contents

Subscribe to Our Youtube Channel
Related Manuals for Polsen UWM-2


Summary of Contents for Polsen UWM-2
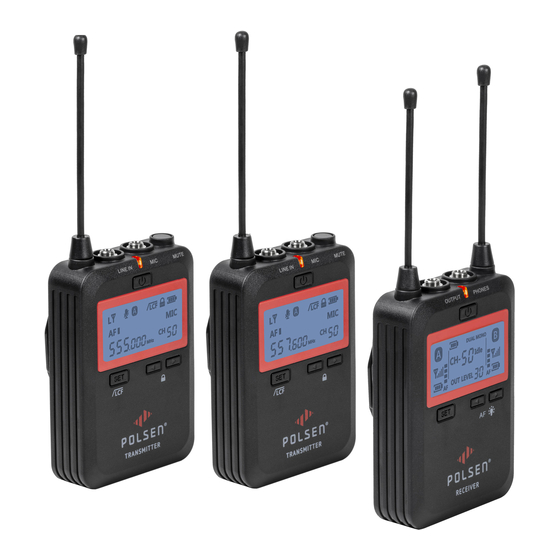
- Page 1 UWM-2 DUAL CHANNEL UHF WIRELESS LAVALIER MICROPHONE PRODUCT MANUAL...
- Page 2 You can choose from 100 channels to avoid interference. Up to four UWM-2 systems can be deployed simultaneously in the same location. Whether you’re using a camcorder, DSLR camera, or portable recorder, you’ll capture pristine and broadcast-quality audio.
- Page 3 P R E C A U T I O N S • Exposure to high sound levels can cause permanent hearing loss. Avoid listening at high volumes for extended periods of time. • Keep this unit away from water and any flammable gases or liquids. •...
- Page 4 R E C E I V E R Antennas Audio output Power indicator Headphone output Power button LCD screen Charging status indicator USB Micro-B charging port Left and right buttons Set button Battery compartment 1/8 in. (3.5 mm) TRS to TRRS cable 1/8 in.
- Page 5 L C D S C R E E N ( R E C E I V E R ) Battery indicator Transmitter status indicator (Channel A) RF reception indicator (Transmitter A) Battery status (Transmitter A) Audio level meter (Transmitter A) 6.
- Page 6 T R A N S M I T T E R Antenna Tie clip (×2) Line level input Shoe mount Power indicator Belt clip Mic level input Mute button Power button LCD screen Charging status indicator USB Micro-B charging port Left and right buttons Set button Battery compartment...
- Page 7 L C D S C R E E N ( T R A N S M I T T E R ) RF transmission power indicator Mute indicator Transmitter channel selector Low-cut filter Function lock 6. Battery indicator Mic / Line indicator Frequency channel selector / Input level (Gain) Frequency indicator Level meter...
-
Page 8: Transmitter And Receiver
I N S TA L L I N G T H E B AT T E R I E S Transmitter and Receiver The transmitter and receiver are each powered by two AA batteries. To install the batteries, follow these steps. 1. -
Page 9: Shoe Mount
Tip: Before you record, insert fresh batteries into the transmitter and receiver. Have spare fresh batteries on hand during a session. If you’re using rechargeable batteries, bring extra batteries and a battery charger with you. M O U N T I N G The transmitter and receiver can be worn attached to a belt or mounted on a camera, or attached to a tripod or articulating arm. -
Page 10: Tripod Mounting
A or B. See Setting the Receiver Channel and Setting the Transmitter Channel below. Locking Connectors To ensure the cables are not disconnected from the UWM-2 during a recording or performance, the included cables have locking 1/8 in. (3.5 mm) connectors. - Page 11 Make sure to attach the plug with the locking connector to the transmitter and receiver. Fully insert the plug into the jack, and turn the locking collar clockwise until secure. Don’t overtighten the locking connection. O P E R AT I N G R A N G E Each transmitter has a normal operating range of 150 ft.
- Page 12 I N T E R F E R E N C E Radio Frequency (RF) or Electromagnetic (EM) interference can cause buzzing or humming, noise bursts, pops, clicks, and dropouts. The channel status indicator shows whether a channel is usable, or if it has interference that can affect your audio. See Finding an Interference-Free Channel below.
-
Page 13: Lavalier Microphone
C O N N E C T I N G T H E R E C E I V E R 1/8 in. (3.5 mm) TRS to Dual XLR Cable Use this cable to connect the two-channel output of the receiver to a camcorder, portable recorder/mixer, or mixing board. -
Page 14: Setting The Output Signal
O P E R AT I N G T H E R E C E I V E R Powering On Press and hold the power button until the screen illuminates. The battery indicator shows the remaining battery power. Setting the Output Signal The receiver can output a mixed stereo signal or a dual mono signal. -
Page 15: Adjusting The Output Level
Important: Both transmitters and the receiver must be set to the same channel. See Setting the Transmitter Channel below. Finding an Interference-Free Channel The channel status indicator shows whether a channel is usable, or if it has excessive interference that will affect your audio. -
Page 16: Signal Strength
When the receiver is not connected to the transmitter, the transmitter signal indicator will blink. A steady transmitter indicator means the receiver is connected and receiving signal from the transmitter. To select a transmitter signal: 1. Press the set button repeatedly until one or both transmitter indicators blink. 2. - Page 17 The audio level should be as high as possible without peaking. If the meter rises to the top due to intermittent loud noises or vocal plosives like P and B sounds, it could distort the audio. To remedy peaking audio, see Setting Mic/Line Level Input and Setting Input Volume (Gain) below.
- Page 18 To set the signal strength, follow these steps: 1. Press the set button repeatedly until the RF transmission power indicator blinks. 2. Use the left/right buttons to select H (high) or L (low). 3. Press the set button to accept. Setting the Transmitter Channel The transmission channel determines whether the transmitter sends the signal to the receiver on channel A or B.
- Page 19 Setting Mic/Line Level Input Select mic to use the included lavalier microphone. Select line to transmit the signal from a smartphone, computer, portable recorder, or field mixer. To set the input level: 1. Press the set button repeatedly until the mic/line indicator blinks. 2.
-
Page 20: Low-Cut Filter
Setting Input Volume (Gain) The transmitter’s input volume level, or gain, determines the signal level that’s sent to the receiver. For optimum recording levels, see Audio Level above. To set the input volume: 1. Press the set button repeatedly until the volume level indicator blinks. 2. -
Page 21: Muting The Transmitter
S TA G E D I R E C T I O N A N D TA L E N T C U E I N G The UWM-2 can be used as an impromptu one-way voice communication system for stage directions and talent cueing. -
Page 22: Wireless Transmission
S P E C I F I C AT I O N S SYSTEM Analog UHF WIRELESS TRANSMISSION OPERATING RANGE 150 ft. (39.6 m) 300 ft. (91.4 m) in optimum conditions FREQUENCY RANGE 538.000 to 586.000 MHz 2 × bodypack with lavalier microphone INCLUDED TRANSMITTERS NUMBER OF RF CHANNELS 100 (50 per transmitter channel) -
Page 23: Power Requirements
TRANSMITTER FORM FACTOR Body pack 15 mW, 25 mW RF POWER OUTPUT AUDIO I/O 1/8 in. (3.5 mm) female line in (lockable) 1/8 in. (3.5 mm) female mic in (lockable) 0.5% or less (-60 dBV, 1 kHz input) SIGNAL-TO-NOISE RATIO ≥70 dB MUTING Yes, mute switch... - Page 24 TRANSMITTER (CONT.) APPROXIMATE BATTERY LIFE 8 hours (alkaline) DISPLAY & INDICATORS Backlit LCD (transmitter signal strength, transmission channel, mic/line, channel, volume, low-cut filter, mute) OPERATING TEMPERATURE 32°F to 122°F (0°C to 50°C) DIMENSIONS (H × W × D) 3.5 × 2.4 × 0.9 in. (8.9 × 6.2 × 2.2 cm) WEIGHT 2.8 oz.
- Page 25 RECEIVER FORM FACTOR Camera mount MOUNTING OPTIONS Mounting foot, 1/4-20 threaded socket, belt clip ANTENNA 2 flexible, fixed NUMBER OF AUDIO CHANNELS 2 (mixed, dual mono) AUDIO I/O 1/8 in. (3.5 mm) female lockable 1/8 in. (3.5 mm) headphone out DYNAMIC RANGE 40 Hz to 18 kHz (±...
-
Page 26: Total Harmonic Distortion
MICROPHONE TRANSDUCER Back electret condenser POLAR PATTERN Omnidirectional FREQUENCY RESPONSE 50 Hz to 20 kHz SENSITIVITY -37 dB ± IMPEDANCE 2.2 kΩ MAXIMUM SPL 100 dB TOTAL HARMONIC DISTORTION <5% OPERATING VOLTAGE 1 to 5 V HEAD DIAMETER 0.25 in. (0.6cm) - Page 27 F R E Q U E NC Y A L LO C AT I O N C H A R T TRANSMITTER A TRANSMITTER B TRANSMITTER A TRANSMITTER B CHANNEL FREQUENCY FREQUENCY CHANNEL FREQUENCY FREQUENCY 538.000 566.400 543.600 572.000 538.400 566.800 544.000 572.400...
- Page 28 TRANSMITTER A TRANSMITTER B TRANSMITTER A TRANSMITTER B (CONT.) (CONT.) (CONT.) (CONT.) CHANNEL FREQUENCY FREQUENCY CHANNEL FREQUENCY FREQUENCY 549.200 577.600 554.800 583.200 549.600 578.000 555.200 583.600 550.000 578.400 555.600 584.000 550.400 578.800 556.000 584.400 550.800 579.200 556.400 584.800 551.200 579.600 556.800 585.200 551.600...
-
Page 29: Troubleshooting
T R O U B L E S H O OT I NG Problem Solution The audio is noisy or • Noise might be caused by RF interference. Try a different channel. Make sure both units are on the same distorted. - Page 30 Problem Solution The input level on • Turn down the audio input level on your camera or recording device. the camera, recorder, • Decrease the receiver’s output level. or mixer is too high. • Make sure the output of the receiver is plugged into the line-level input on your mixer, or that the line/mic switch on your mixer is set to line.
- Page 31 Problem Solution Too much ambience • If you’re using an omnidirectional microphone, the microphone may be picking up too much ambience or is being picked up. room noise. • Make sure the microphone is as close as possible to the subject. Approximately 6 inches (15.2 cm) from the subject is usually good microphone placement, but you may need to experiment.
- Page 32 To obtain warranty coverage, contact the Polsen Customer Service Department to obtain a return merchandise authorization (“RMA”) number, and return the defective product to Polsen along with the RMA number and proof of purchase. Shipment of the defective product is at the purchaser’s own risk and expense.
Need help?
Do you have a question about the UWM-2 and is the answer not in the manual?
Questions and answers