Table of Contents
Advertisement
Available languages
Available languages
Advertisement
Table of Contents

Related Manuals for My Geko Gear Orbit 960


Summary of Contents for My Geko Gear Orbit 960
- Page 1 DASH CAMERA Orbit 960 Quick User Manual...
- Page 3 Disclaimer 1. Please follow the set-up and usage instructions in the print material that came with this Dashboard Camera (dash cam) product. 2. You should not set/install this dash cam at a place that would obstruct or reduce a driver’s view; make sure your usage complies with pertinent vehicle codes of your state, province, territory or country.
-
Page 4: About Micro Sd Card
Product features may change without notice according to the region where it's purchased in. Thank You! Thank you for purchasing the Orbit 960 dash camera. This user manual contains technical specifications and instructions for use, operate, and install. Please read this manual carefully before using. -
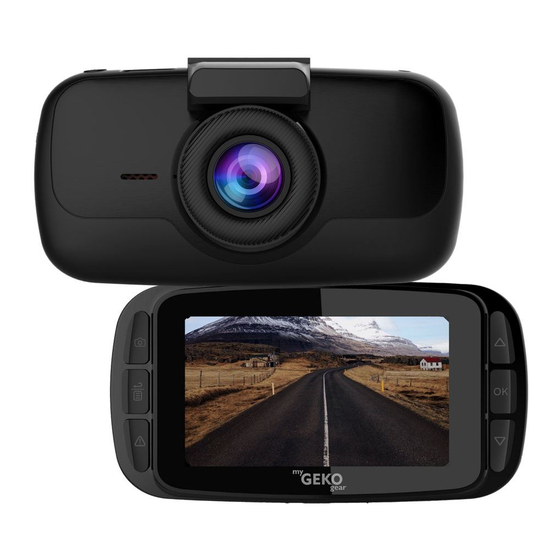
Page 5: Product Overview
Product Overview The Orbit 960 is an ultra high-definition dash cam recording in 4k resolution, along with GPS logging, Wi-Fi APP control. and the Sony Starvis sensor. Package Content Orbit 960 Dash Cam Windshield Suction Mount & Windshield 3M Sticker Mount... -
Page 6: Dash Cam Overview
● Video Format: MP4 ● Built-in Microphone/ Speakers ● Battery Capacity: 3C 320mAh/3.7V Li-ion battery ● Compatible with TF(SDHC) memory card up to 512GB. ● Automatic Screensaver (Wake up the screen by pressing any button on the panel). ● Loop Recording /Motion Detection ●... - Page 7 Where to Install Your Dash Cam ① To have a better view, try to install in the center of the windshield. ② Make sure the lens is located in a place where the windshield wiper can clean the window to ensure view is clear. ③...
-
Page 8: Power Off
Power Off Hold down the power button at least 5 seconds to turn off device. To avoid breaking down the last file recorded, do not eject the microSD Card immediately after powering off. If you need to turn it back on simply hold the power button for at least 3 seconds. -
Page 9: Battery Charge
1. Connect to Car Cigarette Lighter: Connect car cigarette lighter power cable to USB interface of Orbit 960. 2. USB charging: Connect Orbit 960 to computer USB port with USB cable microSD Card Installation and Removal 1. Look for the microSD card slot located on the right side of the dash cam. - Page 10 6. Screen Dormant: Off/ 1min/ 3min To set the screen saver time, the dash cam’s LCD screen will turn off when it goes without a handle period. 7. Key Tone: Off/On Turn On/ Off Key Button Sound 8. Volume: Off/60%/80%100% To control the noise level of the key button sound.
-
Page 11: Playback Mode
17. Reset system: Cancel/ Confirm Reset the unit to default settings 18. About: Unit firmware version information Recording: When connected to a car charger, the device turns on and start recording automatically. The red ● icon will show on the screen. The flashing red ● icon indicates that the device is recording. -
Page 12: Technical Specifications
Technical Specifications Display 2.7-inch TFT LCD monitor Lens F 1.8 ,140 degree wide viewing angle and 7 layer all glass lens plus IR . TTL:21~22mm Languages English /Chinese/French Video Format Video Resolution 3840 x 2160P30, 2560 x 1440P30, 2304 x 1296P30, 1 920 x 1080P30 Motion Detection ON/OFF... - Page 13 CAMÉRA DE TABLEAU DE BORD Orbit 960 Manuel d’utilisateur...
-
Page 14: Avis De Non-Responsabilité
Avis de non-responsabilité 1. Veuillez suivre les instructions de configuration et d’usage se trouvant dans les documents qui sont venus avec cette caméra de tableau de bord. 2. Vous ne devriez pas mettre/installer la caméra à un endroit qui obstruerait ou réduirait la vue du conducteur;... -
Page 15: À Propos De La Carte Micro Sd
été acheté, sans préavis. Merci ! Merci d’avoir acheté la caméra de tableau de bord Orbit 960. Ce manuel d’utilisateur contient les spécifications techniques et les instructions pour son utilisation, son opération, et son installation. Veuillez lire ce manuel... -
Page 16: Vue D'ensemble Du Produit
Vue d’ensemble du produit L’Orbit 960 est une caméra de tableau de bord ultra haute-définition avec résolution 4K, enregistrement GPS, contrôle Wi-Fi, et capteur Sony Starvis. Contenus du paquet Caméra Orbit 960 Support à ventouse & Support collant 3M Chargeur USB avec câble Manuel d’utilisateur... -
Page 17: Vue D'ensemble De La Caméra
● Format vidéo :MP4 ● Microphone/Haut-parleurs intégrés ● Capacité de la batterie : Batterie Li-ion 3C 320mAh/3.7V ● Compatible avec carte mémoire TF(SDHC) jusqu’à512Go. ● Écran de veille automatique(Appuyer sur n’importe quel bouton pour éveiller) ● Enregistrement en boucle / Détection de mouvements ●... -
Page 18: Allumer L'appareil
Où installer la caméra de tableau de bord Pare-brise Meilleur endroit de montage Brancher au chargeur de la voiture Attention : Nous ne sommes pas responsables de tout dommage causé à, ou causé par, le sac gonflable à cause du mauvais emplacement de la caméra à... -
Page 19: Éteindre L'appareil
Éteindre l’appareil Tenir le bouton d’alimentation enfoncé pendant au moins 5 secondes pour éteindre l’appareil. Pour éviter de briser les fichiers sauvegardés, ne pas éjecter la carte micro SD immédiatement après avoir éteint l’appareil. Si vous avez à le rallumer, tenir le bouton enfoncé pendant au moins 3 secondes. Définition des boutons Boutons Fonctions... -
Page 20: Chargement De La Batterie
Chargement de la batterie 1. Brancher directement le câble au chargeur pour voiture et dans la fente USB de l’Orbit 960. 2. Chargement USB : Connecter l’Orbit 960 au port USB de l’ordinateur avec le câble USB. Insérer et retirer une carte microSD 1. - Page 21 5. Sensibilité: Désactivée/Basse/Moyenne/Haute Si une collision ou une vibration a lieu pendant l’enregistrement, la caméra verrouillera automatiquement la vidéo. Un cadenas apparaîtra dans le haut à droite de l’écran. Après l’enregistrement, la vidéo sera protégée contre l’effacement. 6. Écran de veille : Désactivé / 1 min /3 min Régler le temps de l’écran de veille pour que l’écran s’éteigne après un certain temps sans interaction.
-
Page 22: Mode Lecture
16. Avertissement de formatage : Désactivé,15 jours, 30 jours, 60 jours Régler un temps pour le formatage de la carte SD, et la caméra formatera la carte SD au temps choisis. 17. Réinitialisation : Annuler/Confirmer Réinitialiser l’appareil aux paramètres par défaut. 18. -
Page 23: Spécifications Techniques
Spécifications techniques Écran Écran TFT LCD de 6.8cm Lentilles F 1.8 , angle de vue large de 140 degrés, et 8 couches tout en verre plus IR . TTL:21~22mm Langues Anglais / Chinois / Français Format vidéo Résolution vidéo 3840 x 2160P30, 2560 x 1440P30, 2304 x 1296P30,1920 x 1080P30 Détection de mouvements Activé/Désactivé...
Need help?
Do you have a question about the Orbit 960 and is the answer not in the manual?
Questions and answers