Table of Contents
Advertisement
Advertisement
Table of Contents

Related Manuals for PASCO PASPort Xplorer PS-2000


Summary of Contents for PASCO PASPort Xplorer PS-2000
- Page 1 PS-2000...
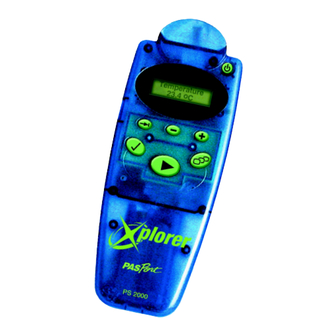
- Page 2 QUICK REFERENCE (See also -- back inside cover) Power button LCD (Liquid Crystal Display) screen Plus button Tab button Display button Minus button Check button LED (Light Emitting Start/Stop button Diode) light Function Indicator * LED light (above the Start button) flashes to indicate Xplorer is storing data.
- Page 3 QUICK REFERENCE (See also -- front inside cover) Main Display Modes (vary with settings and sensor) Press to change the display mode to the next display in the sequence or exit out of any submenu. Repeatedly press- cycles through the main display modes. ([DPSOH 'LVSOD\V IRU D 7HPSHUDWXUH 6HQVRU FRQQHFWHG WR ;SORUHU 1.
- Page 4 012-07784C Printed in U.S.A. © copyright 2001 PASCO scientific All rights reserved.
-
Page 5: Table Of Contents
012-07784C Xplorer User’s Guide TABLE OF CONTENTS EQUIPMENT ..............3 SETUP Inserting Batteries ............4 Installing DataStudio ..........5 Connecting Xplorer to a Computer ........6 Connecting Xplorer(s) to a USB hub ......7 BASIC FUNCTIONS Xplorer Buttons..............8 Turning Xplorer On/Off..........9 Setting the Date and Time..........10 Measuring with Xplorer.......... - Page 6 Xplorer User’s Guide 012-07784C TABLE OF CONTENTS (Continued) MEASUREMENT/SAMPLING OPTIONS (CONT.) -Measuring with Manual Sampling....23-24 -Switching Sensors during Manual Sampling..25 Smart Sampling Method ...........25 -Measuring with Smart Sampling ......26 -Smart Sampling Level..........26 -Changing the Smart Sampling Level .....27 -Smart Sampled Data in DataStudio......27 DATA SET REVIEW/DELETION Reviewing Data Sets..........28 Changing Units in Data Set Review .......29...
-
Page 7: Equipment
012-07784C Xplorer User’s Guide Equipment The PS-2000 Xplorer comes with the following: a) USB A-B cable (1) b) AA batteries (2) c) DataStudio Lite CD (1) d) Zip-sealed vinyl bag for protecting Xplorer from harsh chemicals and water. (Save the bag for storing Xplorer when not in use.) (1) e) Lanyard (1) fi... -
Page 8: Inserting Batteries
Xplorer User’s Guide 012-07784C Inserting Batteries Away from the computer, Xplorer requires two AA batter- ies for power. When connected to a computer, Xplorer is powered by the USB connection. Turn Xplorer face down and open the battery door on the back. -
Page 9: Installing Datastudio
012-07784C Xplorer User’s Guide Installing DataStudio With its data memory and a built-in LCD display, Xplorer can measure, display, and store data in the field. For dis- playing and analyzing data sets in a graphical display, a computer is essential. For display and analysis, Xplorer works with DataStudio software on your PC or Macin- tosh. -
Page 10: Connecting Xplorer To A Computer
Xplorer User’s Guide 012-07784C Connecting Xplorer to a Computer Xplorer connects to your PC or Macintosh with a standard USB A-B cable. Xplorer automatically turns on when connected to a computer’s USB port. When you connect Xplorer to the computer, DataStudio launches if Xplorer has stored data or a sensor connected. -
Page 11: Connecting Xplorer(S) To A Usb Hub
Xplorers together away from the computer with sample rates of 100 Hz or above. (Also see “Merging Data Sets from Multiple Xplorers” on page 35.) To order a USB 4-port hub from PASCO, use part no. PS-2501. ®... -
Page 12: Xplorer Buttons
Xplorer User’s Guide 012-07784C Xplorer Buttons 1. Tab button 2. Power button • Moves the edit cursors to • Turns Xplorer on and off the next field 3/4. Minus/Plus buttons • Changes the value in the edit field (1 pt. for each button press) •... -
Page 13: Turning Xplorer On/Off
012-07784C Xplorer User’s Guide Turning Xplorer On/Off Xplorer automatically turns on when connected to a com- puter. Xplorer automatically turns itself off after a few minutes if: • Xplorer is not connected to a computer. • Xplorer is not taking measurements. •... -
Page 14: Setting The Date And Time
Xplorer User’s Guide 012-07784C Setting the Date and Time Xplorer contains a clock and calendar to keep track of time and date measurements. [Set the date and time the first time you turn on the Xplorer, or if you leave Xplorer without good batteries for more than two days.] If you connect Xplorer to the computer with DataStudio soft- ware, Xplorer’s date and time are automatically set. -
Page 15: Measuring With Xplorer
012-07784C Xplorer User’s Guide Measuring with Xplorer Turn Xplorer on. Heart Beat Plug in any sensor. (Xplorer displays a name and unit of measure spe- Heart Beat cific to that sensor.) Note: If monitoring mode is on, Xplorer automatically begins Data Memory measuring and displaying data 1 set 3% full... -
Page 16: Plugging In A Sensor
Xplorer User’s Guide 012-07784C Plugging in a Sensor 1. Orient the pins on the mini DIN connector of the PASPORT sensor to the holes on the Xplorer. Figure 3: mini DIN Connect 2. Plug the sensor into the mini DIN receptacle on the top of Xplorer. Figure 4: Plugging in a Sensor Retrieving Stored Data with DataStudio Note: To transfer Xplorer data to your computer, you must... -
Page 17: Main Display Modes
012-07784C Xplorer User’s Guide Main Display Modes Xplorer displays up to seven main modes (depending on the sensor used and if data is stored). Each mode displays up to two 16-character lines. (Note: The displays will vary according to settings and the type of sensor you have con- nected. - Page 18 Xplorer User’s Guide 012-07784C Sensor Value display - shows the latest measured value for a connected sensor if Xplorer is taking measurements or an “Empty” value if Xplorer is not in measurement mode. (An animated icon in the upper-right corner of the display indicates that Xplorer is storing measurements, regardless of the display mode.) The top line of the dis- play shows the selected measurement name and the bottom...
-
Page 19: Changing The Display Mode
012-07784C Xplorer User’s Guide Data Set Review Display -indicates stored data sets ready for review. Calibration Display - allows for calibrating specific sen- sors. Changing the Display Mode Switch between display options like channels on a televi- sion. Press to change the display mode to the next dis- play in sequence. -
Page 20: Changing The Sensor Measurement
Xplorer User’s Guide 012-07784C If you are using a display sub-mode (like data set review or setting the date and time), pressing cancels the edit- ing changes or review mode and advances to the next main display mode. (See the main display modes on page 13). Changing the Sensor Measurement Some sensors can simultaneously take more than one mea- surement (i.e. -
Page 21: Changing The Sensor Units
012-07784C Xplorer User’s Guide Changing the Sensor Units Some sensors have more than one unit of measurement option (e.g. The Temperature Sensor has Celsius, Fahren- heit, and Kelvin.) To change the unit of mea- sure for the current value: From the Sensor dis- Temperature 23.7 play, press... -
Page 22: Sampling Measurement Options
Xplorer User’s Guide 012-07784C Sampling Measurement Options Xplorer’s sampling methods are designed for various mea- suring and data storage situations, as follows: • Sample Rate method - for automatic measuring and data storage at regular time intervals • Manual Sampling method - for measuring at irregular time intervals;... -
Page 23: Sample Rate Measurement Method
012-07784C Xplorer User’s Guide For instructions on clearing this memory, see “Resetting or Clearing the Sensor Memory” on page 32. The “Measurement Options” section of this manual describes the uses of each method. Also see “Changing the Sampling Rate/Unit” and “Changing the Smart Sampling Level”... -
Page 24: Measuring With The Sample Rate Method
Xplorer User’s Guide 012-07784C Measuring with the Sample Rate Method Select the Sample Rate display. (Also see “Changing the Sampling Method.”) Sample Rate Press . (Xplorer 100 samples/s begins measuring and storing at the speci- fied sample rate.) Heart Beat A clock appears in the display’s upper-right corner to indicate that... - Page 25 012-07784C Xplorer User’s Guide Faster sample rates also fill the Xplorer’s data memory more quickly. A slower sample rate conserves Xplorer’s data memory, but may cause Xplorer to miss an important change that occurred rapidly. If you expect changes to occur slowly, (like measuring the air temperature outside), slow sample rates (once every minute or slower) allow Xplorer to con- serve battery power by “sleeping”...
-
Page 26: Changing The Sampling Rate/Unit
Xplorer User’s Guide 012-07784C Changing the Sample Rate/Unit Select the Sample Sample Rate Rate display. (See 1 sample/s “Changing the Sam- pling Method on page 18.”) Sample Rate 2 sample/s Press . (The Sample Rate cursors indicate the 5 sample/s sample rate number is selected for editing.) . -
Page 27: Manual Sampling Measurement Method
012-07784C Xplorer User’s Guide To accept your changes, press . (To cancel the editing, press Manual Sampling Measurement Method Sometimes, you want to take several measurements with a sensor, but not at a regular rate. You might want to change locations or experimental conditions between measure- ments. - Page 28 Xplorer User’s Guide 012-07784C the display to indicate that it is waiting for you to tell it when to measure.) To save a measurement, press . (Xplorer saves one value for each sensor measurement.) Repeat this step for each measurement you take. Press again.
-
Page 29: Switching Sensors During Manual Sampling
012-07784C Xplorer User’s Guide Switching Sensors During Manual Sampling Xplorer allows you to take measurements using multiple sensors during manual sampling by swapping the con- nected sensor. This allows you to take two or more mea- surements from multiple sensors using the single sensor port of the Xplorer. -
Page 30: Measuring With Smart Sampling
Xplorer User’s Guide 012-07784C Measuring with Smart Sampling Select the Smart Sam- Smart Sampling pling method (See LOW---*-HIGH “Changing the Sampling Method” on page 18.) Press . (Xplorer Acceleration 100 m/s/s begins measuring and dis- playing, but only stores measurements when it Data Memory detects a significant 1 set 3% full... -
Page 31: Changing The Smart Sampling Level
012-07784C Xplorer User’s Guide Xplorer to store only significant changes and uses less data memory. Changing the Smart Sampling Level 1. Select the “Smart Sam- Smart Sampling pling” measurement --*-- HIGH method. (For instruc- tions, see page 18.) Smart Sampling 2. -
Page 32: Reviewing Data Sets
Xplorer User’s Guide 012-07784C begins to change, Xplorer notes the time and begins stor- ing. This sampling method results in data with “gaps” when viewed in a graph with data points displayed. Be assured that nothing is really missing! Remember that Xplorer measures at the highest sample rate possible for the sensor and that no change was detected over that time. -
Page 33: Changing Units In Data Set Review
012-07784C Xplorer User’s Guide Press . (Xplorer displays the first measurement value for the selected data set and measurement. The cursors show each sequential step in the data set.) Repeatedly press to review successive measurement values. (Hold down the Plus or Minus button for 2 seconds, and Xplorer rapidly steps through values. -
Page 34: Data Set Numbering
Xplorer User’s Guide 012-07784C Data Set Numbering When you press , Xplorer creates a data set and assigns the set a number (1, 2, 3, etc...). When you delete a data set, the remaining data sets are NOT renumbered. They keep their originally assigned numbers. Data set numbers are only re-used (starting with 1) when you delete all data sets. -
Page 35: Calibration
012-07784C Xplorer User’s Guide Calibration Calibration is the process of using one or two known val- ues for a measurement as reference points. Xplorer allows you to fine tune the accuracy of certain sensors by calibrating. In most cases, calibration is not necessary to obtain useful measurements with a PASPORT sensor. -
Page 36: Resetting/Clearing Sensor Memory
Xplorer User’s Guide 012-07784C calibration value until it is equal to the known refer- ence calibration value. (Some calibrations have a fixed reference value that cannot be changed (e.g. 100%). Press to accept the calibration value. Some cali- brations require two reference calibration values. Repeat steps 2-5 to calibrate the sensor with a second known value. -
Page 37: Using Xplorer With Datastudio
012-07784C Xplorer User’s Guide you unplug a sensor from Xplorer and delete all data sets, Xplorer clears the sensor setting memory. All sensors then revert to their factory settings the next time they are used. Using Xplorer with DataStudio Xplorer has many capabilities as a data logger away from a computer, but it is also useful with DataStudio for real-time measurement and display. -
Page 38: Retrieving Stored Data Into Datastudio
Xplorer User’s Guide 012-07784C Retrieving Xplorer Data into DataStudio DataStudio is the software used for retrieving logged data from the Xplorer. DataStudio offers rich graphing, analy- sis, data editing and multimedia Workbook capabilities not possible with the Xplorer alone. When retrieving data from an Xplorer, DataStudio adds the following to the open activity: •... -
Page 39: Merging Data Sets From Multiple Xplorers
012-07784C Xplorer User’s Guide three runs (#1, #2, and #3), and 2 data sets are retrieved from an Xplorer, the new runs created are #4 and #5. Merging Data Sets from Multiple Xplorers Since Xplorer saves the exact date and time measurements are taken, DataStudio can add data from more than one Xplorer together in a single data run. - Page 40 Xplorer User’s Guide 012-07784C 4. Click the Retrieve Now button. DataStudio synchro- nizes the Xplorers’ clocks to the computer’s clocks. The data sets merge and display in DataStudio and are removed from the Xplorer. Note: The data merge feature is designed for data col- lected in the field using Xplorers.
-
Page 41: Maximizing Battery Life
012-07784C Xplorer User’s Guide Maximizing Battery Life Expected battery life with new alkaline batteries is between 12 and 24 hours of continuous operation (depending on the sensor used). Without batteries, Xplorer can retain data memory contents and the date and time for over two days. When away from a computer, good batteries are essential for a successful measurement experience. -
Page 42: Maximizing Data Memory
Xplorer User’s Guide 012-07784C This is appropriate for experiments that might take hours to complete, but where rapidly changing conditions are not expected. XPLORER’S LED FLASHES WHENEVER IT IS STOR- ING MEASUREMENTS. THE LED ALSO FLASHES WHEN XPLORER IS SLEEPING BETWEEN SAM- PLES. - Page 43 012-07784C Xplorer User’s Guide • Use slower sample rates for longer experiments. If you expect your experiment to run for several hours or days (or minutes with a very fast sample rate), set the sam- ple rate as slow as possible. Sampling too quickly when the conditions being measured do not change quickly uses space in data memory.
-
Page 44: Troubleshooting
Xplorer User’s Guide 012-07784C Troubleshooting Problem Solution(s) Xplorer temporarily Put Xplorer in a shaded area. blanks out in direct Avoid placing Xplorer in direct sunlight. sunlight. DataStudio does not Check your USB cable connec- retrieve data from tion to the Xplorer and to your the Xplorer. -
Page 45: Technical Support
012-07784C Xplorer User’s Guide Technical Support Before you call PASCO Technical Support, have the appa- ratus and this user’s guide available. Note the following: • DataStudio version • Title and model number (listed on the label) of the product; •... -
Page 46: Warranty
PASCO scientific warrants the product to be free from defects in materials and workmanship for a period of one year from the date of shipment to the customer. PASCO will repair or replace, at its option, any part of the product which is deemed to be defective in material or workman- ship. - Page 47 012-07784C Xplorer User’s Guide NOTES ®...
- Page 48 Xplorer User’s Guide 012-07784C NOTES ®...
Need help?
Do you have a question about the PASPort Xplorer PS-2000 and is the answer not in the manual?
Questions and answers