Advertisement
18
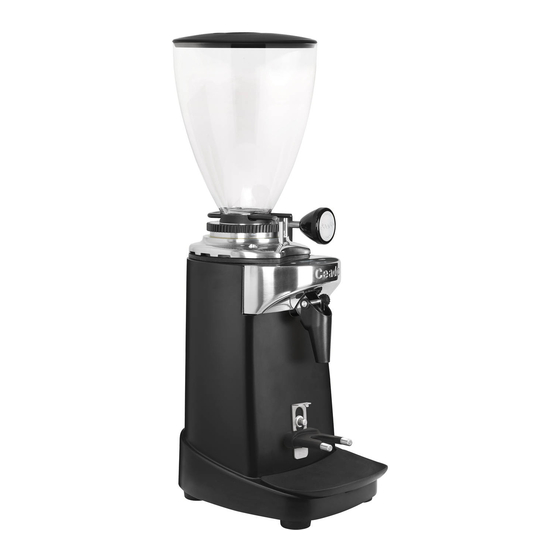
Main parts (Fig. 1, Fig. 2, Fig. 3)
Motor housing
1
Bean hopper
2
Hopper lid
3
Grind regulating lever
4
Bean hopper shutter
5
Discharge opening
6
Start button
7
Filter-holder rest
8
Tray
9
3
4
6
7
8
9
Fig. 1
COFFEE GRINDER
10
11
12
13
14
15
16
2
5
10
1
Dosing buttons
Dosing display
Button + Button -
Button SET
Single shot selection
Double shot selection
ON-OFF (I-O) switch
5
16
GB
Fig. 2
Advertisement
Table of Contents

Related Manuals for Ceado E37 Series


Summary of Contents for Ceado E37 Series
- Page 1 COFFEE GRINDER Main parts (Fig. 1, Fig. 2, Fig. 3) Motor housing Dosing buttons Bean hopper Dosing display Hopper lid Button + Button - Grind regulating lever Button SET Bean hopper shutter Single shot selection Discharge opening Double shot selection Start button ON-OFF (I-O) switch Filter-holder rest...
- Page 2 Fig. 3 SAFETY RECOMMENDATIONS GENERAL INSTRUCTIONS Read the following instructions carefully before using the appliance. Installation and maintenance should be carried out by qualified personnel only. This appliance is intended for professional use, and should therefore be used by adults and qualified personnel only.
-
Page 3: Installation
Due to statistical tests on the product in the factory, some coffee grounds may be found in the appliance. SAVE THESE INSTRUCTIONS! The EC declaration of conformity for this appliance is available in the Products section of our website www.ceado.com. INSTALLATION Comply with the safety recommendations indicated above and hereafter when installing the appliance. -
Page 4: Preparation And Use
Turn the ON-OFF switch (16 Fig. 2) to position “I”. When the appliance is switched on the display will show: Coffee Grinder CEADO E37 Note: After being unused for 10 seconds the rear lighting of the display goes out. It lights up again automatically when any button is pressed. -
Page 5: Reading The Counters
Both LEDs will light up and the display will show: Manual dose READY Taking out the coffee When the appliance is READY, to start grinding press the start button (7 Fig. 1) with the filter holder and keep the filter holder in position until distribution is ended. During operation the respective LED flashes and the message WORKING appears on the display. -
Page 6: Single Shot
To reset a counter, hold down the button for 3 seconds until you hear a double beep. To read the main counter, press the button again. The display will show: Total shots ground In this case too, by pressing the button can also distinguish between the single or double shots distributed since the last reset: Single shots... -
Page 7: Other Settings
Double shot To change the grinding time for the double shot, you have to enter the settings menu and, when the display shows: Set time single shot Press the button once. The display will show: Set time double shot At this point, by pressing the button you can set the grinding time for the double shot, in the same was as explained above for the single shot. -
Page 8: Selecting The Menu Language
Selecting the menu language Press the button twice to display the page: Language Press the to confirm. The display will show the screen: Use buttons + - Language English Press the button to select one of the 5 languages: Italian, English, Spanish, German and French. - Page 9 Press to confirm. The display will show: Press button + - to delete By pressing the buttons simultaneously, followed by button to confirm, a complete reset will be made. Note: If you no longer wish to perform the reset operation, wait 5 seconds without pressing any button and the system will return to the settings menu.
- Page 10 Leaving the settings menu To leave the settings menu and return to READY status, press the button six times until this screen is displayed: Exit Press the button to confirm. REGULATING GRINDING When it leaves the factory the machine has a standard setting, but it may be necessary to adjust grinding further due to various external factors such as the type of mixture used, the humidity, temperature, or the particular distribution requirements of the espresso coffee machine.
-
Page 11: Warnings And Suggestions
WARNINGS AND SUGGESTIONS Never operate without hopper and lid in place. Make sure that shutter is completely open (to the last click) (see Fig. 5). Do not let the coffee grinder run long without coffee beans in the hopper; if this were to happen it would cause tripping of the motor thermal overload protection. -
Page 12: Maintenance
Fig. 6 MAINTENANCE Maintenance must be carried out exclusively by qualified technical personnel. Care for the mechanical and electrical parts of the appliance is indispensable in order to guarantee their safety and efficiency. If any parts need replaced, authentic spare parts must always be used. The burrs are subject to normal wear and the manufacturer recommends replacing them roughly every 400 kg of coffee;... - Page 13 Problem Solution Make sure it is plugged in. • Make sure the safety circuit breaker is closed. • Check that the main switch of the appliance is ON. • The appliance does not turn If the problem occurs itself after a long period of intensive •...
-
Page 14: Warranty
DISPOSAL Correct disposal of this product (waste electrical and electronic equipment) (Applicable in the European Union and other countries with separate collection systems in conformity with European Directive 2002/96/EC) This product has been made from high-quality parts and materials, which can be re-used and recycled.
Need help?
Do you have a question about the E37 Series and is the answer not in the manual?
Questions and answers