Table of Contents
Advertisement
Quick Links
Advertisement
Table of Contents

Subscribe to Our Youtube Channel
Related Manuals for Eaton CEAG CG-S / IP Router+ 1P. V2


Summary of Contents for Eaton CEAG CG-S / IP Router+ 1P. V2
- Page 1 CEAG CG-S / IP Router+ 1P . V2 Montage- und Betriebsanleitung Mounting and Operating Instructions Zielgruppe: Elektrofachkraft Target group: Skilled electricians Verwendungszweck: Notbeleuchtung, nicht für privaten Gebrauch Intended Application: Emergency Lighting, not suitable for private use...
-
Page 2: Table Of Contents
Inhaltsverzeichnis Inhaltsverzeichnis 1 ALLGEMEINES ........... . 4 1.1 Sicherheitshinweise .................. - Page 3 Contents Contents 1 GENERAL INFORMATION ......... . . 4 1.1 Safety instructions ..................
-
Page 4: Inhaltsverzeichnis
Inhaltsverzeichnis 1 Allgemeines 1 General information 1.1 Sicherheitshinweise 1.1 Safety instructions Dieses Produkt ist zum Zeitpunkt seiner This product has been constructed in Entwicklung und Fertigung nach gelten- accordance with valid technical regula- den, anerkannten Regeln der Technik tions at the time of its development and gebaut und gilt als betriebssicher. -
Page 5: Veränderungen Und Umbauten
1 Allgemeines 1.4 Veränderungen und Umbauten 1.4 Modifications and conversions Zur Vermeidung von Gefährdungen und zur Sicherung der optimalen Leistung, dürfen No modifications or conversions should an dem Gerät weder Veränderungen be carried out to this device that have not noch An- oder Umbauten vorgenommen been expressly permitted by the manu- werden, die durch den Hersteller nicht... -
Page 6: Technische Daten
Inhaltsverzeichnis 1.6 Technische Daten 1.6 Technical data Spannungsversorgung Spannung 24 V DC +/-20%, 230 V AC/DC Power supply Voltage (CG-S / IP Router+ 1P. V2 Anschlussbox / connection box) Leistungsaufnahme < 2,5 W Power consumption < 2.5 W Anschluss Steckschraubklemmen 0,5 – 2,5mm² Connection 0.5 –... -
Page 7: Aufbau Und Funktion
2 Set-up and functionality 2 Aufbau und Funktion 2 Set-up and functionality 2.1 Grundlegende Funktion 2.1 Basic function Der CG-S / IP Router+ 1P. V2 ermöglicht The CG-S/IP Router+ 1P. V2 enables the eine IP-Basierte Vernetzung von ZB-S, IP-based networking of ZB-S, LP-STAR, LP-STAR, AT-S oder CG2000 Notlicht- AT-S... -
Page 8: Vernetzung Mit Cg-S/Usb-Interface Und Cg-S / Ip Router+ 1P. V2
2 Aufbau und Funktion 2.2 Vernetzung mit CG-S/USB- 2.2 Networking with the CG-S/ Interface und CG-S / IP USB interface and CG-S/IP Router+ 1P. V2 Router+ 1P. V2 Auf Seite der CGVision wird am CG-S/ On the CGVision side a CG-S / IP USB-Interface ein CG-S / IP Router+ 1P. -
Page 9: Vernetzung Mit Cg-S/Ip-Interface Und Cg-S / Ip Router+ 1P. V2
2 Set-up and functionality 2.3 Vernetzung mit CG-S/ 2.3 Networking with CG-S/ IP-Interface und CG-S / IP IP interface and CG-S/IP Router+ 1P. V2 Router+ 1P. V2 Auf Seite der CGVision wird der PC The PC is connected directly with the direkt mit dem Netzwerk (LAN) über network (LAN) via RJ45 on the CGVi- RJ45 angeschlossen. -
Page 10: Funktionsweise
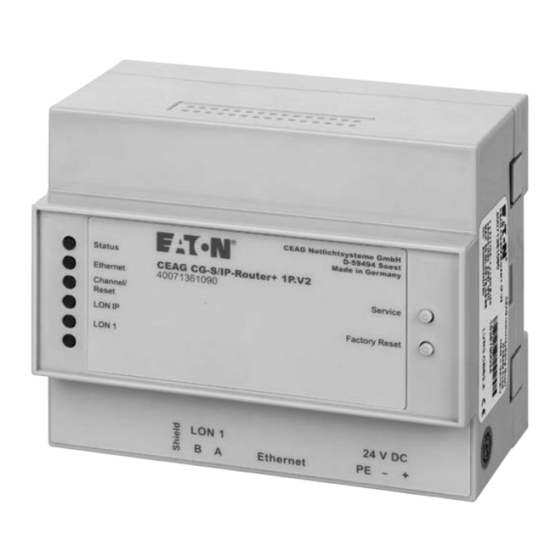
2 Aufbau und Funktion 2.4 Funktionsweise 2.4 Operation Der CG-S / IP Router+ 1P. V2 ermöglicht The CG-S / IP Router+ 1P. V2 enables den CEAG CG-S Bus durch ein vorhan- the CEAG CG-S bus to „tunnel“ via an denes Intranet (LAN) zu „tunneln“. So ist existing intranet (LAN). - Page 11 2 Set-up and functionality Abbildung: Der CG-S / IP Router+ 1P. V2 Abbildung: CG-S / IP Router+ 1P. V2 Figure: CG-S / IP Router+ 1P. V2 Anschlussbox Figure: CG-S / IP Router+ 1P. V2 connection box MANUAL CEAG CG-S / IP-RoUTER+ 1P . V2 40071860292 (A) February 2017 www.ceag.de...
-
Page 12: Leds, Taster Und Dil-Schalter
2 Aufbau und Funktion 2.5 LEDs und Taster 2.5 LEDs and push buttons Abbildung: Bedienelemente und Figure: Control Elements and Anschlüsse Connections X1 LONWORKS Anschluss, TP/FT-10 X1 LON/TP connection, TP/FT-10 or TP/ (DIN EN 14908-2) (ISO/IEC 14908-2) X2 Ethernet Anschluss, LON/IP-852 X2 Ethernet connection, LON/IP-852 (DIN EN 14908-4) (ISO/IEC 14908-4) - Page 13 2 Set-up and functionality LEDs LEDs Auf der Gehäuseoberseite sowie an der The following LEDs are available at the seitlichen RJ45-Buchse gibt es folgende front side of the housing and at the lat- LEDs: eral RJ45 connector: Status: Nach dem Einschalten leuch- Status: After activation this LED •...
-
Page 14: Wichtige Hinweise
Netzwerk nicht schon an ein anderes A user with name „Admin“ and pass- Gerät vergeben wurde, um Kollisionen zu word „EATON“ has been factory set for vermeiden. access to setting options of the router Um Zugriff auf die Einstellungsmög- via the web interface. -
Page 15: Das Gerät Einrichten
3 Setting up the device 3 Das Gerät einrichten 3 Setting up the device 3.1 Kabel anschließen 3.1 Connecting the cable Zu den Anschlüssen des Gerätes s. a. See the figure on page 11 for device Abbildung auf Seite 11. connections. -
Page 16: Lon/Ft Schnittstelle
3 Das Gerät einrichten 3.1.3 LON/FT Schnittstelle 3.1.3 LON/FT interface Der CG-S / IP Router+ 1P. V2 verfügt The CG-S / IP Router+ 1P. V2 has an über einen FTT-10 Transceiver zur FTT-10 transceiver for connection with Verbindung mit einem LON/FT Netz a LON/FT network (CEA-709.3, Figure, (CG-S Bus, Abbildung S.12, Anschluss page 12, X1 connection). -
Page 17: Lon/Ip Schnittstelle
3 Setting up the device 3.2 LON/IP Schnittstelle 3.2 LON/IP interface Auf dem mitgelieferten Datenträger der The CG-S / IP Router+ 1P. V2 documen- CGVision finden Sie die Dokumentation tation, the DeviceFinder program for des CG-S / IP Router+ 1P. V2 und das searching for the device via ethernet Programm „DeviceFinder“... - Page 18 To configurate the device, a login is Um das Gerät zu konfigurieren, ist necessary. Factory default settings: ein Login erforderlich. Die Werksein- User: Admin / Password: EATON stellungen sind: Benutzer: Admin / Passwort: EATON. Abbildung: Das Web-Interface des Figure: Web interface of the CG-S / IP Router+ 1P.
-
Page 19: Ip-Adresse Festlegen
ändern. CAUTION! ACHTUNG! A user with name „Admin“ and pass- Um Zugriff auf die word „EATON“ has been factory set Einstellungsmöglichkeiten des for access to setting options of the Routers über das Web-Interface zu router via the web interface. Please... - Page 20 3 Das Gerät einrichten Von der Verwendung dynamischer We recommend not to use dynamic IP IP-Adressen für den Router wird abge- addresses for the router because routing raten, da bei jedem Adress wechsel das is interrupted for a period of time with Routing für einige Zeit unterbrochen each address modification.
- Page 21 3 Setting up the device ACHTUNG! CAUTION! Die Verwendung einer Software The use of a software MAC Address MAC Adresse, die, sofern angegeben, that replaces the hardware MAC die Hardware MAC Adresse des Address of the device (if specified) Gerätes ersetzt muss mit Überlegung must be carefully considered.
-
Page 22: Zeiteinstellungen Anpassen
3 Das Gerät einrichten 3.5 Zeiteinstellungen anpassen 3.5 Adapting the time settings Die CEA-852 Norm empfiehlt für ein The CEA-852 standard recommends LON/IP Netzwerk die Synchronisation synchronisation of the routers to permit der Router, um die Erkennung von the detection of obsolete messages for veralteten Nachrichten zu erlauben. - Page 23 3 Setting up the device Die eingebaute Echtzeituhr verfügt über The integral time clock has a buffering eine Pufferung von etwa 6 Tagen. Bleibt of approx. 6 days. If the router is longer der Router länger ohne Strom, müssen without power, you must reset the time Sie die Uhrzeit einmal manuell oder per manually or via NTP.
- Page 24 3 Das Gerät einrichten Unter Local Date bzw. Local Time You can also manually enter the desired können Sie die gewünschte Uhrzeit time or date (in UTC/GMT) under Local bzw. das gewünschte Datum (in UTC/ Date or Local Time. In this case the NTP GMT) auch manuell eingeben.
-
Page 25: Kennwort Ändern, Benutzer Verwalten
3 Setting up the device 3.6 Kennwort ändern, Benutzer 3.6 Modifying the password and verwalten managing users Ändern Sie beim ersten Einloggen auch When logging in for the first time, das Kennwort des Standardbenutzers modify the password of the standard „Admin”. -
Page 26: Configuration Server
4 Configuration Server 4 Configuration Server 4 Configuration server Der CG-S / IP Router+ 1P. V2 verfügt über The CG-S / IP Router+ 1P. V2 has an einen integrierten Configuration Server, integrated configuration server which der über das Web interface aktiviert wer- can be activated via the web interface. - Page 27 4 Configuration server Der Configuration Server wird durch ein The configuration server is activated by Häkchen in der entsprechenden Check- ticking the corresponding checkbox. box aktiviert. Automatic registration: Automatische Registrierung: If this mode is selected, LON/IP report- Ist dieser Modus gewählt, so werden ing with the configuration server are LON/IP Geräte, die sich beim Con- registered.
- Page 28 4 Configuration Server Channel-Timeout: Channel timeout: Mit dem Channel Timeout werden Delayed IP packets are identified with verspätete IP Pakete erkannt. Wird hier the Channel Timeout. If a value is ein Wert angegeben, dann müssen specified here, all devices in the network alle Devices im Netz genau die glei- must have exactly the same time.
-
Page 29: Router Über Configuration Server Verwalten
4 Configuration server 4.2 Router über Configuration 4.2 Managing the router via con- Server verwalten figuration server Wird der CG-S / IP Router+ 1P. V2 als If the CG-S / IP Router+ 1P. V2 is oper- Configuration Server betrieben, so ist ated as a configuration server, then der Zugriff auf die Clients von diesem access to the clients is also possible... - Page 30 4 Configuration Server Klicken auf die IP Adresse eine Gerätes Clicking on the IP address of a device öffnet das Web Interface dieses Gerätes, opens its the web interface for modify- so dass an ihm Einstellungen verändert ing settings to the device. werden können.
- Page 31 4 Configuration server Die Befehlsschaltflächen unter der Liste The command buttons below the list have the following meaning, referring haben folgende Bedeutung, die sich specifically to the selected devices: jeweils auf die ausgewählten Geräte bezieht: A further router can be manually entered Hinzufügen Ein weiterer Router kann manuell in die into the list.
- Page 32 4 Configuration Server Dynamisch Dynamic Das Gerät wird in einen Zustand ver- The device is set to a condition corre- setzt, der der Automatic Registration sponding to Automatic Registration, entspricht, d. h. meldet es sich nicht meaning if it does not register within innerhalb des festgelegten Automatic the specified Automatic Deregistration Deregistration Timeout, so wird es von...
-
Page 33: Tipps Zu Configuration Server Einstellungen
4 Configuration server 4.3 Tipps zu Configuration Server 4.3 Tips for configuration server Einstellungen settings Channel Timeout, danger of data loss Channel Timeout, Gefahr von Daten- verlust The Channel Timeout should be deac- tivated (= 0). If it is set too briefly, it Das Channel Timeout sollte ausgeschal- may cause the loss of data packets. - Page 34 4 Configuration Server Disable oder Blacklist aus der Kommu- Disable or Blacklist nikation herausgenommen werden. In Automatic Registration mode, Danach kann die Automatic Registration messages from devices with Blacklist für den normalen Betrieb wieder been- status are no longer accepted. Disabled det werden.
-
Page 35: Router-Funktionalität Nutzen
5 Using router functionality 5 Router-Funktionalität 5 Using router functionality nutzen 5.1 Configuring the LON/IP interface 5.1 LON/IP-Schnittstelle konfigurieren Configuration of the CEA-852 interface is via the web interface of the CG-S / IP Die Konfiguration des CEA-852-Inter- Router+ 1P. V2. Enter the IP address of faces erfolgt über das Web-Interface des the router into the address bar of a web CG-S / IP Router+ 1P. - Page 36 5 Router-Funktionalität nutzen ACHTUNG! CAUTION! Wird der CG-S / IP Router+ 1P. V2 If the CG-S / IP Router+ 1P. V2 is used zugleich als Configuration Server simultaneously as configuration eingesetzt, so stehen bestimm- server, certain device settings (e.g. te Device Einstellungen (z. B. NTP NTP server, unicast and multicast Server, Unicast, Multicast Adressen) addresses) are not available as they...
- Page 37 5 Using router functionality Alle Teilnehmer eines LON/IP-Kanals All participants in a LON/IP chan- sollten dieselbe Multicast-Adresse nel should use the same multicast und dieselbe Port-Nummer nutzen. address and the same port number. LON/IP TTL LON/IP TTL Die hier angegebene Time To Live gibt The specified Time To Live gives die Zahl der Router Hops an, über die ein...
-
Page 38: Serviceprozeduren Durchführen
6 Serviceprozeduren durchführen 6 Serviceprozeduren durch- 6 Implementing service pro- führen cedures Dieser Abschnitt beschreibt einige This section describes some routine Routine Operationen, die beim Betrieb operations that may occasionally be eines Routers gelegentlich erforderlich required with router operation. sein können. 6.1 Restarting the router 6.1 Router neu starten To restart the CG-S / IP Router+ 1P. -
Page 39: Konfiguration Sichern Und Laden
6 Implementing service procedures 6.2 Konfiguration sichern und 6.2 Saving and loading configu- laden ration Die aktuellen Einstellungen des Routers The current router settings can be saved lassen sich als .rcf-Datei lokal abspei- locally as a .gsf file and the uploaded to chern und später erneut in das Gerät the device later. -
Page 40: Firmware Aktualisieren
6 Serviceprozeduren durchführen 6.3 Firmware aktualisieren 6.3 Updating firmware EATON stellt Aktualisierungen zur EATON makes updates for the firmware Firmware des Routers in Form spezieller of the router available in the form of .GUF-Dateien zur Verfügung, die Sie special .GUF files . These are available über die Webseite www.ceag.de bezie-... -
Page 41: Router Auf Werkseinstellungen Zurücksetzen
6 Implementing service procedures 6.4 Router auf Werksein- 6.4 Resetting router to factory stellungen zurücksetzen settings Verfahren Sie nach folgender Prozedur, um Implement the following process to den CG-S / IP Router+ 1P. V2 auf seine reset the CG-S / IP Router+ 1P. V2 to its Werkseinstellungen zurückzusetzen: factory settings: 1. -
Page 42: Probleme Lösen
EATON. nicht grün leuchten, so nehmen Sie bitte Kontakt mit dem Service der 3. Does the Status LED flash red or Firma EATON auf. red/green? In this case the router has problems 3. Blinkt die Status LED rot oder rot/grün? with the IP address. - Page 43 7 Troubleshooting 4. Prüfen Sie die Leuchtdioden an 4. Check the LEDs on the ethernet der Ethernet Buchse des CG-S / IP socket of the Router+ 1P. V2. Die grüne LED muss CG-S / IP Router+ 1P. V2. The green l euchten.
- Page 44 Erfolg unserer Kunden stets an erster Stelle stehen. Für mehr Informationen besuchen Sie www.eaton.de. Ihre Ansprechpartner finden Sie unter www.ceag.de. At Eaton, we’re energized by the challenge of powering a world that demands more. With over 100 years experience in electrical power management, we have the expertise to see beyond today.
Need help?
Do you have a question about the CEAG CG-S / IP Router+ 1P. V2 and is the answer not in the manual?
Questions and answers