Table of Contents
Advertisement
Advertisement
Table of Contents

Related Manuals for JVC UX-D750


Summary of Contents for JVC UX-D750
- Page 1 Instruction Manual Wireless DAB Hi-Fi UX-D750...
-
Page 3: Table Of Contents
Contents Safety Warnings ........................5 Unpacking ..........................7 Product Overview ........................8 Main Unit .................................8 Amplifier ................................9 Remote Control ............................10 Preparation .........................11 Battery Replacement for the Remote Control ................11 Remote Control Operation Range .......................12 Connections ........................13 Connecting the Amplifier and CD Player ..................13 Connecting the Speakers ........................13 Connecting the Aerial ..........................14 Using the AUX Connection........................14... - Page 4 Playback ................................ 25 To Skip Search or Search and Play ...................... 25 Selecting an Album (for MP3 disc) ..................... 25 Repeat Playback ............................26 Text Display During Playback ....................... 26 Programme Play ............................27 Using the USB ........................27 AUX Operation ........................28 Bluetooth®...
-
Page 5: Safety Warnings
Safety Warnings • Read all the instructions carefully before Ventilation using the unit and keep them for future • To prevent the risk of electric shock or reference. fire hazard due to overheating, ensure • Retain the manual. If you pass the unit that curtains and other materials do not onto a third party make sure to include this obstruct the ventilation vents. - Page 6 Maintenance • Please dispose of batteries correctly by following the guidance in this manual. • Ensure to unplug the unit from the mains socket before cleaning. Supervision • Do not use any type of abrasive pad or • Children should be supervised to ensure abrasive cleaning solutions as these may that they do not play with the unit and the damage the unit’s surface.
-
Page 7: Unpacking
Thank you for purchasing your new product. We recommend that you spend some time reading this instruction manual in order that you fully understand all the operational features it offers. You will also find some hints and tips to help you resolve any issues. Read all the safety instructions carefully before use and keep this instruction manual for future reference. -
Page 8: Product Overview
Product Overview Main Unit Front View STANDBY Button / Standby Indicator 2. Remote Sensor 3. Disc Tray Open / Close Button 5. CLOCK Button 6. REP/SHUF Button 500mA USB Socket NFC Sensor 9. Display Fast Forward Button Tuning forward button Reverse Button Tuning backward button... -
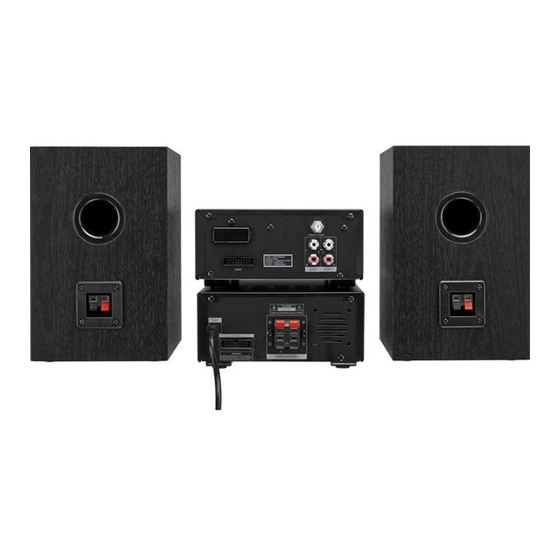
Page 9: Amplifier
Amplifier Front View 4. VOLUME Dial Headphones Socket 5. SOURCE Dial 2. BASS Dial 3. TREBLE Dial Rear View 1. AC ~ Power Cable 2. CABLE Socket 3. SPEAKER OUT 6Ω (L/R) Terminal... -
Page 10: Remote Control
Remote Control Standby Button PAIR Button 3. CD/USB Button Button 5. ALBUM/PRESET Button Button Button Button 9. ALBUM/PRESET Button 10. AUX 1/2 Button 11. FM/DAB Button Stop Button 13. REP/SHUF Button 14. SCAN Button 15. PROGRAM Button 16. INFO Button 17. -
Page 11: Preparation
Preparation Battery Replacement for the Remote Control 1. Press and hold the button at the back of the remote control to open the back cover. 2. Insert 2 AAA batteries with correct polarity (+/-) as indicated. 3. Replace the back cover. Ensure the back cover is in right position. -
Page 12: Remote Control Operation Range
Remote Control Operation Range • Point the remote control to the unit no more than 6 meters from the remote control sensor and within 60° horizontally and 20° vertically of the front of the unit. 30° 30° • Please note that the operating distance may vary depending Max. -
Page 13: Connections
Connections Connecting the Amplifier and CD Player Place the CD player on top of the amplifier, and connect them with the Connection Cable. Ensure all connections are connected before connecting to the mains power socket. Rear View of the Main Unit Connection CABLE Cable... -
Page 14: Connecting The Aerial
Connecting the Aerial Fully extend the DAB / FM aerial. Connect the supplied DAB / FM aerial to the DAB/FM AERIAL socket on the rear of the unit by turning the antenna screw cap clockwise. Rear View of the Main Unit CABLE •... -
Page 15: Playing Mp3 From A Usb Device
Playing MP3 from a USB Device When a USB device is connected to the unit, turn the SOURCE dial on the unit or press the CD/USB button on the remote control to select the USB mode. • The player supports the USB music file format of MP3 only. •... -
Page 16: Connecting To The Mains Supply
Connecting to the Mains Supply • This unit is designed to operate with an AC 220-240V ~ 50/60Hz power supply. • Connecting the unit to any other power source may cause damage to the unit. Unwind the mains cable to its full length. Connect the mains plug to a mains socket. Make sure the mains plug is fully inserted into the mains socket. -
Page 17: Basic Operating
This instruction manual explains the basic instructions for operating this unit. Unless otherwise stated, all operations described are based on remote control use. Basic Operating Switching ON / OFF When you first connect the unit to the AC power, the unit will be in Standby mode. STANDBY on the unit or •... -
Page 18: Adjust The Speaker Level Settings And Effects
Adjust the Speaker Level Settings and Effects Adjusting the Volume To increase or decrease the volume, turn the – VOLUME + dial on the unit or press the VOL + / – buttons on the remote control. Mute Sound If you wish to turn the sound off, press button. -
Page 19: Clock Operation
Clock Operation In DAB / RDS station, the unit can synchronize with time transmitted by DAB / RDS station (with CT information) automatically. Manually Setting the Clock Manual setting the clock can only be done in Standby mode. 1. In Standby mode, press and hold the CLOCK button until the display scrolls across CLOCK SET, then the word “CLOCK”... -
Page 20: Daily Timer
Daily Timer You can use the setting timer to make the unit automatically turn on at a certain time everyday from standby. When the setting timer is on, the timer indicator “ ” will be displayed. The clock must be correctly set for the timer to operate correctly. 1. -
Page 21: Manual Tuning
Manual Tuning As well as the auto tune function, you can manually tune the receiver. This can help you when aligning your aerial or when adding stations that were missed while auto tuning. 1. Press and hold the button. The display will show the current channel and frequency. 2. -
Page 22: Dab Information Display
DAB Information Display You can view the DAB service information in the following modes. Depending on the DAB radio station you are tuning to, some information modes may be unavailable. Press the INFO button repeatedly on the remote control to view the following information. Station Name Station Name When an RDS station is received, the name of that... -
Page 23: Fm Radio Operation
FM Radio Operation • Make sure that you have correctly connected and fully extended the antenna. • The search may not stop at a station with a very weak signal. • If reception is still poor, try to adjust the DAB / FM aerial location. Turn SOURCE dial on the unit or press FM/DAB button repeatedly on the remote control to select the tuner source. -
Page 24: Recalling A Preset Station
Manually To store a preset, you must first be listening to the station that you would like to save. Using the Remote Control • 1. Press PROGRAM to activate program mode. The preset number “PR##” will blink. 2. Press ALBUM/PRESET / to select the desired station preset number. 3. -
Page 25: Cd/Mp3 Operation
CD/MP3 Operation Compatible Disc Types Disc Types Disc Logo Recorded Content CD-R (CD Recordable - Audio/MP3) AUDIO / MP3 CD-RW (CD-Rewritable - Audio/MP3) AUDIO / MP3 AUDIO-CD (Compact Disc Digital Audio) AUDIO • Some recorded files may not be able to be played due to the type and format of disc or condition of the recording. -
Page 26: Repeat Playback
Repeat Playback ONE and ALL Repeat Play • Press the REP/SHUF button repeatedly to set the function. First press : To repeat the same track; “TRK” and “REP” will blink. Second press : To repeat playing all tracks on a disc; “TRK” will stay lit, and “REP ALL” will blink. -
Page 27: Programme Play
Programme Play You can programme up to 20 tracks to play in any desired order. 1. Make sure the disc is inserted and in STOP mode. 2. Press PROGRAM to enter the programme mode. The display will show “01 P-01”. 3. -
Page 28: Aux Operation
BT (Bluetooth®) mode. The display will show “BT” and then “BT READY“. 2. Activate your Bluetooth® device and select the search mode. “UX-D750” will appear on your Bluetooth® device list. 3. Select “UX-D750” and enter “0000” for the password if necessary. If connect successful, the unit will make a beep sound. -
Page 29: Nfc (Near Field Communication) Operation
NFC (Near Field Communication) Operation Pair your NFC-enabled mobile device directly with this unit by just a single tap. 1. Activate NFC on your mobile device. 2. Tap the mobile device on the icon of the unit. The device vibrates or a message pops up. -
Page 30: Handling Discs
Handling Discs • Do not touch the playback side of the disc. • Do not attach paper or tape to the disc. Cleaning Discs • Fingerprints and dust on the disc cause picture and sound deterioration. Wipe the disc from the centre outwards with a soft cloth. Always keep the disc clean. Playback side •... -
Page 31: Hints And Tips
Hints and Tips If a problem does occur, it may often be due to something very minor. The following table contains various tips. If you require additional assistance For UK, please call our UK Call Centre on 0344 561 1234. •... - Page 32 • Perform a system reset and then a DAB full scan. Bluetooth® Problem Solution I cannot find • Ensure the Bluetooth® function is activated on your “UX-D750” on my Bluetooth® device. Bluetooth® device. • Ensure you have paired your unit with the Bluetooth® device. Some NFC-enabled •...
-
Page 33: Product Fiche And Specifications
Product Fiche and Specifications Brand Model UX-D750 System Section Power Supply 220V-240V~ 50/60Hz Power Consumption 28 W Dimension 160 (W) × 275 (D) × 156 (H) mm Bluetooth® Bluetooth® Version Bluetooth® 4.2 Maximum transmitted 4 dBm power Frequency bands 2402 MHz ~ 2480 MHz... -
Page 34: Useful Information And Licences
Useful Information and Licences Visit Partmaster.co.uk today for the easiest way to buy electrical spares and accessories. With over 1 million spares and accessories available we can deliver direct to your door the very next day. Visit www.partmaster.co.uk or call 0344 800 3456 (UK customers only). Calls charged at National Rate. This radio is future-ready and can receive the available DAB, DAB+ and FM radio stations. - Page 36 DSG Retail Ireland Ltd (259460) 3rd Floor Office Suite, Omni Park SC, Santry, Dublin 9, Republic of Ireland The product is distributed and warranted exclusive by DSG Retail Ltd. “JVC” is the trademark of JVCKENWOOD Corporation, used by DSG Retail Ltd. under license. (IB-UX-D750-200427V6)
Need help?
Do you have a question about the UX-D750 and is the answer not in the manual?
Questions and answers
The stereo keeps saying Goodbye and shutting down even though it's in use. Also, I changed the clock and it’s not changing the time.
The JVC UX-D750 stereo may say "BYE BYE" and shut down while in use because it automatically enters ECOPOWER / STANDBY mode after 15 minutes of inactivity in BT, AUX 1, AUX 2, DISC, or USB mode, or if the external device is disconnected, turned off, or the volume is too low.
The clock may not be changing the time because the RDS CLOCK system does not work properly in areas where RDS CLOCK service is unavailable.
This answer is automatically generated
mains power not applying
The JVC UX-D750 unit does not power up, showing no red light and no response to the power button, despite the mains fuse being fine. Possible reasons could include:
1. The mains plug is not fully inserted into the mains socket.
2. A faulty power connection or internal power supply failure.
3. The unit is in standby mode but not responding.
4. A deeper hardware issue requiring professional repair.
A free estimate and repair service is available for this issue.
This answer is automatically generated