Table of Contents
Advertisement
Quick Links
INSTALLATION
AND OPERATION
MANUAL
VARIABLE SPEED PUMP
Models RPVSP1
IMPORTANT SAFETY INSTRUCTIONS. READ AND FOLLOW ALL
NOTE: The instructions in this manual are for the use of qualified individuals specially trained and experienced
in the installation and maintenance of this type of equipment and related system components. Installation and
service personnel are required by some states to be licensed. Persons not qualified shall not attempt to install,
service, or maintain this equipment.
This manual should be maintained in legible condition and kept adjacent to the variable speed pump or in a safe
place for future use.
CONTROLLED COPY approved for factory use on 4/16/2020. RAYPAK PROPRIETARY AND CONFIDENTIAL INFORMATION . Approva
INSTRUCTION. SAVE THESE INSTRUCTIONS.
Effective: 01-15-20
Replaces: 12-10-19
P/N 241832 Rev 3
Advertisement
Table of Contents

Subscribe to Our Youtube Channel
Related Manuals for Rheem Raypak RPVSP1


Summary of Contents for Rheem Raypak RPVSP1
- Page 1 INSTALLATION AND OPERATION MANUAL VARIABLE SPEED PUMP Models RPVSP1 IMPORTANT SAFETY INSTRUCTIONS. READ AND FOLLOW ALL INSTRUCTION. SAVE THESE INSTRUCTIONS. NOTE: The instructions in this manual are for the use of qualified individuals specially trained and experienced in the installation and maintenance of this type of equipment and related system components. Installation and service personnel are required by some states to be licensed.
- Page 2 Revision 3 reflects the following changes: Figure 1 changed on page 7. Parts list descriptions updated on page 18. Warranty certificate added on pages 19 and 20. CONTROLLED COPY approved for factory use on 4/16/2020. RAYPAK PROPRIETARY AND CONFIDENTIAL INFORMATION . Approva...
-
Page 3: Table Of Contents
CONTENTS 1. WARNINGS ............4 5. GENERAL MAINTENANCE ........ 15 Pay Attention to these Terms ........4 Winterizing ............15 Entrapment Prevention ........... 6 6. ERROR DESCRIPTIONS ........16 2. INSTALLATION ............6 Communication Error ..........16 Pump ............... 7 7. -
Page 4: Warnings
1. WARNINGS Pay Attention to these Terms Indicates the presence of immediate hazards which will cause severe personal injury, death or substantial DANGER property damage if ignored. ndicates the presence of hazards or unsafe practices which could cause severe personal injury, death or WARNING substantial property damage if ignored. - Page 5 DANGER: DO NOT BLOCK SUCTION. SUCTION WARNING: Pumps are not a substitute for properly HAZARD. Suction can cause serious injury or death. installed and secured pool drain covers. An ANSI/ASME Do not use this pump for wading pools, shallow pools, A112.19.8 approved anti-entrapment drain cover must or spas containing bottom drains, unless the pump is be used for each drain.
-
Page 6: Entrapment Prevention
Entrapment Prevention Water Velocity The maximum water velocity through the suction fitting, DANGER: DO NOT BLOCK SUCTION. or cover, for any suction outlet must be 1.5 ft (.5 m) per second, unless the outlet complies with the latest published DANGER: Hazardous suction can edition of ANSI/ASME A112.19.8 (ANSI/APSP-16, 2011), trap hair or body parts, causing severe the standard for Suction Fittings For Use in Swimming and... -
Page 7: Pump
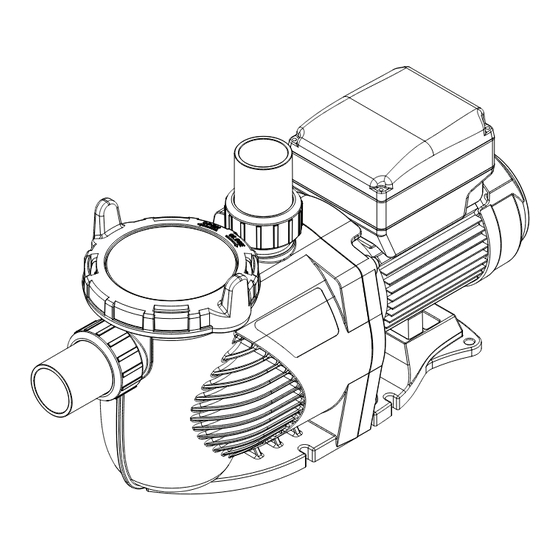
WARNING: Chemical fumes and/or spills can cause serious corrosion to the filter and pump structural L = 5 x 1.5" PIPING OUTER DIAMETER components. Structurally weakened components can cause filter, pump or valve attachments to separate and could cause serious bodily injury or property damage. VERTICAL LIFT 10 FT (3 M) Packaging A union kit is included and needed to make the connections. - Page 8 1. Permanently ground motor. Locate the ground terminal located on the rear side of the motor and use the wire gauge and type required by code to connect the motor ground terminal to the electrical service ground. On cord-connected circuits, check for proper grounding.
-
Page 9: Operation
2. Bond permanently-wired pumps. The National 4. CONTROLS Electrical Code requires that the motor be electrically bonded to the appropriate permanently-installed Overview pool or spa/hot tub structure using a solid copper The panel include the below display or control functions to conductor no smaller than No. - Page 10 Self-Checking Interface (~3 seconds) (Short press MODE to change page) E.g. "SP:1000" Monitoring Interface Speed Display Unit: RPM E.g. "P: 0" Power Consumption Display Unit: Watt (W) (Long press MODE for 2 seconds) E.g. "CI: 0:00" Time Display (Long press MODE for 2 seconds) Enter Time Setting Interface E.g.
-
Page 11: Operation Procedure
1. Long press (press and hold for 2 seconds) the MODE Operation Procedure button to access clock settings. 2. Short press SPEED 1 and SPEED 2 to shift between Power Up Hour and Minute. The applicable digits will flash. Plug in the power and the pump will perform self-diagnostic 3. - Page 12 • Short press to set END TIME (IF:00:00) . Change Preset SPEED 1-3 Default is 00:00. • Press SPEED 1 and long press the MODE button. • Short press SPEED 1 and SPEED 2 to shift between The four digital speed values will flash. Hour and Minute.
- Page 13 • Press to adjust the value. • Short press MODE to save the setting, or press SPEED 3 to cancel. Prime Speed • Short press to access PRIME SPEED setting. Figure 18. Schedule 3 Setting Schedule Policy a. Programmed Schedule Priority, Schedule 1 > Schedule 2.
- Page 14 RS485 Setting System Reset To Factory Default Setting The pump is equipped with a RS485 communication • Short press to access system RESET function. interface to use with an external automation controller. It is not intended to be accessed by domestic users. The pin assignment is 1 = A and 2=B.
-
Page 15: General Maintenance
Press START/STOP button to cancel the countdown during 1. Stop the pump, close the suction and discharge gate the auto-recovery process or to activate the auto-recovery valves, and release all pressure from the system immediately (without activating the auto-run). If there before proceeding. -
Page 16: Error Descriptions
6. ERROR DESCRIPTIONS Communication Error If the communication error ("ER ---") appears, make sure that the plug has good electrical contact with the current. Reset the system by unplugging the equipment from the power supply, then wait at least 60 seconds before reconnecting. -
Page 17: Troubleshooting
7. TROUBLESHOOTING Problem Cause Action Disconnected switch, or circuit breaker is in ON Check electrical wiring position Motor does not Thermal overload open Let the motor naturally cool down start Locked motor shaft Check for obstructions inside pump body Low voltage Check that electric power is 220-240VAC Suction lines, pump, strainer, and pump body are not Pump is not primed... -
Page 18: Illustrated Parts List
8. ILLUSTRATED PARTS LIST Figure 28. Parts Exploded View Item Description Raypak Order No. Kit - Transparent Cover VSP 018228F Kit - Pump Basket VSP 018229F Kit - Water Union 1-1/2" PVC 018230F Kit - Drain Plug With O-ring 018231F Kit - Pump Diffuser with O-Ring 018232F Kit - Pump Impeller with Screw... -
Page 19: Warranty
9. WARRANTY Catalog Number: 6000.954 Effective 01/01/20 LIMITED WARRANTY ABOVE GROUND SWIMMING POOL PUMPS Models: RPAGP75, RPAGP100, RPAGP102, RPAGP150, RPAGP152, and RPVSP1 SCOPE OF WARRANTY Raypak, Inc. (“Raypak”) warrants to the original owner that the above ground swimming pool pump models listed above and sold with this Limited Warranty certificate (the “Pump”), when installed in the United States of America with a pool, will be free from defects in materials and workmanship under normal use and service for the Applicable Warranty Period defined herein. - Page 20 10. to damage, malfunctions or failures resulting from misuse or neglect, including but not limited to, freeze-ups. HOW TO MAKE A WARRANTY CLAIM You should immediately notify your dealer and provide proof of purchase model number serial number and date of installation. If the dealer is not available, please contact Raypak customer service at 805- 278-5300.
Need help?
Do you have a question about the Raypak RPVSP1 and is the answer not in the manual?
Questions and answers