Table of Contents
Advertisement
Quick Links
Advertisement
Table of Contents

Related Manuals for Iridex TruFocus LIO+


Summary of Contents for Iridex TruFocus LIO+
- Page 1 ™ TruFocus LIO+ Operator Manual IRIDEX 13102-EN ® Revision C...
- Page 2 IRIDEX reserved. Published in the USA. CORPORATION Except with the express written permission of IRIDEX, the contents of this 1212 Terra Bella Avenue operator manual may not be copied in whole or in part, or reproduced in, Mountain View, California or transmitted to any other media.
-
Page 3: Table Of Contents
Contents INTRODUCTION · 1 LIO+ · 1 BOUT THE OCUS LIO+ S · 2 OCUS PECIFICATIONS Standard-Spot Dual Wavelength TruFocus LIO+ · 2 Console compatibility · 2 Console firmware compatibility · 2 Treatment wavelength · 2 Laser spot size · 2 Headset styles ·... - Page 4 · 9 DJUSTING THE Fitting the headpiece · 9 Adjusting the head size · 9 Adjusting the height · 9 Adjusting the optical unit · 9 Adjusting the eyepieces · 10 · 11 DJUSTING THE LLUMINATION IGHT AND IMING Using the TruFocus LIO+ as a therapeutic device · 11 Adjusting the white illumination beam intensity ·...
- Page 5 CLINICAL & SAFETY · 23 · 23 LINICAL PPLICATIONS Indications for clinical use · 23 Contraindication · 23 Recommended procedure for clinical use · 23 Panretinal photocoagulation (outpatient) · 23 Panretinal photocoagulation (operating room) · 24 Sealing treatment · 24 Treating patients who have a gas-filled eye ·...
- Page 6 TruFocus LIO+ Operator Manual 13102C-EN...
-
Page 7: Introduction
Introduction About the TruFocus LIO+ ™ ® The TruFocus LIO+, when connected to the OcuLight console, adds CAUTION the therapeutic capability of transpupillary retinal photocoagulation to Federal law restricts this the diagnostic indirect ophthalmoscope. It enables you to deliver laser device to sale by or on the energy to pathologies in the far periphery of the retina and to treat order of a physician. -
Page 8: Trufocus Lio+ Specifications
TruFocus LIO+ Specifications Standard-Spot Dual Wavelength TruFocus LIO+ Console compatibility OcuLight GL OcuLight GLx OcuLight TX OcuLight SLx OcuLight OR IQ 810™ Console firmware compatibility OcuLight GL version 3.2 and above OcuLight GLx version 3.3 and above OcuLight TX version 4.0 and above OcuLight SLx version 4.1 and above OcuLight OR version 2.0 and above IQ 810 version 1.0 and above... -
Page 9: Treatment Wavelength
IQ 810 Treatment wavelength Laser Diode, 810 nm Laser spot size 360 µm spot at the retina using a 20 D lens Headset styles Cap, strap Large-Spot 810 nm Wavelength TruFocus LIO+ Console compatibility OcuLight SL (with optional large-spot upgrade) OcuLight SLx IQ 810 Treatment wavelength... -
Page 10: Warranty And Service
Please complete and forward to us the enclosed product registration card. Service and technical support IRIDEX has established an efficient process to support its installations worldwide. Should you require assistance, please contact your local IRIDEX Technical Support representative or our corporate headquarters. -
Page 11: Operation
Along with this manual, you should have the TruFocus LIO+, zero-diopter IRIDEX Technical Support lenses, and a spare halogen bulb. representative immediately. -
Page 12: Trufocus Lio
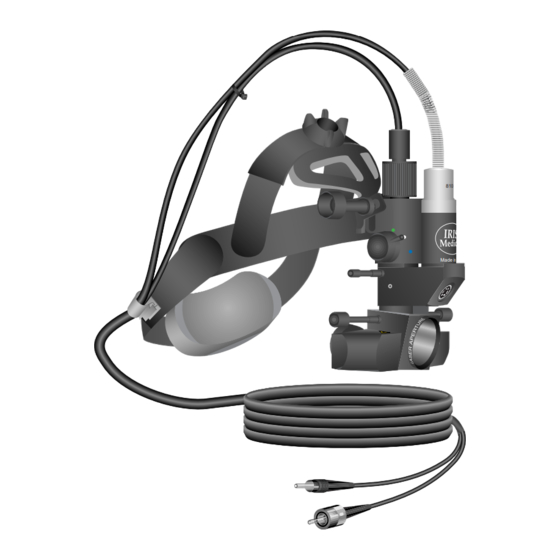
TruFocus LIO+ The TruFocus LIO+ delivers the treatment and aiming beam from the console to the patient’s eye. It consists of: • Optical assembly • Controls for adjusting the headpiece • Controls for adjusting the position of the optical assembly •... -
Page 13: Connecting The Components
Laser Aperture At End Of Do not use the Fiber Optic TruFocus LIO+ with any laser system other than an IRIDEX console. Such use Fiber-optic connector may void any product Protective cap warranties and jeopardize the safety of the patient, yourself, and others in the treatment room. -
Page 14: Connect The Illumination Connector To The Console
Connect the illumination connector to the console Insert the illumination connector into the console TruFocus LIO+ receptacle. Press firmly to seat the connector. Σ n Counter Reset Σ n=0 SmartKey Laser Aperture At End Of Fiber Optic Using the TruFocus LIO+ as a diagnostic device Connect the illumination connector to the console. -
Page 15: Adjusting The Fit
Adjusting the Fit Fitting the headpiece Adjusting the head size Turn the knob on the strap at the back of the headpiece counter-clockwise to enlarge the circumference of the strap enough to easily fit over your head. Place the TruFocus LIO+ on your head. Turn the knob clockwise until the TruFocus LIO+ fits securely. -
Page 16: Adjusting The Eyepieces
Adjusting the eyepieces Slide each eye piece to the correct position by pushing the finger tabs under each eyepiece (interpupillary distance adjustment). Place a viewing target 36 cm (14 inches) away for the TruFocus LIO+. Close one eye. Adjust the separation until you see the entire target. Do the same with the other eye. -
Page 17: Adjusting The Illumination Light And Aiming Beam
Adjusting the Illumination Light and Aiming Beam Using the TruFocus LIO+ as a therapeutic device Adjusting the illumination light and aiming beam ensures that the treatment beam will be in the field of view when the TruFocus LIO+ is used for therapeutic laser treatment. Adjusting the white illumination beam intensity Use the illumination brightness control on the console to adjust... -
Page 18: Positioning The White Illumination Beam
Positioning the white illumination beam Use the vertical adjustment control to center the white light within the field Made in of view. If the illumination beam appears to be displaced to one side, move both interpupillary distance adjustment finger tabs in the same direction until the light is centered. -
Page 19: Using The Special Function Controls
Using the Special Function Controls Selecting the illumination filter Use the illumination filter controls to select red-free, cobalt or white light illumination. White light is most frequently used during laser treatment. Made in Selecting the illumination aperture size Use the illumination aperture control to select a small, medium, or large illumination aperture. -
Page 20: Before Treating Patients
Before Treating Patients REFERENCE 1. Ensure that the console and TruFocus LIO+ are properly connected and set up. Read the Clinical and Safety sections of your 2. Post the laser warning sign outside the treatment room door. console manual and this manual before using the TruFocus LIO+. -
Page 21: Treating A Patient
Treating a Patient 1. Turn on the console. REFERENCE See the Using the Control 2. Ensure that the TruFocus LIO+ fits properly. Panel section of your 3. Make the necessary illumination light and aiming beam adjustments. console manual for 4. Select the illumination filter. instructions on using the treatment controls and 5. -
Page 22: Concluding Patient Treatment
Concluding Patient Treatment REFERENCE 1. Place the console in Standby mode. See the Inspecting and 2. If desired, record the number of exposures and any other treatment Cleaning sections of parameters. your console manual and 3. Turn off the console and remove the key to prevent unauthorized use. this manual for cleaning 4. -
Page 23: Troubleshooting
If you continue to experience problems, write manual and this manual down the error message, product name, and serial number of the console for more information. and the TruFocus LIO+ before contacting your local IRIDEX Technical Support representative. Problem Action Inadequate or no aiming beam •... - Page 24 Problem Action No illumination light • Ensure that the illumination connector is connected to the console. • Ensure that the special function control is not between detents. • Check the bulb and replace, if necessary. Illumination light is too dim •...
- Page 25 Problem Action The treatment lesions are variable • The TruFocus LIO+ may be or intermittent slightly out of focus. This decreases power density . Readjust your working distance to obtain the smallest spot size. • A poorly centered laser beam may be clipping on the examination lens or on the patient’...
- Page 26 TruFocus LIO+ Operator Manual 13102C-EN...
-
Page 27: Maintenance
Maintenance Inspecting and Cleaning Routine care CAUTION Turn off the console • Do not tightly kink or bend the fiber-optic. before inspecting any • When connected to the console, ensure that the fiber-optic is located delivery device away from high traffic areas. components. -
Page 28: Changing The Illumination Lamp
Changing the Illumination Lamp CAUTION 1. Unscrew the retaining cap. Do not touch the lamp’s 2. Remove the burned-out illumination lamp. glass envelope. Remove 3. Insert an identical type of lamp, aligning the key on the lamp base with any fingerprints from the the slot in the TruFocus LIO+. -
Page 29: Clinical & Safety
Qualified physicians should review the available literature presented in clinical papers before using the TruFocus LIO+ delivery device. A Reference Catalog of clinical papers and presentations is available through IRIDEX Marketing. Panretinal photocoagulation (outpatient) • Slit lamp delivery is typically used to treat the posterior 80% of the retina with the use of mirrored contact lenses. -
Page 30: Panretinal Photocoagulation (Operating Room)
Panretinal photocoagulation (operating room) The TruFocus LIO+: • Is particularly useful for diabetic patients undergoing pars plana vitrectomy . • Allows for better treatment of the superior quadrant than does the endolaser. • Allows better visibility through phakic gas-filled eyes since there are fewer reflections than present with biconcave lenses. -
Page 31: Treating Patients With A Localized Vitreous Hemorrhage
Treating patients with a localized vitreous hemorrhage The prismatic effect of the lens and use of scleral depression may assist in moving vitreous hemorrhage out of the way or pushing untreated retina into the view of the laser beam. The 810 nm (infrared) wavelength penetrates vitreous hemorrhage better than the 514-532 nm (green) wavelengths. -
Page 32: Using The Scleral Depressor
Using the scleral depressor The use of the scleral depressor is extremely helpful when treating with the TruFocus LIO+: • The scleral depressor helps stabilize the eye, acting as a ‘splint’ to inhibit voluntary and involuntary eye movement. • The depressor helps to manipulate the eye in various fixations and helps to flatten residual subretinal fluid. -
Page 33: Power Density And Spot Size
Power density and spot size NOTE The relationship between Tissue response to laser light is primarily determined by power density . spot size and resultant Power density (Watts/cm ) is laser power (Watts) divided by the area (cm power density is not linear. of the illuminated spot;... -
Page 34: Power And Duration
Other factors that can affect spot size include: • The refractive index of media in the eye, as shown. Medium Spot Size Smaller Fluid Standard Silicone Larger • Working distance. The smallest spot is obtained when the laser spot is at its focus point on the image plane. -
Page 35: Repeat Interval
Repeat interval REFERENCE See the Adjusting the Placing multiple treatment spots on the fundus is more easily Illuminating Light and accomplished utilizing the console’ s repeat mode. This eliminates Aiming Beam section of constant foot pedal action that is very awkward, especially in a standing this manual for proper position while the surgeon attempts to avoid head motion. -
Page 36: Safety
Safety Preventing unintended exposure of laser energy CAUTION Use of controls or To prevent exposure to laser energy, except as a therapeutic application, adjustments or from either direct or diffusely reflected laser beams, always review and performing of procedures observe the safety precautions outlined in this manual and the console other than those specified operator manual before using the TruFocus LIO+. -
Page 37: Ensuring Ocular Protection
Ensuring ocular protection WARNING Ensure that all persons in Protection for the physician the treatment room are wearing the appropriate An integral eye safety filter on the TruFocus LIO+ ensures that any laser laser safety eyewear. Never radiation returned to your eyes during clinical use is below Class 1 limit. substitute prescription eyewear for appropriate Protection for all persons in the treatment room —... -
Page 38: Location Of Regulatory Compliance And Other System Labels
Laser aperture labels LASER APERTURE LASER APERTURE LASER APERTURE 0344 LASER APERTURE LASER APERTURE LASER APERTURE CE label 0344 0344 L XXXX TruFocus LIO+ Operator Manual 13102C-EN...
Need help?
Do you have a question about the TruFocus LIO+ and is the answer not in the manual?
Questions and answers