Table of Contents
Advertisement
Advertisement
Table of Contents

Related Manuals for multicomp pro MP710086


Summary of Contents for multicomp pro MP710086
- Page 1 Single Output Power Supply MP710086 & MP710087...
-
Page 2: Table Of Contents
4.1.1 Display Brightness ..............9 4.1.2 Language Setting ..............9 4.1.3 Buzzer ..................9 4.1.4 Display (Only for MP710086 and MP710087) ......9 4.1.5 Curve Type You can set the type of the displayed curve to voltage curve or current curve............10 5. - Page 3 Safety Instructions Please read these instructions carefully before use and retain for future reference. Check that the voltage indicated on the rating plate corresponds with that of the local network before connecting the product to the mains power supply. When using electrical appliances basic safety precautions should ...
-
Page 4: Safety Terms And Symbols
User Manual 1. Safety Terms and Symbols Terms in this manual (The following terms may appear in this manual): Warning: Warning indicates conditions or practices that could result in injury or loss of life. Caution: Caution indicates the conditions or practices that could result in damage to this product or other property. -
Page 5: Panel And Interface
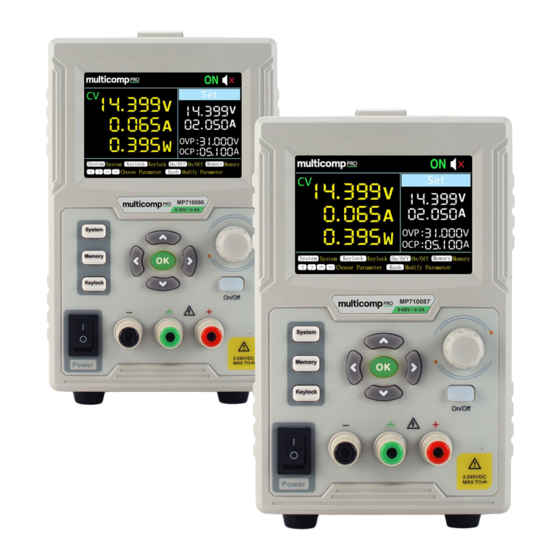
User Manual 2. Panel and Interface 2.1.1 Front Panel Figure 3-1 Front Panel Overview ① Display Area ② Direction Key Display user interface. Select menu; select parameters; Edit the cursor. OK Key 1) Enter the menu or confirm the entered parameters. ③... -
Page 6: Rear Panel
User Manual Button light instruction On/Off key:The key lights up when the channel is active. 2.1.2 Rear Panel ① ② ⑤ ③ ④ Figure 3-2 Rear Panel Overview ① AC Power AC power input interface ② Fuse Input Jack ③ Air Vent Power fuse ④... -
Page 7: User Interface
User Manual 2.1.3 User Interface Channel output status Constant Voltage output Constant Current outpu Buzzer status Actual voltage output Set values of voltage Actual current output Set values of current Set values of O.V.P Actual power output Set values of O.C.P Figure 3-3 User Interface 2.2 General Inspection When you have got a new power supply, it is suggested that you should... -
Page 8: Output Inspection
User Manual 2.4 Output Inspection Output inspection is to ensure that the instrument can achieve its rated outputs and properly respond to operation from the front panel. For the procedures below, it is suggested that you read "Turn On/Off the Channel Output" on page 8 and "Set the Output Voltage/Current"... -
Page 9: Panel Operation
User Manual 3. Panel Operation 3.1.1 Turn On/Off the Channel Output Press the On/Off key to turn on/off the channel. 3.1.2 Set the Output Voltage/Current ∧ ∨ In the channel setting area, press the keys to move the red cursor between parameters. -
Page 10: Memory Key Shortcut Settings
User Manual Set values of O.V.P Set values of O.C.P 3.1.4 Memory key shortcut settings Press Memory key on front panel, the M1, M2, and M3 keys can store five sets of channel parameters M1, M2, M3, M4, and M5, respectively, for quick output. -
Page 11: System Settings
When the system prompts, it beeps, such as when the output is cut due to overvoltage/overcurrent protection. 4.1.4 Display (Only for MP710086 and MP710087) menu. Press the ∨ arrow keys to choose Display submenu. Press the < / >... -
Page 12: Curve Type You Can Set The Type Of The Displayed Curve To Voltage Curve Or Current Curve
User Manual arrow keys or turn the rotary control to set the display mode to Number or Curve. In system main interface, you can also press the OK key or press the rotary control to toggle between Number and Curve display mode. Number menu. - Page 13 User Manual menu. Press the ∨ arrow keys to choose Display submenu. Press the < / > Press the System softkey and turn the rotary control to select the [Utility] the ∨ arrow keys to choose CurveType submenu, press the < / > arrow arrow keys or turn the rotary control to set the display mode to Curve.
- Page 14 User Manual Curve display mode. Press the ∧ / ∨ arrow keys to select the Curr curve type. control to select the The display mode of Curr curve is as below: Note: In Curr curve display mode, you can still set the value of voltage or current.
-
Page 15: Interface Setting
User Manual 5. Interface Setting (1) Press the ∨ arrow keys to select the baud rate, and press the < / > arrow keys to set the baud rate of the RS232 serial interface. The optional values for the baud rate are: 2400, 4800, 9600, 19200, 38400, 57600, 115200, and the factory default setting is 115200. -
Page 16: Troubleshooting
User Manual Backlight Buzzer Baud Rate 115200 Port Data Digit System Port Setting Parity Check None Stop Digit Display (Only for Number special models) 7. Troubleshooting 1. The instrument is powered on but no display showing. Check if the power is connected properly. ... -
Page 17: Appendix
User Manual 8. Appendix 8.1.1 Appendix A:Accessories standard: Power Cord RS232 Cable User Manual Fuse optional: Banana plug to USB2.0 to S232 crocodile clip common port test leads connector 8.1.2 Appendix B: General Care and Cleaning General Care Do not store or leave the instrument where the liquid crystal display could be exposed to direct sunlight for long periods of time. - Page 18 User Manual Clean the instrument with a lightly damp soft cloth. It is recommended to wipe with mild detergent or fresh water. To avoid damage to the instrument, do not use any corrosive chemical cleaning agent. Warning: Before re-applying power, ensure that the instrument is completely dry, avoiding any electric shock or electrical short circuit resulting from moisture.
Need help?
Do you have a question about the MP710086 and is the answer not in the manual?
Questions and answers