Table of Contents
Advertisement
Quick Links
Advertisement
Table of Contents

Related Manuals for Easypix DV5008


Summary of Contents for Easypix DV5008
- Page 1 English...
- Page 2 English Preface Many thanks for your selection of our products. Before use, please thoroughly read this manual to ensure you can enjoy every function of this machine and keep it long under normal service. Please also keep this manual properly for future reference during use. Copyright Without prior written permission by the Company, the contents in this publication shall not be reproduced, distributed or reprinted in electronic, mechanical, magnetic, optical, chemical,...
-
Page 3: Table Of Contents
English Contents 1 Introduction .......................... 4 1.1 Accessories ........................ 4 1.2 Components and Names ..................... 5 2 Get Video Camera Ready ....................7 2.1 How to Turn ON/OFF the Power of Video Camera ............. 7 2.1.1 Installing Battery ....................7 2.1.2 Turning ON/OFF Video Camera................. -
Page 4: Introduction
English 1 Introduction The video camera you select and purchase is a digital video device integrating high-quality digital video camera, digital camera, super MP3, digital pen recorder and PC-Cam. It will bring you endless new experiences in digital video. 1.1 Accessories AC Adaptor Cradle A/V Cable... -
Page 5: Components And Names
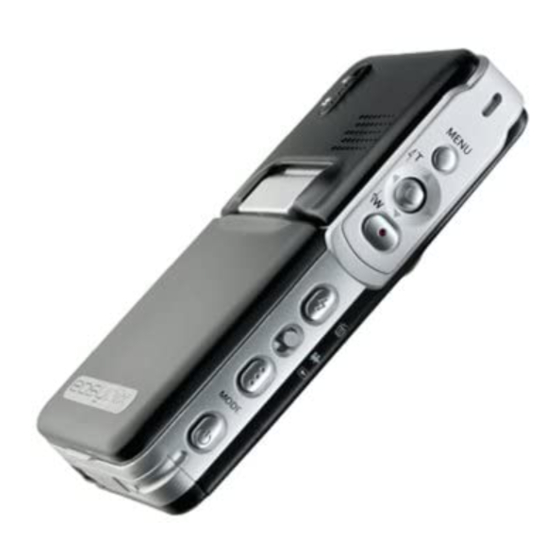
English 1.2 Components and Names 1 LCD Display 2 Microspur Switch 3 Strap Attaching Hole 4 Indicator 5 Menu Button 6 5-Direction Button 7 Shutter Button 8 Flash Button 9 Shooting/Playback Mode Switch 10 Mode Button 11 Power Button 12 Microphone 13 Lens 14 Flash 15 Shooting Indicator... - Page 6 English 17 Cradle Connection Hole 18 External MemoryCard /Battery Cover 19 Battery 20 Battery Lock 21 Storage Card Slot 22 Cradle Connector 23 DC Input Port 24 USB Port 25 Audio/Video Output Port Note: The bundled AC Adaptor output voltage is 5V, 1.0A. Please only use the bundled AC Adaptor.
-
Page 7: Get Video Camera Ready
English 2 Get Video Camera Ready 2.1 How to Turn ON/OFF the Power of Video Camera 2.1.1 Installing Battery This video camera uses rechargeable lithium ion battery. Please refer to following procedures for correct installation of the battery: 1) Move the battery lock along direction to open the card/battery cover. -
Page 8: Removing Battery
English Note: This camera also supports USB charging. 1) Insert the video camera into the base 2) Use the bundled USB cable to connect between the base and computer. Switch on the computer. 3) The charging indicator will become red when it starts charging. 4) Wait until the charging indicator turns into green, indicating that the battery is fully charged. -
Page 9: Installing And Removing Sd Card
English 2.2 Installing and Removing SD Card It is suggested to use SD card if you need an external memory card to expand the storage capacity of your video camera. Installing SD Card 1) Turn the video camera off and open the card/battery cover. -
Page 10: Using Lcd Display
English 2.3 Using LCD Display When recording the images, you can view the pictures from LCD display. From this display, you can also view the contents recorded before. 1) Open the LCD display. 2) Adjust the angle of LCD display according to the recording/play angle required. To its maximum, the display can be rotated to following angle: 90 in open/close, 180 in forward direction and 90 in reverse direction. - Page 11 English Shooting 1) Shooting Status 2) Scenery Indication 3) Battery Power 4) Exposure Compensation 5) Memory Card 6) Date Stamp 7) Digital Zoom 8) Photo counting [Recorded/Recordable] 9) Microspur Status 10) Photo Size 11) Self-shot Indication 12) Photo Quality 13) White Balance Mode 14) Flash Mode Voice Recording 1) Voice Recording Status...
-
Page 12: Use The Video Camera
English 3 Use the Video Camera The main functions of this digital video camera include six modes, i.e. video capture, photo taking, voice recording, playback, MP3 play and browser. In this chapter, we will introduce the functions and use of video camera based on these modes. 3.1 Working Modes 3.1.1 Video Capture The system will automatically enter into video capture mode after the video camera is... - Page 13 English 4) Setting Audio (Default setting is ON) Set the working mode to video mode , then press (MENU) button to enter into video menu. Use 5-direction button to select (Audio) for setting its property and press (OK) to confirm. The icon will appear on the display when the voice is turned off.
-
Page 14: Shooting
English 3.1.2 Shooting The photo you shot will be saved in JPEG format. Turn on the video camera and press (MODE) button. Shoot mode is selected when the icon appears on upper left of the display. Find the view from LCD display under shooting preview status. Hold your camera and fully press down the shutter button to complete the shooting. - Page 15 English Set the working mode to shoot mode then press (MENU) button to enter into shoot menu. Use 5-direction button to select (Quality) for setting its property and press (OK) to confirm. Exit the menu and return to preview mode. The new setting will be shown on the display. Three quality modes are provided for your selection: (Super) The image quality is best but the image file is largest.
- Page 16 English 8) Setting the Date Stamp (The preset value is OFF) Switch the working mode to shoot mode , then press (MENU) button to enter into shoot menu. Use 5-direction button to select (Date Stamp) for setting its property and press (OK) to confirm.
- Page 17 English 12) Setting the EV (The preset value is 0) You may use this function to adjust the brightness of the photo you shot. Please switch the working mode to shoot mode , then press (MENU) button to enter into the menu. Select (EV) and press (OK) to enter into preview mode for exposure compensation setting.
-
Page 18: Voice Recording
English 3.1.3 Voice Recording Please set the shoot/playback mode switch to shoot mode . Twice pressing (MODE) button, the camera will enter into preparing status for voice recording. Press the shutter button to start voice recording. The voice-recording indicator in the front of the camera will be bright and the time recorded will be shown on the display. - Page 19 English 3) Setting the Lock To prevent the user from deleting the file by error, the video camera provides file lock function. a.) Set the shoot/playback mode switch to playback mode , then press 5-direction button to select the photo, movie or voice you want to lock. Press (MENU) to enter into playback menu and then use 5-direction button to select (LOCK) menu.
- Page 20 English 7) Setting the Rotation Set the shoot/playback mode switch to playback mode , then press 5-direction button to select the photo you want to rotate. Press OK to switch to enlarged playback and then press MENU to enter into playback menu. Only the photo can be set for rotation. a.) Select Rotate from playback menu and press (OK).
-
Page 21: Setting Mode
English photo. An icon will appear on upper left of the display, in which there is a blue-colored rectangular frame prompting the cut area. Press 5-direction button to select an area and press (OK). The area in rectangular frame will be cut to form a separate photo and show on the display. - Page 22 English 4) Setting Beep (The preset value is ON) a.) Select (Beep) to enter into property list. b.) Select “ON” to turn on the beep sound upon each press. Select “OFF” to cancel the beep sound. c.) Press (OK) to confirm the setting. 5) Setting USB Mode (The preset value is memory) a.) Select (USB MODE) to enter into property list.
- Page 23 English 11) Setting LCD Brightness a.) Select (LCD Brightness) and press (OK). An indication bar for brightness adjustment will be shown on the menu interface. b.) Use (LEFT/RIGHT) button to adjust the screen to your desired brightness. c.) Press (OK) to confirm the setting.
- Page 24 English 12) Setting Flicker Frequency This video camera provides two light frequencies for your selection. There are two different light frequencies 50Hz and 60Hz for different area. This function is designed for avoiding camera LCD display flicker. Please set the option according your area. 60HZ 50HZ Tahiti...
-
Page 25: Mp3 Play
English 3.1.6 MP3 Play This video camera is provided with MP3 play function. You can listen to music by earphone (recommended to use earphone) or directly by the loudspeaker output from the camera. Note: The MP3 files must be put under MP3 directory of the memory; otherwise they cannot be played. -
Page 26: Browser Mode
English 3.1.7 Browser Mode Set the shoot/playback mode switch to playback mode, then press (MODE) to switch to browser mode, where you can quickly browse the photo, movie, voice and MP3 files you have recorded. a.) Use 5-direction button to select the file folder or a single file. b.) To edit a file, you can select this file and then press RIGHT button. -
Page 27: Functions Related To Computer
English 4 Functions Related to Computer Preparations To use the functions related to computer, you need to install video camera software and connect the video camera to the computer. Minimum Requirements for computer: • Computer with MMX Pentium 233MHz or faster CPU •... -
Page 28: Precautions On Use
English English 5 Precautions on Use 5.1 About Safety Full consideration has been made to the safety of this product. But to ensure correct use, you are still requested to read the following warnings and precautions thoroughly. Warning: • Please do not tear down, modify or repair the video camera by yourself. Please contact your dealer for repair and internal inspection. -
Page 29: About Battery And Charging
English 5.3 About Battery and Charging Long storage of batteries in the video camera, even not in use, will cause the battery • power to decrease. And long connection of the batteries to the video camera will cause excessive discharge, in which case the battery cannot be used even it is recharged. -
Page 30: Troubleshooting
English English 6 Troubleshooting Problem Cause How to Correct The camera cannot be - If the power is correctly - Install the battery into the turned on. connected. camera in a correct - If the power is fully direction. charged. - Use DC adaptor to charge the battery full. - Page 31 dark. value is incorrect. compensation. LCD display is not clear LCD display is dirty. Clean it with dry and soft cloth. The image cannot be - Cable connection is - Check the cable downloaded to the incorrect. connection. computer. - The operating system is - Install Windows not Windows 98/98SE/ 2000 /ME /XP...
-
Page 32: Product Specifications
English En lish 7 Product Specifications Image Sensor 1/1.8-inch CMOS, 5,000,000 pixel Lens f=8.22mm F=2.8 Image Size 3648 x 2736 10 mega pixels / 3264 x 2448 8 mega pixels 2560 x 1920 5 mega pixels 2048 x 1536 3 mega pixels 1600 x 1200 2 mega pixels 640 x 480... -
Page 33: Security And Disposal Advise
8 Security and disposal advise Caution: Danger of explosion at improper exchange of battery/accumulator. Disposal of used batteries/accumulators according to instructions. Attention: Remark regarding separation from mains. To separate the device completely from mains plug has to be pulled from the mains socket. Therefore the device has to be set up in a way that an unobstructed access to the mains socket is ensured, so that the mains plug can be pulled immediately in case of an emergency.
Need help?
Do you have a question about the DV5008 and is the answer not in the manual?
Questions and answers