
Related Manuals for DIGISYNTHETIC DP Series


Summary of Contents for DIGISYNTHETIC DP Series
- Page 1 DIGISYNTHETIC PROFESSIONAL POWER AMPLIFIER DP45O DP Series Power Amplifier USER MANUAL...
-
Page 2: Table Of Contents
TABLE OF CONTENTS 1. Safety Instructions . Introduction Welcome Unpacking 3. Description 3.1 Features 3.2 Frontpanel 3.3 Rearpanel 4. Installation 4.1 Stereo 4.2 Mono 4.3 Additional Load Protection 4.4 Required AC Mains 5. Operation 5.1 Precautions 5.2 Power Indicator 5.3 Protection Systems 5.3.1 Drive Protection 5.3.2 Transformer thermal Protection 5.3.3 Signal Limiting Circuit... - Page 3 The information furnished in this manual does not include all of the details of design and engineering of this particular product; not does it cover every possible application or situation concerning its usage, which may occur during the installation, operation or maintenance of said DIGISYNTHETIC product. IMPORTANT THE PRODUCT REQUIRES CLASS 2 OUTPUT WIRING.
-
Page 4: Introduction
Please read this manual carefully. It contains important and helpful information to enable you to get the DIGISYNTHETIC performance out of your new product. If you plan to use this amplifier in either of the 2 available Mono modes, please refer to section 2.2 1.1 Unpacking... -
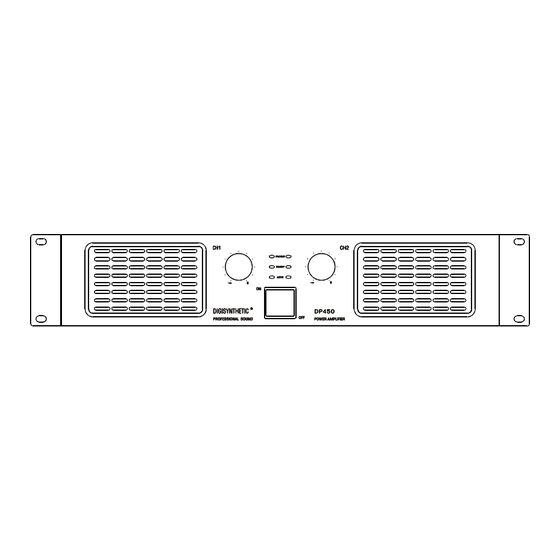
Page 5: Frontpanel
3.2 Front panel Indicators CH.2 CH.1 Power Switch Ch1. Level Control Ch2. Level Control 3.3 Rear panel MODE SWITCH AC 220V ± 10%/ 50Hz-60Hz Power 1-Ch.1 Output Input Binding Post andSpeakon cord 2-Ch.2 Output Input Output Connectors Page 4... -
Page 6: Installation
4 Installation Installation Always reduce volume by turning level controls fully counterclockwise when either connecting or disconnecting cables to the amplifier. This reduces the chance of an audio "spike" that could possibly cause loudspeaker damage.The guidelines below are provided to help you get your amplifier installed and ready to go quickly and easily. -
Page 7: Stereo
2. Use high-quality loudspeaker cables to connect the load to the amplifier's outputs. Do not use shielded cable. 3. Use shielded cables to connect audio sources to the amplifier's inputs. Either balanced or unbalanced wiring can be used as shown below.(Barrier block input connectors are available with the PM-BB accessories). BALANCED UNBALANCED SHIELD... -
Page 8: Additional Load Protection
Use Figure 2-6 to find the correct value for either type of fuse. RequiredAC Mains All DP Series amplifiers are shipped with an appropriate line cord and plug. When possible, use a power receptacle on a dedicated circuit; and always, make sure it will provide the correct voltage and sufficient current. -
Page 9: Power Indicator
7. Tampering with circuitry by unqualified personnel or making unauthorized circuit changes may be hazardous and invalidates warranty. Remember DIGISYNTHETIC Audio INC., is not liable for any damage that results from overdriving other system components. 5.2 Power Indicator When illuminated, the green power indicator (the volume control) shows that the amplifier has been turned on. -
Page 10: Signal Limiting Circuit
LEVEL CONTROL Min. fan speed, TPC normal Fan speed Fig.2.1 Front Panel Level Control Amplifier: DP Series The following diagram illustrates the actions taken by the Thermal Management System: Fig.2.2 TPC Load Impedance: Safe with all types of loads. Rated at 4 to 8 ohms in Stereo, 4 to 8ohms in Bridge-Mono and 4 to 8 ohms in Parallel-Mono mode. - Page 11 Channel 1 inputs are active; Both channel volume controls are available. Protection DP Series amplifiers are protected against shorted circuits or mismatched loads, overloaded power supplies, excessive temperature, chain destruction phenomena, input overload and high frequency blowups. They also protect loudspeakers from input and output DC and provide protection from turn-on/turn-off transients.
- Page 12 Dimensions: Standard 56 cm rack mount width ElA RS-310-B), 15 cm height and 47 cm depth behind the mounting surface. Approximate Weight: Center of gravity is 10 inches (25.42 cm) behind front mounting surface. In an effort to provide you with as much information as possible about the high power-producing capabilities of your amplifier, we have created the following power matrices: need to change the delay.
-
Page 13: Service
5. Service This unit has very sophisticated circuitry and should only be serviced by a fully trained technician. This is why each unit bears the following label: CAUTION To prevent electric shock, do not remove covers. No user serviceable parts inside.
Need help?
Do you have a question about the DP Series and is the answer not in the manual?
Questions and answers