
Related Manuals for Axis T93C10


Summary of Contents for Axis T93C10
- Page 1 AXIS T93C10 Outdoor Housing Installation Guide Available from A1 Security Cameras www.a1securitycameras.com email: sales@a1securitycameras.com...
- Page 2 Available from A1 Security Cameras www.a1securitycameras.com email: sales@a1securitycameras.com...
- Page 3 English France: Français Deutschland: Deutsch Italia: Italiano España: Español 日本 : 日本語 中文 : 简体中文 Available from A1 Security Cameras www.a1securitycameras.com email: sales@a1securitycameras.com...
- Page 4 Every care has been taken in the preparation of this installation. This equipment generates, uses and can document. Please inform your local Axis office of any radiate radio frequency energy and, if not installed and inaccuracies or omissions. Axis Communications AB cannot...
- Page 5 This symbol means that the product shall not be • report problems to Axis support staff by logging in to disposed of together with household or commercial waste. your private support area Directive 2012/19/EU on waste electrical and electronic •...
-
Page 6: Table Of Contents
Installation Guide Table of Contents Package contents ..........Product overview . - Page 7 AXIS T93C10 Outdoor Housing Table of Contents Die Wandhalterung anbringen ........
- Page 8 Installation Guide Table of Contents Cómo prevenir la humedad en la carcasa ....... Cómo realizar el movimiento vertical y horizontal de la carcasa.
- Page 9 AXIS T93C10 Outdoor Housing Table of Contents 危险等级 ..........
- Page 10 Available from A1 Security Cameras www.a1securitycameras.com email: sales@a1securitycameras.com...
-
Page 11: Package Contents
AXIS T93C10 Outdoor Housing Package contents • AXIS T93C10 Outdoor Housing • Wall mount bracket • Pan-tilt knuckle and mounting hardware • Camera mounting hardware 1 camera sled 20 bolts 3/8 inch (9.5 mm) 1 split washer 1 flat washer •... -
Page 12: Product Overview
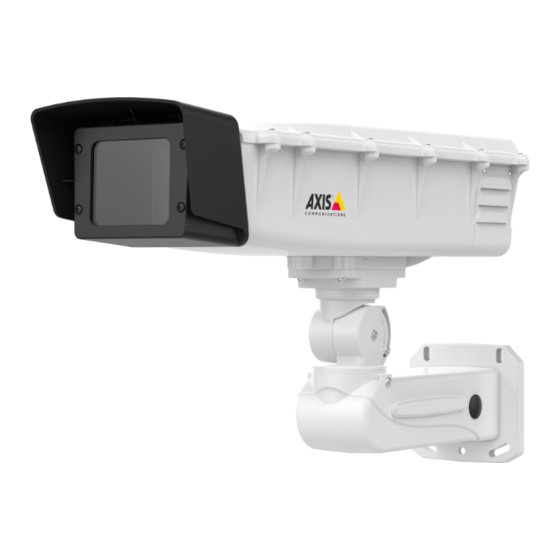
AXIS T93C10 Outdoor Housing Product overview Housing Cable gland Knuckle Wall mount Camera spacer Camera sled Humidity control pack Available from A1 Security Cameras www.a1securitycameras.com email: sales@a1securitycameras.com... -
Page 13: How To Install The Product
AXIS T93C10 Outdoor Housing How to install the product How to install the camera in the housing 1. Open the housing. 2. Remove the hardware pouch. 3. Loosen and remove the two rear screws that are securing the camera sled. -
Page 14: How To Install The Wall Mount
AXIS T93C10 Outdoor Housing How to install the wall mount CAUTION Make sure that the screws and plugs are appropriate for the material (e.g. wood, metal, drywall, stone) and that the material is strong enough to support the combined weight of the camera, housing, and wall mount. - Page 15 AXIS T93C10 Outdoor Housing • Use only one cable per cable gland port. • Use only round cables. How to prepare the cable glands 1. Remove the external nut to expose the cable glands. 2. Push out the washer through the cable gland, from the inside of the housing. Use a blunt tool.
-
Page 16: How To Connect Power
AXIS T93C10 Outdoor Housing How to connect power 1. Connect 24 V DC to the red terminal of the terminal block. 2. Connect (-) DC ground wire to the black terminal of the terminal block. 3. Tighten firmly with a small flat screwdriver. -
Page 17: How To Secure The Lid
AXIS T93C10 Outdoor Housing How to secure the lid 1. Close the housing. 2. Make sure to alternately tighten the seven captive screws. Available from A1 Security Cameras www.a1securitycameras.com email: sales@a1securitycameras.com... - Page 18 Available from A1 Security Cameras www.a1securitycameras.com email: sales@a1securitycameras.com...
-
Page 19: Safety Information
AXIS T93C10 Outdoor Housing Safety information Hazard levels DANGER Indicates a hazardous situation which, if not avoided, will result in death or serious injury. WARNING Indicates a hazardous situation which, if not avoided, could result in death or serious injury. -
Page 20: Safety Instructions
Axis or a third party. Axis recommends using Axis power source equipment compatible with your product. • Use only spare parts provided by or recommended by Axis. • Do not attempt to repair the product yourself. Contact Axis support or your Axis reseller for service matters. Transportation... -
Page 21: Contenu De L'emballage
AXIS T93C10 Outdoor Housing Contenu de l’emballage • Boîtier extérieur AXIS T93C10 • Support de montage mural • Pivot panoramique/inclinaison et matériel de montage • Matériel de montage de la caméra 1 système de fixation de caméra 20 boulons de 9,5 mm... -
Page 22: Vue D'ensemble Du Produit
AXIS T93C10 Outdoor Housing Vue d'ensemble du produit Boîtier Presse-étoupe Pivot Fixation murale Espaceur de caméra Système de fixation de caméra Pack de contrôle de l'humidité Available from A1 Security Cameras www.a1securitycameras.com email: sales@a1securitycameras.com... -
Page 23: Comment Installer Le Produit
AXIS T93C10 Outdoor Housing Comment installer le produit Comment installer la caméra dans le boîtier 1. Ouvrez le boîtier. 2. Retirez la pochette de matériel. 3. Desserrez et retirez les deux vis arrière qui fixent le système de fixation de caméra. -
Page 24: Comment Installer La Fixation Murale
Pour les schémas avec les dimensions, consultez www.axis.com. 1. Marquez les perforations pour la fixation murale sur le mur et forez les trous correspondants. - Page 25 AXIS T93C10 Outdoor Housing A A A VIS Pour éviter toute humidité à l'intérieur du boîtier, les ports de câble, les alimentations en fil et les tuyaux doivent être complètement scellés. Vérifiez que les critères suivants sont bien respectés : •...
-
Page 26: Comment Brancher L'alimentation
AXIS T93C10 Outdoor Housing Écrou Comment brancher l'alimentation 1. Branchez le fil d'alimentation 24 VCC au terminal rouge du bloc terminal. 2. Branchez le fil de terre (-) au terminal noir du bloc terminal. 3. Serrez fortement à l'aide d'un petit tournevis plat. -
Page 27: Comment Fixer Solidement Le Couvercle
AXIS T93C10 Outdoor Housing 2. Faites zoomer l'objectif en tournant manuellement la bague située sur l'objectif. 3. Verrouillez la position du zoom avec l'élastique fourni. Comment fixer solidement le couvercle 1. Fermez le boîtier. 2. Veillez à serrer alternativement les 7 vis captives. - Page 28 Available from A1 Security Cameras www.a1securitycameras.com email: sales@a1securitycameras.com...
-
Page 29: Informations Sur La Sécurité
AXIS T93C10 Outdoor Housing Informations sur la sécurité Niveaux de risques DANGER Indique une situation dangereuse qui, si elle n'est pas évitée, entraînera le décès ou des blessures graves. AVERTISSEMENT Indique une situation dangereuse qui, si elle n'est pas évitée, pourrait entraîner le décès ou des blessures graves. -
Page 30: Consignes De Sécurité
• Utiliser un chiffon propre imbibé d'eau pure pour le nettoyage. • Utiliser uniquement des accessoires conformes aux caractéristiques techniques de votre produit. Ils peuvent être fournis par Axis ou un tiers. Axis recommande d'utiliser un équipement d'alimentation Axis compatible avec votre produit. -
Page 31: Lieferumfang
AXIS T93C10 Outdoor Housing Lieferumfang • AXIS T93C10 Außenbereichsgehäuse • Wandhalterung • Gelenk zum Schwenken und Neigen mit Befestigungselementen • Befestigungselemente der Kamera 1 Kameraschlitten 20 Schrauben, 3/8 Zoll (9,5 mm) 1 Federring 1 Unterlegscheibe • Befestigungsabstandshalter der Kamera •... -
Page 32: Produktübersicht
AXIS T93C10 Outdoor Housing Produktübersicht Gehäuse Kabelverschraubung Gelenk Wandhalterung Abstandshalter der Kamera Kameraschlitten Luftentfeuchterbeutel Available from A1 Security Cameras www.a1securitycameras.com email: sales@a1securitycameras.com... -
Page 33: Installieren Des Produkts
AXIS T93C10 Outdoor Housing Installieren des Produkts Die Kamera in das Gehäuse einbauen 1. Das Gehäuse öffnen. 2. Die Hardwaretasche entfernen. 3. Die beiden Sicherungsschrauben hinten am Kameraschlitten lösen und entfernen. 4. Den Kameraschlitten aus der Kamera nehmen. 5. Die Kamera am Kameraschlitten befestigen. -
Page 34: Die Wandhalterung Anbringen
AXIS T93C10 Outdoor Housing Die Wandhalterung anbringen VORSICHT Sicherstellen, dass Schrauben und Dübel für das Trägermaterial (zum Beispiel Holz, Metall, Trockenbauelement, Stein) geeignet sind und dass die Tragfähigkeit des Materials dem Gesamtgewicht von Kamera, Gehäuse und Halterung entspricht. Siehe www.axis.com zu Maßzeichnungen. -
Page 35: Das Gehäuse An Der Wandhalterung Befestigen
AXIS T93C10 Outdoor Housing Das Gehäuse an der Wandhalterung befestigen 1. Die beiden Schrauben der Wandhalterung lösen. 2. Das Gehäuse zusammen mit dem angebrachten Schenkel an der Wandhalterung befestigen. 3. Die beiden Schrauben anziehen. Informationen zu Kabeln und Kabelverschraubungen Sämtliche Stromkabel und Netzwerkkabel müssen durch Kabelverschraubungen geführt werden. -
Page 36: Die Stromversorgung Herstellen
AXIS T93C10 Outdoor Housing Kabelverschraubung Dichtring Mutter Die Stromversorgung herstellen 1. Das Gleichstromkabel 24 V (+) an den roten Anschluss des Anschlussblocks anschließen. 2. Das Erdungskabel (-) an den schwarzen Anschluss des Anschlussblocks anschließen. 3. Die Schrauben mit einem passenden Schlitzschraubenzieher fest anziehen. -
Page 37: Das Gehäuse Horizontal Und Vertikal Ausrichten
AXIS T93C10 Outdoor Housing Das Gehäuse horizontal und vertikal ausrichten. Um auf den Livestream zuzugreifen, im Netzwerk die Kamera ermitteln und sich auf der Webseite der Kamera anmelden. Den Neigungswinkel einstellen: 1. Die Schraube im Gelenk zum Schwenken und Neigen lösen. - Page 38 Available from A1 Security Cameras www.a1securitycameras.com email: sales@a1securitycameras.com...
-
Page 39: Sicherheitsinformationen
AXIS T93C10 Outdoor Housing Sicherheitsinformationen Gefährdungsstufen GEFAHR Weist auf eine gefährliche Situation hin, welche, falls nicht verhindert, zu Tod oder schweren Verletzungen führen kann. WARNUNG Weist auf eine gefährliche Situation hin, welche, falls nicht verhindert, zu Tod oder schweren Verletzungen führen kann. -
Page 40: Sicherheitsanweisungen
• Verwenden Sie zum Reinigen ein sauberes, mit destilliertem Wasser angefeuchtetes Tuch. • Verwenden Sie nur Zubehör, das den technischen Vorgaben Ihres Produkts entspricht. Dieses ist von Axis oder Drittanbietern erhältlich. Axis empfiehlt die mit Ihrem Produkt kompatible Stromversorgung von Axis. -
Page 41: Contenuto Della Confezione
AXIS T93C10 Outdoor Housing Contenuto della confezione • Alloggiamento per esterni AXIS T93C10 • Staffa per il montaggio a parete • Asse di rotazione-inclinazione e hardware per il montaggio • Hardware di montaggio della telecamera 1 slitta della telecamera 20 bulloni da 9,5 mm... -
Page 42: Panoramica Del Dispositivo
AXIS T93C10 Outdoor Housing Panoramica del dispositivo Alloggiamento Pressacavo Asse di rotazione Montaggio a parete Distanziale della telecamera Slitta della telecamera Pacchetto di controllo dell'umidità Available from A1 Security Cameras www.a1securitycameras.com email: sales@a1securitycameras.com... -
Page 43: Come Installare Il Dispositivo
AXIS T93C10 Outdoor Housing Come installare il dispositivo Modalità di installazione della telecamera nell'alloggiamento 1. Aprire l'alloggiamento. 2. Rimuovere la custodia dell'hardware. 3. Allentare e rimuovere le due viti posteriori che fissano la slitta della telecamera. 4. Rimozione la slitta della telecamera dall'alloggiamento. -
Page 44: Modalità Di Installazione Del Supporto A Parete
Visitare il sito www.axis.com per i disegni dimensionali. 1. Contrassegnare i fori per il montaggio a parete e praticare i fori. -
Page 45: Modalità Di Collegamento Dell'alloggiamento Al Supporto A Parete
AXIS T93C10 Outdoor Housing Modalità di collegamento dell'alloggiamento al supporto a parete 1. Allentare le due viti sul supporto a parete. 2. Collegare l'alloggiamento all'asse di rotazione collegato al supporto a parete. 3. Fissare le due viti. Informazioni sui cavi e sui pressacavi Tutti i cavi di rete e di alimentazione devono essere installati mediante pressacavi. -
Page 46: Modalità Di Collegamento Dell'alimentazione
AXIS T93C10 Outdoor Housing Pressacavo Rondella Dado Modalità di collegamento dell'alimentazione 1. Collegare il cavo da 24 V CC al morsetto rosso della morsettiera. 2. Collegare il cavo di terra CC (-) al morsetto nero della morsettiera. 3. Serrare saldamente con un piccolo cacciavite spaccato. -
Page 47: Modalità Di Rotazione E Inclinazione Dell'alloggiamento
AXIS T93C10 Outdoor Housing Modalità di rotazione e inclinazione dell'alloggiamento Per accedere al flusso dal vivo, cercare la telecamera nella rete ed eseguire l'accesso alla pagina Web della telecamera. Per la regolazione dell'inclinazione: 1. Allentare la vite nell'asse di rotazione-inclinazione. - Page 48 Available from A1 Security Cameras www.a1securitycameras.com email: sales@a1securitycameras.com...
-
Page 49: Informazioni Di Sicurezza
AXIS T93C10 Outdoor Housing Informazioni di sicurezza Livelli di pericolo PERICOLO Indica una situazione pericolosa che, se non evitata, provoca morte o lesioni gravi. AVVERTENZA Indica una situazione pericolosa che, se non evitata, potrebbe provocare la morte o lesioni gravi. -
Page 50: Informazioni Di Sicurezza
VVISO VVISO • Il dispositivo Axis deve essere utilizzato in conformità alle leggi e alle disposizioni locali. • Conservare il dispositivo Axis in un ambiente asciutto e ventilato. • Evitare di esporre il dispositivo Axis a urti o pressioni eccessive. -
Page 51: Contenido Del Paquete
AXIS T93C10 Outdoor Housing Contenido del paquete • Carcasa para Exteriores AXIS T93C10 • Soporte para montaje en pared • Movimiento horizontal/vertical de la pieza articulada y hardware de montaje • Hardware de montaje de la cámara 1 guías deslizantes para la cámara... -
Page 52: Información General Del Producto
AXIS T93C10 Outdoor Housing Información general del producto Carcasa Prensaestopas Pieza articulada Soporte de pared Separador de la cámara Guías deslizantes para la cámara Pack de control de la humedad Available from A1 Security Cameras www.a1securitycameras.com email: sales@a1securitycameras.com... -
Page 53: Cómo Instalar El Producto
AXIS T93C10 Outdoor Housing Cómo instalar el producto Cómo instalar la cámara en la carcasa 1. Abra la carcasa. 2. Extraiga la bolsa de hardware. 3. Afloje y extraiga los dos tornillos traseros que sujetan la guía deslizante de la cámara. -
Page 54: Cómo Instalar El Soporte De Pared
Para consultar dibujos de dimensiones, visite www.axis.com. 1. Marque en la pared los orificios para el soporte y taladre los orificios. -
Page 55: Cómo Fijar La Carcasa Al Soporte De Pared
AXIS T93C10 Outdoor Housing Cómo fijar la carcasa al soporte de pared 1. Afloje los dos tornillos del soporte de pared. 2. Fije la carcasa con la pieza articulada incluida al soporte de pared. 3. Fije los dos tornillos. Acerca de los cables y los prensaestopas Todos los cables de alimentación y de red deben pasarse por los prensaestopas. -
Page 56: Cómo Conectar La Alimentación
AXIS T93C10 Outdoor Housing Prensaestopas Arandela Tuerca Cómo conectar la alimentación 1. Conecte 24 V CC al terminal rojo del bloque de terminales. 2. Conecte el cable de masa de (-) CC al terminal negro del bloque de terminales. 3. Apriételo fuertemente con un destornillador plano. -
Page 57: Cómo Realizar El Movimiento Vertical Y Horizontal De La Carcasa
AXIS T93C10 Outdoor Housing Cómo realizar el movimiento vertical y horizontal de la carcasa. Para acceder al flujo de visualización en directo, encuentre la cámara en la red e inicie sesión en la página web de la cámara. Para ajustar el movimiento vertical: 1. - Page 58 Available from A1 Security Cameras www.a1securitycameras.com email: sales@a1securitycameras.com...
-
Page 59: Información De Seguridad
AXIS T93C10 Outdoor Housing Información de seguridad Niveles de peligro PELIGRO Indica una situación peligrosa que, si no se evita, provocará lesiones graves o la muerte. ADVERTENCIA Indica una situación peligrosa que, si no se evita, puede provocar lesiones graves o la muerte. -
Page 60: Instrucciones De Seguridad
VISO VISO • Este producto de Axis debe utilizarse de acuerdo con las leyes y normativas locales. • Almacene el producto de Axis en un entorno seco y ventilado. • Evite la exposición del producto de Axis a choques o a una fuerte presión. -
Page 61: パ パ パ ッ ッ ッ ケ ケ ケ ー ー ー ジ ジ ジ の の の 内 内 内 容 容 容
AXIS T93C10 Outdoor Housing パ パ パ ッ ッ ッ ケ ケ ケ ー ー ー ジ ジ ジ の の の 内 内 内 容 容 容 AXIS T93C10 屋外ハウジング • 壁⾯取付ブラケット • パン/チルトナックルおよび取付ハードウェア • • カメラ取付ハードウェア カメラスレッド (×1) 9.5 mm ボルト... -
Page 62: 製 製 製 品 品 品 の の の 概 概 概 要 要 要
AXIS T93C10 Outdoor Housing 製 製 製 品 品 品 の の の 概 概 概 要 要 要 ハウジング ケーブルグランド ナックル 壁⾯取付ブラケット カメラスペーサー カメラスレッド 湿度調整パック Available from A1 Security Cameras www.a1securitycameras.com email: sales@a1securitycameras.com... -
Page 63: 製 製 製 品 品 品 の の の 取 取 取 り り り 付 付 付 け け け 方 方 方 法 法 法
AXIS T93C10 Outdoor Housing 製 製 製 品 品 品 の の の 取 取 取 り り り 付 付 付 け け け ⽅ ⽅ ⽅ 法 法 法 カ カ カ メ メ メ ラ ラ ラ を を を ハ ハ ハ ウ ウ ウ ジ ジ ジ ン ン ン グ グ グ に に に イ イ イ ン ン ン ス ス ス ト ト ト ー ー ー ル ル ル す す す る る る ⽅ ⽅ ⽅ 法 法 法... -
Page 64: 壁面取付ブラケットの取り付け方法
AXIS T93C10 Outdoor Housing 壁 壁 壁 ⾯ ⾯ ⾯ 取 取 取 付 付 付 ブ ブ ブ ラ ラ ラ ケ ケ ケ ッ ッ ッ ト ト ト の の の 取 取 取 り り り 付 付 付 け け け ⽅ ⽅ ⽅ 法 法 法... -
Page 65: ハウジングの壁面取付ブラケットへの取り付け方法
AXIS T93C10 Outdoor Housing ハ ハ ハ ウ ウ ウ ジ ジ ジ ン ン ン グ グ グ の の の 壁 壁 壁 ⾯ ⾯ ⾯ 取 取 取 付 付 付 ブ ブ ブ ラ ラ ラ ケ ケ ケ ッ ッ ッ ト ト ト へ へ へ の の の 取 取 取 り り り 付 付 付 け け け ⽅ ⽅ ⽅ 法 法 法... -
Page 66: 電源の接続方法
AXIS T93C10 Outdoor Housing ケーブルグランド ワッシャー ナット 電 電 電 源 源 源 の の の 接 接 接 続 続 続 ⽅ ⽅ ⽅ 法 法 法 1. 24 V DCをターミナルブロックの⾚ターミナルに接続します。 2. (-) DCアース線をターミナルブロックの⿊ターミナルに接続します。 3. ⼩さなマイナスドライバーでしっかりと締めます。 ネ ネ ネ ッ ッ ッ ト ト ト ワ ワ ワ ー ー ー ク ク ク の の の 接 接 接 続 続 続 ⽅ ⽅ ⽅ 法 法 法... -
Page 67: ハウジングをパンおよびチルトする方法
AXIS T93C10 Outdoor Housing ハ ハ ハ ウ ウ ウ ジ ジ ジ ン ン ン グ グ グ を を を パ パ パ ン ン ン お お お よ よ よ び び び チ チ チ ル ル ル ト ト ト す す す る る る ⽅ ⽅ ⽅ 法 法 法... - Page 68 Available from A1 Security Cameras www.a1securitycameras.com email: sales@a1securitycameras.com...
-
Page 69: 安 安 安 全 全 全 情 情 情 報 報 報
AXIS T93C10 Outdoor Housing 安 安 安 全 全 全 情 情 情 報 報 報 危 危 危 険 険 険 レ レ レ ベ ベ ベ ル ル ル 危険 回避しない場合、死亡または重傷につながる危険な状態を⽰します。 警告 回避しない場合、死亡または重傷につながるおそれのある危険な状態を ⽰します。 注意 回避しない場合、軽傷または中程度の怪我につながるおそれのある危険 な状態を⽰します。 注記... -
Page 70: 安 安 安 全 全 全 手 手 手 順 順 順
AXIS T93C10 Outdoor Housing 安 安 安 全 全 全 ⼿ ⼿ ⼿ 順 順 順 注記 • 本製品は、お使いになる地域の法律や規制に準拠して使⽤してください。 • 本製品は乾燥した換気のよい環境に保管してください。 • 本製品に衝撃または強い圧⼒を加えないでください。 • 本製品を不安定なポール、ブラケット、表⾯、または壁に設置しないで ください。 • 本製品を設置する際には、適切な⼯具のみを使⽤してください。 電動⼯具を 使⽤して過剰な⼒をかけると、製品が損傷することがあります。 • 化学薬品、腐⾷剤、噴霧式クリーナーは使⽤しないでください。 • 清掃には、きれいな⽔に浸した清潔な布を使⽤してください。 • 製品の技術仕様に準拠したアクセサリーのみを使⽤してください。 これらの アクセサリーは、Axisまたはサードパーティから⼊⼿できます。 Axisは、ご使 ⽤の製品と互換性のあるAxis給電ネットワークスイッチの使⽤を推奨します。... -
Page 71: 包 包 包 装 装 装 内 内 内 容 容 容
AXIS T93C10 Outdoor Housing 包 包 包 装 装 装 内 内 内 容 容 容 AXIS T93C10 室外防护罩 • 墙挂安装支架 • 云台转向节和安装硬件 • • 摄像机安装硬件 1 个摄像机托架 20 个 3/8 英寸(9.5 毫米)的螺栓 1 个开口垫圈 1 个平垫圈 摄像机安装垫片 • 湿度控制组件... -
Page 72: 产 产 产 品 品 品 概 概 概 述 述 述
AXIS T93C10 Outdoor Housing 产 产 产 品 品 品 概 概 概 述 述 述 防护罩 电缆套管 转向节 墙挂支架 摄像机垫片 摄像机托架 湿度控制组件 Available from A1 Security Cameras www.a1securitycameras.com email: sales@a1securitycameras.com... -
Page 73: 如 如 如 何 何 何 安 安 安 装 装 装 产 产 产 品 品 品
AXIS T93C10 Outdoor Housing 如 如 如 何 何 何 安 安 安 装 装 装 产 产 产 品 品 品 如 如 如 何 何 何 将 将 将 摄 摄 摄 像 像 像 机 机 机 安 安 安 装 装 装 在 在 在 防 防 防 护 护 护 罩 罩 罩 中 中 中... -
Page 74: 如何安装墙挂支架
AXIS T93C10 Outdoor Housing 如 如 如 何 何 何 安 安 安 装 装 装 墙 墙 墙 挂 挂 挂 支 支 支 架 架 架 小心 请确保螺丝和塞子适用于材质(如木质、金属、干壁、石头)且材质强度足以 支撑摄像机、防护罩和墙挂支架的总重量。 有关尺寸图的信息,请参见 www.axis.com。 1. 在墙壁上标记用于墙挂支架的孔并钻孔。 2. 将墙挂支架连接至墙壁。 3. 在墙壁中为电缆钻一个孔,且孔位于墙挂支架下方。 电缆孔... -
Page 75: 如何连接电源
AXIS T93C10 Outdoor Housing • 仅使用圆形电缆。 如 如 如 何 何 何 准 准 准 备 备 备 电 电 电 缆 缆 缆 套 套 套 管 管 管 1. 拆下外部螺母以露出电缆套管。 2. 从防护罩内部开始,将垫圈穿过电缆套管从而将其推出。 使用一个钝工具。 如 如 如 何 何 何 连 连 连 接 接 接 电 电 电 缆 缆 缆 套 套 套 管 管 管... -
Page 76: 如何连接网络
AXIS T93C10 Outdoor Housing 3. 使用一把较小的平头螺丝刀牢固拧紧。 如 如 如 何 何 何 连 连 连 接 接 接 网 网 网 络 络 络 1. 将网络电缆连接至摄像机的网络连接器 (PoE)。 请参见摄像机安装指南中 的说明。 如 如 如 何 何 何 避 避 避 免 免 免 防 防 防 护 护 护 罩 罩 罩 内 内 内 受 受 受 潮 潮 潮... -
Page 77: 安 安 安 全 全 全 信 信 信 息 息 息
AXIS T93C10 Outdoor Housing 安 安 安 全 全 全 信 信 信 息 息 息 危 危 危 险 险 险 等 等 等 级 级 级 危险 表示如果不避免则会导致死亡或严重伤害的危险情况。 警告 表示如果不避免则可能导致死亡或严重伤害的危险情况。 小心 表示如果不避免则可能导致轻微或中度伤害的危险情况。 注意 表示如果不避免则可能导致财产损失的情况。 其 其 其 他 他 他 消 消 消 息 息 息 等 等 等 级 级 级... - Page 78 AXIS T93C10 Outdoor Housing 安 安 安 全 全 全 说 说 说 明 明 明 注意 • 使用安讯士产品时应遵守当地法律和法规。 • 在干燥通风的环境中存放安讯士产品。 • 避免将安讯士产品暴露在冲击或高压环境下。 • 请勿将产品安装在不稳固的立杆、支架、表面或墙壁上。 • 安装安讯士产品时,仅使用适用的工具。 使用电动工具过度施力可能导致 产品损坏。 • 请勿使用化学品、腐蚀剂或气雾剂。 • 使用蘸纯净水的干净布进行清洁。 • 仅使用符合产品技术规格的附件。 这些附件可由安讯士或第三方提供。 安讯 士推荐使用与产品兼容的安讯士电源设备。 • 仅使用安讯士提供或推荐的备件。...
- Page 79 Available from A1 Security Cameras www.a1securitycameras.com email: sales@a1securitycameras.com...
- Page 80 Installation Guide Ver. M1.2 AXIS T93C10 Outdoor Housing Date: December 2017 © Axis Communications AB, 2017 Part No. 1797670 Available from A1 Security Cameras www.a1securitycameras.com email: sales@a1securitycameras.com...
Need help?
Do you have a question about the T93C10 and is the answer not in the manual?
Questions and answers