Table of Contents
Advertisement
Available languages
Available languages
Advertisement
Chapters
Table of Contents

Related Manuals for Donner DED-100


Summary of Contents for Donner DED-100
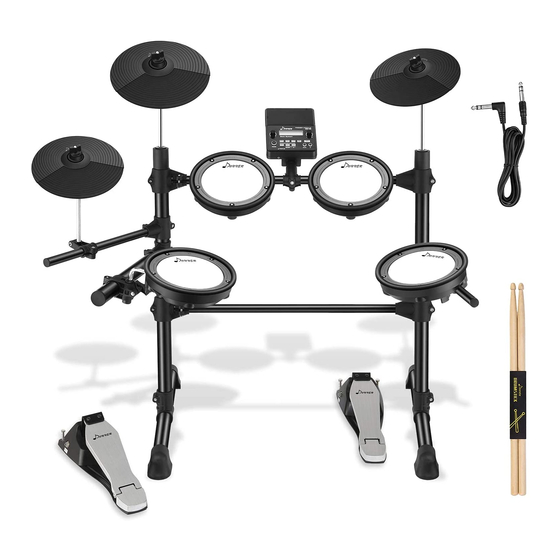
- Page 1 DED-100 INSTRUCTION MANUAL This product is subject to change without prior notice...
-
Page 2: Function Introduction
F U N CT IO N IN TR ODU C T ION Thank you for choosing our electronic drum. Elegant and delicate electronic drum is the perfect combination of modern new electronic technology. ◆Before using this product, you must read the instructions in detail. SAMPLING SOURCES USING DREAM Its core uses the French DREAM brand-new sound source technology, digital sampling, to bring you a lifelike auditory experience for your performance. -
Page 3: Table Of Contents
C A TAL OG FUNCTION INTRODUCTION --------------------------------------------------------- CATALOG ------------------------------------------------------------------------------ INSTALLATION GUIDE --------------------------------------------------------------- Check the attached items ---------------------------------------------------------------------- Pipe fitting -------------------------------------------------------------------------------------- Drum cannula ---------------------------------------------------------------------------------- Mounting bracket and drum plate ------------------------------------------------------------ Install the cymbal, control box and place the pedal ------------------------------------------ Insert the connecting wire of drum and cymbal ---------------------------------------------- DIAGRAM OF MODULE BOX SOCKET ----------------------------------------------- POWER TERMINAL CONNECTION ------------------------------------------------------------- USB MIDI PORT ---------------------------------------------------------------------------------... -
Page 4: Installation Guide
IN ST AL L AT IO N GU IDE REMARK! ● Please follow the instructions and read the "safety precautions" in the User Manual carefully before using it. ● This product needs adult to install, do not let the minor install it independently. Check the attached items ●... -
Page 5: Pipe Fitting
INSTALL ATION GU IDE Pipe fitting ● The pipe fittings are located in an independent small package in the packing box. Drum cannula ● please operate carefully during installation, and be careful not to pinch your fingers. tom1 tom2 snare tom3 Insert 3 TOMS and 1 snare drum into the pipe respectively as shown... -
Page 6: Mounting Bracket And Drum Plate
IN ST AL L AT IO N GU IDE Mounting bracket and drum plate ● The bracket should be inserted in place and the screw should be tightened to avoid falling. Insert the bracket and drum into corresponding positions, and then tighten the screws. Note: tom and snare drum have different functions. -
Page 7: Install The Cymbal, Control Box And Place The Pedal
INSTALL ATION GUIDE Install the cymbal, control box and place the pedal ● Do not tighten the cymbal, leave some space for it to shake up and down. Install the cymbal and control box on the bracket as shown in the figure Note: each cymbal has different functions. -
Page 8: Insert The Connecting Wire Of Drum And Cymbal
IN ST AL L AT IO N GU IDE Insert the connecting wire of drum and cymbal ● Please insert the connecting wire in place to avoid poor contact and insert it correctly as shown in the figure. Insert the parallel port plug into the main box as shown in the figure, and then insert it into the hole position of the corresponding... -
Page 9: Diagram Of Module Box Socket
DIA GR AM OF MODULE BO X SOC KE T SONG MANU POW ER TERMINAL CONNECTI ON 1. When in use, connect the power terminal according to the diagram, insert the power outlet of the module box at one end and 100-240V household power outlet at the other end. (Fig. 1) 2. -
Page 10: Operation Guide
OP ER AT IO N GUIDE P OWER ON 1. Turn on the "POWER" switch, and you can enter the playing state. (Fig. 1) 2. Please turn off the power when not in use. ● Processor chips of this product are complex, similar to computer systems. Sometimes they can not respond. -
Page 11: Timbre Selection Of Drum Group
OPER ATION G UIDE edge surface Hi-hat cymbal Grasp the edge of the + Hi-hat pedal cymbal and silence it. surface edge TIMBRE SELEC TIO N O F DRU M GR O UP 1. Press the "VOICE" button, display the screen (Voice), and enter the drum group adjustment mode. -
Page 12: Demonstration Music Playing
DEM O NSTR ATIO N MUSI C PLAY I NG 1. Press the "SONG" button, the display will show (Song) and enter the demo music mode. (FIG. 9) 2. Using the "UP/DOWN" button, you can choose the following options as an adjustment. (Fig. 4) Display screen display: ●(Num 001-030): Music Selection - A total of 30 built-in pieces. -
Page 13: Drum Disc Sensitivity Adjustment
O PE RATION GUIDE DR UM DISC S EN SITIV ITY A DJUST MENT 1. Press the "MENU" button repeatedly until the display shows (Sensity), enter the sub option to enter the sub option sensitivity adjustment mode of percussion instrument components. (FIG. 10) 2. -
Page 14: Appendix
AP PE NDIX Timbre KICK TOM 1 CRASH RIDE RIM HI-HAT PEDAL 01 Acoustic Kick 01 Acoustic Tom1 01 Acoustic Crash1 01 Acoustic Ride Rim 01 Acoustic Hi-hat Pedal 02 Military Kick 02 Military Tom1 02 Military Crash1 02 Military Ride Rim 02 Military Hi-hat Pedal 03 Original Kick 03 Original Tom1... -
Page 15: Product Maintenance
PRODUCT MA INT ENA NC E Careful maintenance and protection of the product, to extend the service life of the product, reduce the fault has a very important role. AV OID H EATI NG, DAMPNE SS O R DIR ECT SU NL IGHT Do not over expose the product to direct sunlight, or place it near air conditioning or extremely hot place. -
Page 16: Safety Precautions
S AF ET Y PRE CAU T IO N S POWER SUPPLY This product can be powered by standard indoor wall sockets. Please only use the power cord specified in this product. When not in use, please turn off the power supply. When not in use for a long time, pull out the power cord and keep it properly. - Page 17 SAFETY PR ECAUT ION S WARNING BE CAREFUL Smoke, odor, overheating The improper use of power cord may cause When the product smokes, smells or fire and electric shock. The following overheats, there is a danger of fire and precautions must be observed: electric shock when it is used continually.
- Page 18 S AF ET Y PR EC AU T IO N S Falling or colliding Location selection If the product falls or is damaged by strong It should be avoided to place the product impact, it will be in danger of causing fire in the following places, otherwise there is and electric shock.
-
Page 19: Warranty Card
WA RRANTY CARD Warranty rules 1. Faults arising from normal use of this product can be guaranteed free of charge for _________days from the date of purchase. 2. Failure occurs during the warranty period. This warranty card and shopping ticket must be presented during maintenance. - Page 20 Manufacturer: Guangzhou Rantion Technology Co., Ltd. Address: D Building, Kengkou Electronic Digital Base, No. 9, Huaxi Road, Liwan District, Guangzhou City, Guangdong Province www.idonner.com www.donnerdeal.com...
- Page 21 DED-100 Multifunktionale elektronische Trommel Handbuch des Benutzers Elektronische DRUM www.idonner.com www.donnerdeal.com...
- Page 22 EINLEIT UNG DER FUN K T I O N Vielen Dank für den Kauf dieser elektronischen Trommel。Elegante und exquisite elektronische Trommel﹐Es ist eine perfekte Kombination aus moderner neuer elektronischer Technologie und traditionellen Musikinstrumenten。 ◆Vor der Verwendung von Musikinstrumenten﹐Bitte lesen Sie dieses Handbuch sorgfältig. Anwendung DREAM IC Sein Kern nutzt die beste französische Klangquelle,Digitale Akquisitionsvorlage.
- Page 23 Ka talog EINLEITUNG DER FUNKTION-------------------------------------------------------- Katalog-------------------------------------------------------------------------------- Anleitung zur Installation------------------------------------------------------------ Überprüfen Sie die beigefügten Artikel-------------------------------------------------------- Gestell aus Eisen-------------------------------------------------------------------------------- Intubation der Trommelscheibe---------------------------------------------------------------- Unterstützung installieren und trommel ------------------------------------------------------ Steckverbinder einfügen----------------------------------------------------------------------- eckverbinder einfügen ------------------------------------------------------------------------- Demonstration der Schnittstelle von Mainframe Box----------------------------- ANSCHLUSS AN NETZKABEL------------------------------------------------------------------- USB MIDI SCHNITTSTELLE---------------------------------------------------------------------- EARPHONE SCHNITTSTELLE-------------------------------------------------------------------- AUDIO OUTPUT SCHNITTSTELLE--------------------------------------------------------------- AUDIO INPUT SCHNITTSTELLE-----------------------------------------------------------------...
-
Page 24: Anleitung Zur Installation
Anl ei t ung z ur In s ta l l a ti o n Anmerkung:! ● Um die Geräte korrekt zu nutzen, installieren Sie sie bitte nach den Installationsanleitungen und lesen Sie das "Benutzerhandbuch" vor der Benutzung sorgfältig durch. ●... -
Page 25: Gestell Aus Eisen
A nleitung zur In stall a tio n Gestell aus Eisen ●Nach dem Öffnen des Pakets überprüfen Sie bitte, ob die Artikel fehlen. Intubation der Trommelscheibe ●Achten Sie bitte darauf, Ihre Finger während der Installation nicht zu kneifen. tom1 tom2 Militärische Trommel tom3 Die vier Fässer in das Rohr, wie in... -
Page 26: Unterstützung Installieren Und Trommel
Anlei tung zur In sta lla tio n Unterstützung installieren und trommel ●Die Halterung muss in die Position gesteckt werden, und die Schraube sollte verriegelt werden, um zu vermeiden, dass sie fällt.。 die Halterung und die Trommel in die entsprechenden Positionen installieren, Verriegelung der Schraube Anmerkung:!Tom-Trommel und Militärische Trommel haben verschiedene Funktionen... - Page 27 A nleitung zur In stall a tio n Installation von Cymbals、Mainframe Box、 Mechanisches Pedal ● Machen Sie die Befestigungen nicht enger, damit sie sich bewegen können. Installieren Sie Cymbals und Mainframe Box auf der Halterung wie gezeigt Anmerkung:Jede Cymbals-Funktion hat ihren eigenen Unterschied, sie muss sich auf die Zubehöridentifikation für die korrekte Installation beziehen! crash ride...
-
Page 28: Steckverbinder Einfügen
Anl ei t ung z ur In s ta l l a ti o n Steckverbinder einfügen ●Bitte legen Sie den Verbindungsdraht an Ort und Stelle ein, um einen schlechten Kontakt zu vermeiden, und fügen Sie ihn entsprechend der Abbildung korrekt ein. Stecken Sie den Stecker wie in der Abbildung abgebildet in den Hauptmodul-Kasten und fügen Sie ihn dann in das entsprechende Loch... -
Page 29: Demonstration Der Schnittstelle Von Mainframe Box
Demonstration der Schnittstelle von Mainframe Box SONG MANU ANSCHLUSS A N NETZ KABE L 1. Verbinden Sie das Netzkabel wie in der Abbildung dargestellt. Ein Ende wird in den Netzeinlass der Trommel-Hauptmodul-Box eingefügt, das andere Ende wird in eine 100-240V Haushaltssteckdose eingefügt (Abbildung 1) 2. -
Page 30: Anleitung Zur Installation
Anl ei t ung z ur In s t a l l a ti o n POW ER O N 1. Drücken Sie den "power" Schalter auf die "on"-Position, um in den Spielzustand einzutreten. (Abbildung 1) 2. Bitte schalten Sie den Strom aus, wenn er vorübergehend nicht genutzt wird. ●... -
Page 31: Timbre Auswahl Der Trommelgruppe
Anl eitung zur Ins tall a ti o n Kante Oberfläche Hi-Hat Zimbel + Hi-Hat Pedal Greifen Sie den Rand des Zimbels an und halten Sie ihn still. Oberfläche Kante TIMB RE A USWAH L DER TROM MEL GR UP PE 1. -
Page 32: Eingebaute Musik-Wiedergabe
A n le it un g z ur In s t a l l a ti o n EIN GEB AUTE MUSI K -W IEDER GA B E 1. Drücken Sie die "Menü"-Taste kontinuierlich, bis die Anzeige (song) anzeigt, um den Suboption -Demo-Modus zu aktivieren. -
Page 33: Trommelgruppe Empfindlichkeitseinstellung
Anl eitung zur Ins tall a ti o n TROMMELGR UP PE EMP FIN DL I CHKE IT SEI NST EL LU NG 1. Drücken Sie die Schaltfläche "Menü" kontinuierlich, bis die Anzeige "(Sensity)" zeigt, um die Suboption Sensitivitätseinstellung von Percussion-Instrumentenkomponenten einzugeben. (10 Abbildung) 2. -
Page 34: Verzeichnis Der Beigefügten Inhalte
V e rzei chni s der b e igef ü g te n Inha l te Klangfarbe des Drums KICK TOM 1 CRASH RIDE RIM HI-HAT PEDAL 01 Acoustic Kick 01 Acoustic Tom1 01 Acoustic Crash1 01 Acoustic Ride Rim 01 Acoustic Hi-hat Pedal 02 Military Kick 02 Military Tom1... -
Page 35: Wartung Der Produkte
Wa rtung der P ro duk te Die Wartung und der Schutz des Produktes ist sehr wichtig, um die Lebensdauer des Produktes zu verlängern und den Ausfall zu reduzieren. V erme ide n S ie Hitze, Feu chtigk eit ode r dire kte s Sonnenlicht Das Produkt nicht dem direkten Sonnenlicht aussetzen oder in der Nähe der Klimaanlage oder an extrem heißen Stellen platzieren. - Page 36 V o rsi cht sm aß n a hm e n fü r d i e Si c he rhe i t Elektrische Energieversorgung Dieses Produkt kann mit Standardinnenwandsteckdose betrieben werden. Bitte verwenden Sie nur das von diesem Produkt angegebene Netzkabel.Stellen Sie sicher, dass Sie den Strom ausschalten, wenn Sie nicht vorübergehend in Gebrauch sind, und ziehen Sie das Netzkabel aus, wenn Sie lange nicht in Gebrauch sind.
-
Page 37: Vorsichtsmaßnahmen Für Die Sicherheit
Vorsichtsmaßn ahmen f ür di e Sic her hei t WARNUNG SEI VORSICHTIG Rauch, Geruch, Überhitzung Ein falscher Einsatz von Kabeln kann Feuer und Wenn das Produkt raucht, eigenartigen Geruch Elektroschock verursachen.Es sind folgende : abgibt oder überhitzt, kann es Feuer und ●... - Page 38 V o rsi cht sm aß n a hm e n fü r d i e Si c he rhe i t Fallen oder Aufprall Auswahl der Produktstandorte Wenn das Produkt durch Sturz oder starken Vermeiden Sie, das Produkt an den folgenden Aufprall beschädigt wird, kann es Feuer und Stellen zu platzieren.Sonst kann es Feuer und Elektroschock verursachen, wenn es kontinuierlich...
-
Page 39: Versicherungskarte Für Reparaturen
Ver sicherungsk arte f ü r Re pa r a tu r en Versicherungskartenverordnung für die Instandhaltung 1. Das Produkt kann kostenlos Garantie Service für ( ) Tage ab dem Kaufdatum genießen. 2. Bei Ausfall während der Garantiezeit müssen die Garantiekarte und der Kaufbeleg während der Wartung vorgelegt werden. - Page 40 Hersteller: Guangzhou Lanshen Technology Co., Ltd. Adresse: Building D, Hang Kou electronic base, No.9, Huaxi Road, Liwan District, Guangzhou, Guangdong Province www.idonner.com www.donnerdeal.com...
Need help?
Do you have a question about the DED-100 and is the answer not in the manual?
Questions and answers