Table of Contents
Advertisement
Quick Links
Advertisement
Table of Contents

Related Manuals for Vimar 02907


Summary of Contents for Vimar 02907
- Page 1 Installer manual 02907 Wi-Fi touchscreen thermostat CLIMA...
- Page 2 The ID of the device and the rest of the information are automatically recorded on the Cloud servers of Vimar S.p.A. after WiFi configuration and access to the Internet. Users can disable the services that provide remote access to...
-
Page 3: Table Of Contents
Table of Contents 1. Thermostat 02907 ………………………………………………………………………………………………… 3 2. Field of application ……………………………………………………………………………………………… 3 3. Installation ………………………………………………………………………………………………………… 3 4. Connections ………………………………………………………………………………………………………… 5 4.1 Relay connection ……………………………………………………………………………………………… 5 4.2 External temperature probe …………………………………………………………………………………… 6 5. Switching on a resetting parameters …………………………………………………………………………… 8 6. -
Page 5: Thermostat 02907
Thermostat 02907 - Field of application - Installation 1. Thermostat 02907 WiFi thermostat (802.11 b/g/n, 2.4GHz), wall-mounting, mains-powered (230 V~), with interface with capaci- tive keys and equipped with user-friendly functions to facilitate energy saving. Designed to control heating and air-conditioning via C, NC, NO relay output. - Page 6 Installation 2 3 0 0 H z 5 0 /6 2 3 0 5 ( 2 ) 1 . C IT A – T 4 2 3 0 0 H z 5 0 /6 2 3 0 5 ( 2 ) 1 .
-
Page 7: Connections
Connections 4. Connections 4.1 Relay connection C NC NO N L V I M A R S p A Fig. 1 - Circulation pumps, burners, solenoid valves C NC NO N L V I M A R S p A Fig. -
Page 8: External Temperature Probe
Connections 4.2 External temperature probe Depending on how it is configured, the external temperature probe can be used to accomplish several functions; it does NOT have polarity so you can connect the 2 wires in the 2 terminals without any par- ticular order. - Page 9 Connections 02965.1 used for adjustment (of a remote environment) 02965.1 used for limiting the temperature of underfloor heating IMPORTANT: During installation, take care not to damage the insulation of the probe while laying the screed. Perform the installation in such a way that the probe is accessible for any maintenance work.
-
Page 10: Switching On A Resetting Parameters
Switching on and resetting parameters 5. Switching on and resetting parameters When switching on, in the first 3 seconds of power-up the thermostat displays the firmware version. Fig. 4: Start up screen If in this phase you touch the icon, a screen appears on the display where you can reset the device parameters: Fig. -
Page 11: Configuration Via Wifi Interface
Configuration via WiFi interface 6. Configuration via WiFi interface The thermostat 02907 features a WiFi interface that lets you configure and control your device remotely. To function correctly, the WiFi interface must be properly configured by performing the first configuration pro- cedure described in the next paragraph (6.1). - Page 12 Configuration via WiFi interface Otherwise enter the “OnOF” menu by tapping ; “ON” or “OFF” will begin to flash. Using select “ON” and confirm by tapping Using scroll through the list of options until you see the “Conf” screen Confirm by touching The display will show “Strt”...
- Page 13 • On the device, enable the WiFi interface and scan for available networks. • Connect the mobile device to the WiFi network generated by the thermostat 02907. • The login credentials of the WiFi network generated by the thermostat are printed on the label...
- Page 14 "VIMAR02907" and a variable portion of 6 hexadecimal characters indicating the serial number of the device you want to configure (see the example in figures 6 and 7): Fig. 6: Back of the thermostat 02907 Fig. 7: Network selection screen on smartphone 1.
- Page 15 Fig. 9 By-clima App for a database in which there Fig. 8 By-clima App for an empty database is at least one device 3. Select "02907 Thermo WiFi” SC02- Fig. 10 By-clima App and selection of thermostat 02907 4. Select the “Configure a new Thermostat” procedure...
- Page 16 Configuration via WiFi interface Fig. 11 By-clima App and thermostat configuration 5. The procedure will start searching for a new thermostat. 6. After identifying the thermostat, the By-clima App will require you to enter the current PIN (which by default is 1234) and possibly a new custom PIN. Collegati al CronoTermostato Come vuoi procedere? Inserisci ora il PIN di accesso di rete...
-
Page 17: Configuring The Temperature Control Parameters And Using The Device
(via WiFi) only by the mobile device with which it was configured. If you wish to control the 02907 also with other devices then you need to carry out the pairing procedure for additional devices described in paragraph 6.4. - Page 18 In addition to configuring your home network you can also specify whether you want to take advantage of the Vimar cloud service. 6.3.1 Cloud Service Vimar lets users easily access their thermostat from all over the world over the Internet thanks to its cloud service. This service enables: •...
-
Page 19: Pairing Additional Mobile Devices With The Timer-Thermostat
Configuration via WiFi interface 6.4 Pairing additional mobile devices with the thermostat The thermostat 02907 can be controlled only with mobile devices that have been paired with the first config- uration or pairing procedure. A new mobile device (on which the By-clima App has previously been installed) can be paired at any... -
Page 20: Display
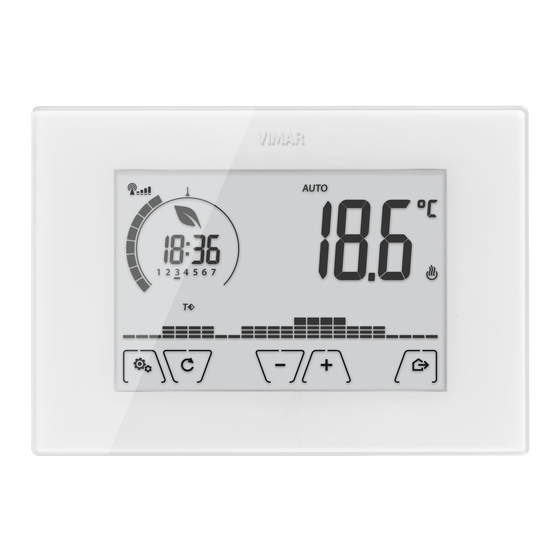
Display 7. Display The touchscreen display allows you to control the system using the following buttons and icons: Fig. 14: Graphical interface and buttons A: WiFi radio signal strength indicator B: Operating mode C: Away D: Confirm E-F: Menu navigation and setting parameters G: Back H: Settings menu I: AUTO programme temperature trends... -
Page 21: Functions Of The Buttons
: Away : Manual : Antifreeze : Switched off (OFF) : Automatic operation : Connection status to the cloud service Vimar (flashing connection attempt in progress; fixed active link) : Alarm : Availability new software update : Air conditioning... -
Page 22: Standby
Display : Eco (saving) : Confirm : Day of the week indicator : Away temperature : Economy temperature : Comfort temperature 7.3 Standby If no operations are carried out on the device for 30 seconds, it automatically activates standby mode which lowers the brightness level of the device. -
Page 23: Viewing The Display
Display 7.5 Alternative views During normal operation, i.e. when you are not navigating the menus, you can select the information to display on the left-hand side of the display. Indicatore qualità segnale WiFi Energy saving indicator Clock Day of the week indicator Set temperature indicator Daily program Fig. -
Page 24: Operating Mode
Operating mode 8. Operating mode The thermostat 02907 is able to regulate the temperature according to the following operating modes: • Switched off (OFF): switches the system off • Manual (ON): lets you set the environment temperature set-point manually • AUTO: lets you set a control program that compares the room temperature with the value set for each quarter of an hour of the current day;... -
Page 25: Manual
Operating mode 8.2 Manual In this mode the device operates as a simple thermostat and regulates the ambient temperature, taking it to the value set by the user. When MANUAL mode is active, the icon is displayed above the temperature indicator. Fig. -
Page 26: Auto
Operating mode 8.3 Auto This is the typical mode of operation of the thermostat. The device automatically changes the ambient temperature according to the time of day and the day of the week, it minimizes user intervention thereby optimizing comfort and energy savings; three different temperatures can be set to cover the needs of normal use, user away or nighttime reduction in the environment. - Page 27 Operating mode Fig. 21: Input screen in Timed Manual mode Using you set the temperature and confirm with The next screen, again using , lets you set the time for which the temperature you have just set is maintained. Fig. 22: Regulating the number of hours of Timed Manual mode Finally confirm with At the end of the set time the thermostat goes back into AUTO mode, the icon switches off and...
-
Page 28: Away
Operating mode 8.5 Away This mode is useful to achieve energy savings quickly and effectively whenever the user leaves the reg- ulated room. In "Away" mode the system makes the adjustment according to the "away temperature" setpoint The Away mode can only be activated by touching The display will show the "away temperature"... -
Page 29: Antifreeze
Operating mode - Settings menu 8.6 Antifreeze This mode, which can only be activated when the system is operating in heating mode, lets you set a minimum temperature value ( setpoint) to avoid damage to the pipework or to keep it from falling below a certain safety level when you are away for lengthy periods in the winter. -
Page 30: Standby Brightness Level Setting
9.3.2 Enable Cloud Service menu lets you select whether or not to take advantage of the cloud service offered by Vimar. If you do not intend to use this service some of the following submenus will be inhibited. Using select “ON” or “OFF” to use or not use the cloud service and confirm with 9.3.3 Automatic time synchronization... - Page 31 Settings menu 9.3.4 First configuration menu enables activating the thermostat configuration procedure with the App. This procedure lets you (via a smartphone or tablet) configure the WiFi network to which the thermostat is to connect during normal operation and it lets you program all the functions of temperature control (for further details please see chap.
-
Page 32: Info About The Device
SW version. - Tap to start the update from the Vimar cloud and wait until the next time the thermostat is restarted. Caution: While updating the SW do not turn off the device, nor access the thermostat with the By-clima app. - Page 33 Parameters table Temperature offset (Offset temp.) [0,..,±3]°C 0.1°C 0°C Hours [00,..,23] Minutes [00,..,59] 1 min Clock [Mon, Tue, Wed, Day of the week Thu, Fri, Sat, Sun] Audible warnings Enable audio feedback [ON, OFF] PIN number [000,..,999] (Away-Heat.) , 10..35]°C 0.1°C 16°C (Economy-Heat.)
-
Page 34: Warnings
• Terminals: Relay C, Relay NC, Relay NO, 2 external temp. probe (art. 02965.1) • WiFi network: complies with 802.11 b/g/n; IP address: static or DHCP • Controlled via local interface (touchscreen) or remotely via WiFi (with Vimar By-clima App for Android, iOS, Windows Phone). -
Page 35: Installation Rules
Standards EN 60730-2-7, EN 60730-2-9, EN 301 489-17, EN 300 328, EN 62311. Vimar SpA declares that the radio equipment complies with Directive 2014/53/EU. The full text of the EU declaration of conformity is on the product sheet available at the following Internet address: www.vimar.com. -
Page 36: Appendix 1 - Data On The Wifi Network
Appendix 1 - Data on the WiFi network 17. Appendix 1 - Data on the WiFi network 17.1 WiFi Thermostat Serial number 17.2 WiFi Router Main router of the installation site. Brand Model Notes 17.3 Additional Access Point If there is an additional device that extends the WiFi coverage inside the home/site. Brand Model Notes... - Page 37 Viale Vicenza, 14 36063 Marostica VI - Italy www.vimar.com 02907IEN 01 1806...
Need help?
Do you have a question about the 02907 and is the answer not in the manual?
Questions and answers