
Related Manuals for it ITVS-760B

Summary of Contents for it ITVS-760B
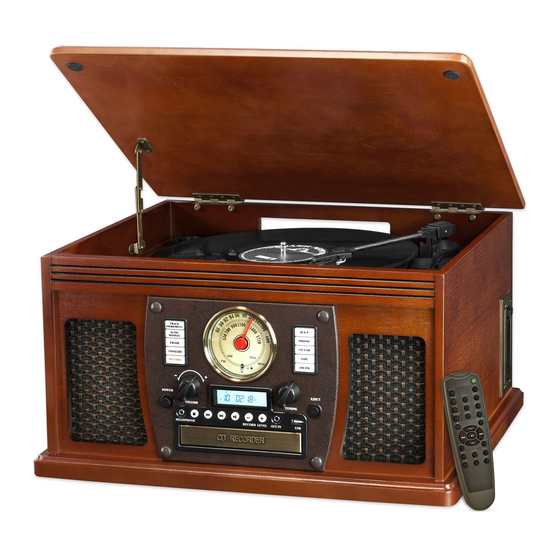
- Page 1 MODEL: ITVS-760B WOODEN MUSIC CENTER WITH BLUETOOTH AND RECORDABLE CD PLAYER / USB...
-
Page 2: Table Of Contents
Important Safety Instructions..................3 Product Overview......................4 Setup / Basic Operation....................7 Remote Control......................7 Listening to a Vinyl Record..................9 Listening to a CD......................9 Listening to the Radio....................11 Listening to an External Audio Device (AUX Mode)............ 12 Listening to an External Audio Device (Bluetooth Mode)........... -
Page 3: Important Safety Instructions
PRODUCT COMPLIES WITH DHHS RULE 21 CFR SUBCHAPTER J IN EFFECT AT DATE OF MANUFACTURE This equipment is a Class II or double insulated electrical appliance. It has been designed in such a way that it does not require a safety connection to electrical earth. -
Page 4: Product Overview
-The exclamation point within a triangle is intended to alert the user to the presence of important operating and maintenance instructions in the manaul accompanying the device. This equipment is a Class II or double insulated electrical appliance. It has been designed so that it does not require a safety connection to electrical earth. - Page 5 “TRACK INCREMENT” During recording, press to separate tracks. “AUTO /MANUAL” Press to select mode of track number assignment for recording. “ERASE” Press to erase or unfinalize a CD-R disc/USB “FINALIZE” Press to finalize a CD-R/CD-RW disc. “RECORD” Press to enter record/pause mode. RADIO TUNER DISPLAY “AUX/BLUETOOTH”...
- Page 6 Rear View A. AUX IN jacks For audio sources with RCA jacks, plug the RCA end of the cable into these jacks and the other into the audio source. Be sure to connect the white plug to the white jack (Left) and the red plug to the red jack (Right).
-
Page 7: Setup / Basic Operation
In such cases, leave the unit for 1-2 hours after plugging it into an AC outlet to allow it to stabilize at the temperature of its surroundings. - Page 8 Replace the battery compartment cover. Battery Replacement When the distance required between the remote control unit and main unit decreases, it is necessary to replace the batteries with new ones. Battery Precautions Be sure to insert the batteries with correct positive “+” and negative “-” orientation.
-
Page 9: Listening To A Vinyl Record
*To lock the top cover in the open position, lift up the top cover all the way so that the hinge is straight (Steps 2-3). Be sure to push the hinge forward so that it will lock securely (Step 4). Slowly lower the... - Page 10 - Do not push the CD tray – always use the OPEN/CLOSE button. - It takes a moment for the unit to load a disc, during which all buttons will be temporarily deactivated. Display...
-
Page 11: Listening To The Radio
Programmed Playback Up to 32 tracks can be programmed to play in the desired order. Notes: - Shuffle playback does not work during programmed playback. - Programmed playback works with finalized disc only. Press “CD/USB” button repeatedly to select CD mode, then load a CD. -
Page 12: Listening To An External Audio Device (Aux Mode)
5. A few seconds later your Bluetooth connection is success and you will hear a rising tune. ENJOY MUSIC FROM AN EXTERNAL DEVICE 1. Get your external device paired. (See “Getting connected”) 2. Turn on the music player program on your external device and set it play. -
Page 13: Listening To A Cassette Tape
Normally, you can control music playback with the PLAY/PAUSE, button on the apparatus. Please Note: Not all buttons/functions will work on all devices. Listening to a Cassette Tape 1. Load an audio cassette tape into the unit (located on the Right side of the unit). - Page 14 If your source of the recording quality is not of best quality it is recommended to use the “MANUAL TRACKING” function for best result in recording.
- Page 15 Note: Be sure not to set the recording volume too low – doing so will result in very low playback volume levels. 3. Once the recording volume level is set, reset the audio source so it is ready for recording. Entering Recording (Play) Mode 1.
- Page 16 6) When the CD is completely finalized, the CD tray will come out automatically and the recorded and finalized CD can be played. Before a CD-R or CD-RW can be played in a standard CD Player, it must be finalized. During finalization, a Table of Contents (TOC) is written to the CD.
-
Page 17: Usb Memory Stick Playback / Record
USB MEMORY STICK PLAYBACK 1. Press CD/USB button repeatedly to switch to USB mode. “USB” will appear on the right corner. “--- busy ” will blink for a few seconds. Note: When no USB is set, “NO USB” will appear on the display. 2. - Page 18 Notes: - If one of the following buttons is pressed, the repeat mode will be cancelled. OPEN/CLOSE, POWER, AM/FM, PHONO, AUX/BLUETOOTH, TAPE, CD/USB. Shuffle Playback To play the tracks on a USB in a random sequence, press the SHUFFLE button during playback. Notes: - Pressing ( ) during shuffle playback will randomly select the next track.
- Page 19 If your source of the recording quality is not of best quality it is recommended to use the “MANUAL TRACKING” function for best result in recording.
- Page 20 Note: Be sure not to set the recording volume too low – doing so will result in very low playback volume levels. 3. Once the recording volume level is set, reset the audio source so it is ready for recording. Entering Recording (Play) Mode 1.
-
Page 21: Maintenance / Proper Handling
3. Press the ( ) button to begin erase the last track. “--- busy” will appear on the display. It will disappear, indicating that the track has been erased permanently from the USB. 4. Repeat steps 2 and 3 to continue erasing tracks one at a time. -
Page 22: Specifications
• In order to shut off the power to this product completely, unplug the power cord from the wall outlet. Be sure to unplug the unit if you will not intend to use it for an extended period of time. -
Page 23: Troubleshooting Guide
• • • sound output. or another interfering device. appliance, and relocate the unit. Unit fails to respond. It might result from external Disconnect the power cord • • • factors such as ESD and external audio (Electro-static discharge). device. Re-plug the power cord after one minute. -
Page 24: Fcc Statement
Troubleshooting Guide Decline in turntable The turntable stylus is worn out Replace the stylus. • • • audio performance No sound output with Both AUX in jacks (front and Unplug the front AUX in • • • external audio device rear) are plugged. -
Page 25: Industry Canada
INDUSTRY CANADA This device complies with Industry Canada licence-exempt RSS standard(s). Operation is subject to the following two conditions: (1) this device may not cause interference, and (2) this device must accept any interference, including interference that may cause undesired operation of the device. Under Industry Canada regulations, this radio transmitter may only operate using an antenna of a type and maximum (or lesser) gain approved for the transmitter by Industry Canada. - Page 26 Warranty is “Not” transferable. IT agrees, within the initial “90 Day” period, to repair or replace the product if it is determined to be defective at “No Charge”. It is further agreed that IT will cover the cost to repair or replace damaged “Parts” only for a total period of “One Year” from the date of the original purchase.
- Page 27 760150604E...
Need help?
Do you have a question about the ITVS-760B and is the answer not in the manual?
Questions and answers
LISTENING TO THE RADIO 1 DAY AND IT JUST POWERED OFF AND WILL NOT COME BACK ON, DO THEY HAVE A FUSE IN THEM SOMEWHERE? MODEL ITVS-760B
replacment belt for the ITVS-760B