Table of Contents

Related Manuals for Instant Pot AIR FRYER LID 6


Summary of Contents for Instant Pot AIR FRYER LID 6
- Page 1 AIR FRYER LID User Manual Important safeguards Product, parts and accessories Get started Control panel Cooking Care, cleaning and storage Troubleshooting Warranty Contact Download the Instant Pot App with 1000+ recipes at instantpot.com/app.
-
Page 2: Important Safeguards
Never pull from the power cord. 06 DO NOT attempt to use a Smart Program on the Instant Pot pressure cooker base for any function when the Air Fryer Lid is placed on top of base cooker. - Page 3 IMPORTANT SAFEGUARDS 09 Oversized foods must not be inserted into the stainless-steel inner pot or the air fryer basket as they may create a fire or risk of electric shock. 10 For household countertop use only. DO NOT use outdoors. Not for commercial use.
- Page 4 20 DO NOT heat the empty stainless-steel inner pot with the Air Fryer Lid for more than 10 minutes, as doing so may damage the cooking surface. • DO NOT move the Instant Pot cooker base if the stainless-steel inner pot contains hot oil, hot food or hot liquids.
- Page 5 IMPORTANT SAFEGUARDS When the Air Fryer Lid is in operation hot air is released through the air vents, which may result in personal injury. Keep your hands and face at a safe distance from the air vents. DO NOT place your face or hands over the appliance when removing the Air Fryer Lid.
-
Page 6: Special Cord Set Instructions
IMPORTANT SAFEGUARDS 33 DO NOT attempt to repair, replace, alter or modify components of the appliance, as this may cause electric shock, fire or injury, and will void the warranty. 34 DO NOT tamper with any of the safety mechanisms. 35 DO NOT use the appliance for other than its intended use. -
Page 7: Compatibility
IMPORTANT SAFEGUARDS Compatibility The 6 Quart Air Fryer Lids are made for use with 6 Quart Instant Pot Multi-Use Pressure Cookers, respectively. Duo 60 (IP-DUO60, IP-DUO60 V2, IP-DUO60 V2.1, IP-DUO60-ENW, IP-DUO60 V3, Duo 60 V3, Duo Frontier Rose 60, Duo Dazzling Dahlia 60, Duo White 60, Duo Teal 60, Duo Red 60, Duo Black SS 60, Duo Red SS 60, Duo Nova Black SS 60). -
Page 8: Table Of Contents
Table of contents IMPORTANT SAFEGUARDS ..................2 Special cord set instructions ...................6 Compatibility ......................7 Find your model name and serial number ............7 Product specifications .....................7 Product, parts and accessories .................. 9 Get started ........................11 Initial set up (it won’t bite!) ...................11 Is something missing or damaged? ..............11 Control panel ...................... -
Page 9: Product, Parts And Accessories
Product, parts and accessories Air Fryer Lid 6 Quart Before using your awesome new lid, make sure that everything is present and accounted for. Front Handle Contol panel Back Air intake Air vent Power cord Illustrations in this document are for reference only and may differ from the actual product. - Page 10 Product, parts and accessories Interior Element cover Heating element (Beneath element cover) Accessories Broil/dehydrating tray Multi-level air fryer basket Protective pad and storage cover Air fryer basket base Illustrations in this document are for reference only and may differ from the actual product. Always refer to the actual product.
-
Page 11: Get Started
Don’t remove the safety warning stickers from the lid or the rating label from the back of the cooker base. 04 Make sure to only use the Instant Pot Air Fryer Lid with a compatible Instant Pot multi-use pressure cooker and stainless-steel inner pot. See Compatibility for the full list of Instant Pots that work with this Air Fryer Lid. -
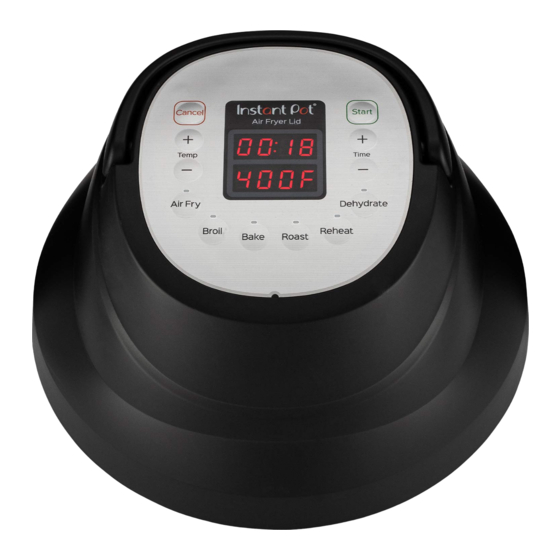
Page 12: Control Panel
Control panel • Air Fry • Broil • Bake Smart Programs • Roast • Reheat • Dehydrate The time display shows the time in HH:MM format. It Time display counts up or down, depending on the Smart Program. The temperature display shows the set temperature in Temperature display ºC or ºF. -
Page 13: Settings
Control panel Settings To do this… Do this! When in standby, press and hold the + button Change the temperature scale over Temp until Fahrenheit (°F) or Celsius (°C) (°F and °C). appears on the display. Sound On: When in Standby mode, press and hold the + button over Time until S On appears on the display. -
Page 14: Status Messages
Status messages The Air Fryer Lid is in standby mode, ready for action! Air Fryer Lid has started preheating. This may indicate: • The lid is not seated properly. • The inner pot is not present in the cooker The Air Fryer Lid has reached the perfect temperature, and is ready to cook your food. -
Page 15: Cooking
Overloading electrical circuits can lead to fire, burns and injury. DO NOT plug in the Air Fryer Lid and the Instant Pot cooker base at the same time. Always unplug the Instant Pot cooker base BEFORE plugging in the Air Fryer Lid. -
Page 16: Using The Accessories
Cooking Using the accessories The multi-level air fryer basket is perforated to help give your food a delicious all over crisp, and should be used for most air fried foods, like wings, nuggets and cauliflower bites. You can get different results by changing the air flow in the inner pot. Do this…... - Page 17 03 When cooking ends (and you have released all pressure, if pressure cooking) remove the pressure cooker lid. 04 Unplug the Instant Pot as directed in 03 If you want to use the broil/ your user manual. dehydrating tray, insert it into the...
-
Page 18: Air Fry, Broil, Bake And Roast
Cooking Air Fry, Broil, Bake and Roast Elevate your meal's taste and texture with the Air Fryer Lid! Smart Default Default Temperature Time range program time* temperature* range 20 minutes 1 to 45 minutes 204°C 149 to 204°C (00:20) (00:01 to 00:45) 400°F 300 to 400°F Air frying is an amazing way to bring out a lot of flavor using only a little oil. - Page 19 Stage 1: Setting up for cooking You can adjust the time or temperature any time with the + / − buttons (then 01 Make sure your Instant Pot is unplugged, press Start to confirm the change) but then connect the Air Fryer Lid’s power changes made after the Smart Program cord to a 120 V power source.
- Page 20 Check out the cooking timetables at display shows End. instantpot.com/airfryerlid, download the Instant Pot app at instantpot.com/app, The fan may keep blowing for up to or, visit our recipe site at instantpot.com/ 5 minutes or until you lift the lid.
-
Page 21: Dehydrate And Reheat
02 Place the Air Fryer Lid on the cooker 02 When you’re ready, make sure base. your Instant Pot is unplugged, then When the lid is placed correctly, the connect the Air Fryer Lid’s power cord display shows OFF and the cooker to a 120 V power source. - Page 22 Cooking Stage 3: The main event 01 Press Start to begin! You can adjust the time or temperature any time with the + / − buttons (then press Start to confirm the change) but changes made after the Smart Program begins are not saved. 02 When the Smart Program finishes, the display shows End.
-
Page 23: Care, Cleaning And Storage
Care, cleaning and storage Clean your Air Fryer Lid after each use. Failure to follow these cleaning instructions may result in catastrophic failure, which may lead to property damage, severe personal injury and/or death. Always unplug the appliance and let it cool to room temperature before cleaning. Never use metal scouring pads, abrasive powders or harsh chemical detergents on any parts or accessories. -
Page 24: Storing The Air Fryer Lid
Care, cleaning and storage WARNING To avoid risk of electricalshock Without proper If you smell or see and personal injury: cleaning, food and black smoke, press Cancel and unplug the grease splatter may • Do not immerse the build up around the appliance. -
Page 25: Troubleshooting
Place the lid correctly on a compatible Instant Pot cooker base. Lid is not detected. Make sure the Instant Pot cooker base is unplugged. Error code Insert the inner pot into a compatible Instant Pot cooker Inner Pot is not flashes on base. detected. -
Page 26: Warranty
Warranty Limited Warranty This Limited Warranty is effective for one year from the date of original consumer purchase. Proof of original purchase date and, if requested by an authorized representative of Instant Brands Inc. (“Instant Brands”), return of your appliance, is required to obtain service under this Limited Warranty. Provided that this appliance is operated and maintained in accordance with written instructions attached to or furnished with the appliance, Instant Brands will, in its sole and exclusive discretion, either: (i) repair defects in materials or workmanship;... - Page 27 Warranty Disclaimer of Implied Warranties EXCEPT AS EXPRESSLY PROVIDED HEREIN AND TO THE EXTENT PERMITTED BY LAW, INSTANT BRANDS MAKES NO WARRANTIES, CONDITIONS OR REPRESENTATIONS, EXPRESS OR IMPLIED, BY STATUTE, USAGE, CUSTOM OF TRADE OR OTHERWISE WITH RESPECT TO THE APPLIANCES OR PARTS COVERED BY THIS WARRANTY, INCLUDING BUT NOT LIMITED TO, WARRANTIES, CONDITIONS, OR REPRESENTATIONS OF WORKMANSHIP, MERCHANTABILITY, MERCHANTABLE QUALITY, FITNESS FOR A PARTICULAR PURPOSE OR DURABILITY.
-
Page 28: Contact Us
Instant Brands Inc. 11—300 Earl Grey Dr., Suite 383 Ottawa, Ontario K2T 1C1 Canada Register your product today instantpot.com/support/register Contact us 1-800-828-7280 support@instantpot.com instantpot.com/#Chat instantpot.com store.instantpot.com Copyright 2020 Instant Brands © ™ 646-0101-92...
Need help?
Do you have a question about the AIR FRYER LID 6 and is the answer not in the manual?
Questions and answers