Table of Contents
Advertisement
Available languages
Available languages
Quick Links
Advertisement
Chapters
Table of Contents

Related Manuals for Sonoro sonoroSTEREO SO-310


Summary of Contents for Sonoro sonoroSTEREO SO-310
- Page 1 sonoroSTEREO (SO-310) Stereo-Musik-System mit Bluetooth -Technologie ® Bedienungsanleitung Operating manual Mode d‘emploi Instrucciones de manejo Manuale operativo Betjeningsvejledning RADIO_CD_STEREO_BDA-Cover.indd 3 22.01.14 17:24...
- Page 2 Sonoro audio GmbH Unter Goldschmied 6 50667 Köln Telefon: +49 221 167929-0 Telefax: +49 221 167929-290 E-Mail: info@sonoro-audio.com Internet: www.sonoro-audio.com © 2013...
- Page 3 Gesamtinhaltsverzeichnis Bedienungsanleitung..........................5 Operating manual........................... 39 Mode d'emploi............................69 Instrucciones de manejo........................103 Manuale operativo..........................137 Betjeningsvejledning..........................171 © 2013...
- Page 4 © 2013...
- Page 5 sonoroSTEREO (SO-310) Stereo-Musik-System mit Bluetooth -Technologie ® Bedienungsanleitung RADIO_CD_STEREO_BDA-Cover.indd 3 22.01.14 17:24...
- Page 6 Sonoro audio GmbH Unter Goldschmied 6 50667 Köln Telefon: +49 221 167929-0 Telefax: +49 221 167929-290 E-Mail: info@sonoro-audio.com Internet: www.sonoro-audio.com © 2013...
-
Page 7: Table Of Contents
Inhaltsverzeichnis Einführung..............................9 Zu Ihrer Sicherheit............................ 9 Symbole in dieser Anleitung......................9 Bestimmungsgemäße Verwendung....................9 Kinder und Personen mit eingeschränkter Wahrnehmung............10 Spannungsversorgung........................10 Batterien............................10 Laser............................... 10 Transport............................10 Umgebungsbedingungen....................... 11 Betrieb............................11 2.10 Verwendung von Kopfhörern...................... 11 2.11 Defekt............................ - Page 8 Weckwiederholung einstellen....................... 25 Wecker ein- und ausschalten......................25 Wecker nach Ertönen des Alarms abstellen.................. 26 Snooze einstellen........................... 26 Allgemeine Funktionen der Audio-Wiedergabe..................26 10.1 Wiedergabemodus wählen......................26 10.2 Lautstärke einstellen........................26 10.3 Wiedergabe stummschalten......................27 Radiowiedergabe............................ 27 11.1 FM-Radio............................27 11.1.1 FM-Sender suchen........................
-
Page 9: Einführung
Wir wünschen Ihnen viel Freude mit dem Gerät! n Wiedergabe von Audio- und MP3-/WMA-CDs. Kontaktdaten n Audio-Wiedergabe vom externen USB-Gerät. n Audio-Wiedergabe von externen Geräten, die über Adresse sonoro audio GmbH AUX angeschlossen werden. Unter Goldschmied 6 n Audio-Wiedergabe von bluetoothfähigen Geräten 50667 Köln (z. B. Mobiltelefonen). -
Page 10: Kinder Und Personen Mit Eingeschränkter Wahrnehmung
Kinder und Personen mit einge- Batterien schränkter Wahrnehmung n Entnehmen Sie Batterien/Akkus aus dem Batterie- fach, sobald sie entladen sind oder das Gerät n Lassen Sie das Gerät nicht unbeaufsichtigt und ver- voraussichtlich längere Zeit nicht benutzt wird. wenden Sie es nicht, wenn Kinder oder Personen, n Werfen Sie die Batterien/Akkus nicht ins Feuer und die die Gefahren nicht einschätzen können, in der setzen Sie sie niemals hohen Temperaturen aus. -
Page 11: Umgebungsbedingungen
Umgebungsbedingungen 2.10 Verwendung von Kopfhörern Der sichere Betrieb des Geräts setzt dem Gerät ange- n Verringern Sie die Lautstärke des Geräts immer, messene Umgebungsbedingungen voraus. Beachten bevor Sie den Kopfhörer aufsetzen. Steigern Sie die Sie daher Folgendes: Lautstärke erst dann auf die gewünschte Höhe, wenn der Kopfhörer richtig sitzt. -
Page 12: Lieferumfang
3 Lieferumfang Zum Lieferumfang des sonoroSTEREO gehören Zusatzteile, die Sie zum Empfangen der Radiofre- quenzen sowie zum Anschließen weiterer Geräte benötigen. n sonoroSTEREO mit Schutzhülle n Fernbedienung n Zwei Knopfzellen (CR2032, 3 V) n Netzkabel (CE und UK) n FM/DAB-Antenne n Handschuhe n Bedienungsanleitung 4 Unterstützte Formate... -
Page 13: Bedienelemente Und Anschlüsse
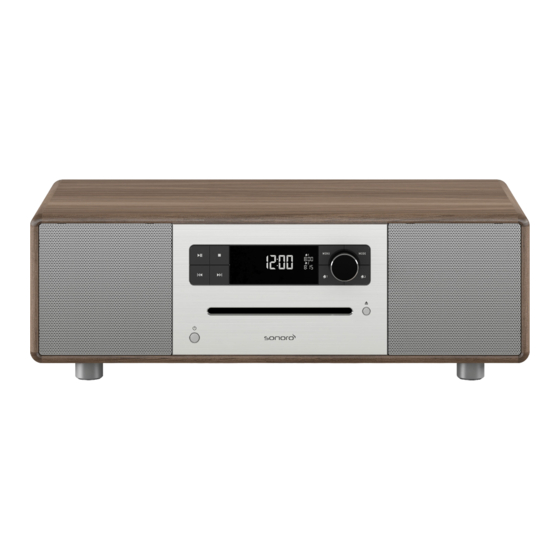
5 Bedienelemente und Anschlüsse sonoroSTEREO Vorderseite Abb. 3: sonoroSTEREO Vorderseite Pos. Bezeichnung Funktion (Abb. 3) Lautsprecher Lautsprecheröffnung. Play/Pause CD/USB: Wiedergabe starten/anhalten. Stop CD/USB: Wiedergabe beenden. DAB und FM: Infotaste. LC-Display Zeigt bei ausgeschaltetem Gerät die aktuelle Uhrzeit und das Datum, bei einge- schaltetem Gerät Informationen zum Modus. - Page 14 sonoroSTEREO Rückseite Abb. 4: sonoroSTEREO Rückseite Pos. Bezeichnung Funktion (Abb. 4) Ein/Aus- Schaltet das Gerät ein bzw. aus. Schalter DAB/FM Anschluss für die mitgelieferte oder eine externe Antenne. ANTENNA Batteriefach Die Batterie (Knopfzelle CR2032, 3 V) gewährleistet das Weiterlaufen der Uhr bei Stromausfall.
- Page 15 Fernbedienung Abb. 5: Fernbedienung Pos. Taste Funktion (Abb. 5) Standby Gerät ein-/ausschalten. DIMMER Dimmer ein-/ausschalten. Dimmer-Einstellungen vornehmen. MUTE n Kurz drücken (im Wiedergabemodus): Tonwiedergabe (Stummschaltung) ein-/ ausschalten. SNOOZE n Kurz drücken (im Weckmodus): Weckwiederholung (Snooze) starten. n Lang drücken: Menü [Snooze Einstellung] zum Einstellen der Weckwiederho- lungszeit aufrufen.
- Page 16 Pos. Taste Funktion (Abb. 5) OK, Play/Pause Ausgewählte Einstellungen im Menü bestätigen. Gewählten Titel abspielen oder anhalten. Alarm 2 n Drücken: Alarm 2 ein-/ausschalten, Alarm stoppen. n Drücken und halten: Alarm einstellen. Speicher 1–6 n Senderspeicher. n Im USB-Abspielmodus (bei angelegten MP3-Ordnern): –...
-
Page 17: Anzeige
6 Anzeige Abb. 6: Anzeige Pos. Symbol Funktion (Abb. 6) Kopfhörer Kopfhörer ist angeschlossen. Sleep Sleeptimer ist aktiv. Repeat CD: Wiederholung aller Titel der CD. Relax Relax-Modus ist aktiv. Shuffle CD: Mixen der Abspielreihenfolge der einzelnen Titel. FM/AM/CD/ Zeigt den gewählten Betriebsmodus an. DAB/AUX/USB Zusatz zur Uhrzeit bei der 12-Stunden-Einstellung. -
Page 18: Gerät Auspacken Und In Betrieb Nehmen
Durch den falschen Umgang mit Batterien kann Sollten Sie einen Schaden feststellen, wenden Sie sich umgehend an Ihren Händler oder an das Gerät beschädigt werden. den Support von sonoro ( Ä „Kontaktdaten“ – Legen Sie Batterien nicht falsch herum ein. auf Seite 9). -
Page 19: Spannungsversorgung Herstellen
Verschrauben Sie die mitgelieferte FM/DAB- Spannungsversorgung herstellen Antenne auf der Rückseite des Geräts mit dem Die Stromversorgung des Geräts erfolgt über das mit- DAB/FM-Antenna-Anschluss. gelieferte Netzkabel. Das Netzteil ist im Gerät selbst Entfalten und richten Sie die Antenne so aus, integriert. -
Page 20: Grundfunktionen Einstellen
Stecken Sie den Kopfhörerstecker an der Rück- Drehen Sie den Bedienknopf, um die Minuten seite des Geräts in den Kopfhörereingang. einzustellen. Drehen Sie den Bedienknopf langsam nach Drücken Sie den Bedienknopf, um die Einstel- rechts, um die Lautstärke zu steigern. lung zu bestätigen. -
Page 21: Einstellungs-Menü
Datum ein-/ausschalten Uhrzeitformat einstellen Abb. 12: Datum ein‐/ausschalten Abb. 13: Uhrzeitformat einstellen Drücken Sie im Standby-Modus die [MENU]- Sie können zwischen dem 24-Stunden- und dem 12- Taste des Geräts oder der Fernbedienung. Stunden-Format wählen. Im 12-Stunden-Format wird die Tageszeit durch [AM] und [PM] gekennzeichnet. ð... -
Page 22: Sleeptimer Einstellen
Im Unternemü [Uhr einstellen] (Abb. 15) können Sie ð Das Display zeigt das Symbol [SLEEP] an die automatische Aktualisierung auswählen. Durch (Abb. 19/1). das Einschalten der Funktion werden die Uhrzeit Sleeptimer ausschalten sowie das Datum automatisch in den Betriebsmodi Um den Sleeptimer auszuschalten, drücken Sie FM-Radio und DAB-Radio synchronisiert. -
Page 23: Klang Einstellen
Drücken Sie die [Bass]- oder [Treble]-Taste auf der Fernbedienung. Um die Bässe einzustellen, wählen Sie [Bass] (Abb. 22/A) und drücken Sie die [VOL +]- bzw. [VOL ‐]-Taste. Abb. 21: Dimmer einstellen Um die Höhen einzustellen, wählen Sie [Höhen] Drücken Sie für ca. 2 Sekunden die [DIMMER]- (Abb. -
Page 24: Sound-Effekt
Drücken Sie den Bedienknopf, um Ihre Auswahl Die Weckfunktionen können auch im Standby-Modus zu bestätigen. des Geräts eingestellt werden. Das Alarm-Setup-Menü ist wie folgt aufgebaut: ð Das Display zeigt das Symbol [EQ] an „Weckzeit einstellen è Alarmquelle einstellen (Abb. 23/1). è... -
Page 25: Wecklautstärke Einstellen
Die Alarm‐Audio‐Wiedergabe beginnt immer in minimaler Lautstärke und wird bis auf die einge‐ stellte Lautstärke langsam gesteigert. Abb. 25: Alarmquelle einstellen Weckwiederholung einstellen Drehen Sie den Bedienknopf, um das gewünschte Medium zu wählen: Nachdem Sie die Wecklautstärke eingestellt und bestätigt haben, können Sie die Weckwiederholung Wählen Sie einen FM-Pro- einstellen (Abb. -
Page 26: Wecker Nach Ertönen Des Alarms Abstellen
Wecker nach Ertönen des Alarms Allgemeine Funktionen der abstellen Audio-Wiedergabe Um den Alarm abzustellen, drücken Sie eine der 10.1 Wiedergabemodus wählen folgenden Tasten: Für die Audio-Wiedergabe von den verschiedenen n [Alarm 1] Medien oder von externen Geräten wählen Sie den n [Alarm 2] entsprechenden Modus. -
Page 27: Wiedergabe Stummschalten
10.3 Wiedergabe stummschalten 11.1 FM-Radio Stummschalten 11.1.1 FM-Sender suchen Automatische Sendersuche Voraussetzung: Die DAB/FM-Antenne ist angeschlossen. Abb. 31: Stummschalten Drücken Sie im Wiedergabemodus kurz die [MUTE]-Taste auf der Fernbedienung, um den Ton während der Wiedergabe abzuschalten. Abb. 32: Automatische Sendersuche ð... -
Page 28: Fm-Sender Speichern
Voraussetzung: Drücken Sie den Bedienknopf, um den Sender zu speichern. Die DAB/FM-Antenne ist angeschlossen. Gespeicherten FM-Sender auf- 11.1.3 rufen Drücken Sie kurz eine der Senderspeicher- Tasten auf der Fernbedienung. Abb. 34: FM Speicher ð Der gewählte Sender wird wiedergegeben. Drücken Sie die [MENU]-Taste. 11.2 DAB-Radio ð... -
Page 29: Dab-Sender Speichern
Manuelle Sendersuche ð Die inaktiven DAB-Sender werden gelöscht. Während des Vorgangs zeigt das Display Voraussetzung: [Pruning] an (Abb. 39). Die DAB/FM-Antenne ist angeschlossen. 11.2.2 DAB-Sender speichern Drücken und halten Sie eine der Senderspeicher- Tasten auf der Fernbedienung. ð Das Display zeigt den Senderspeicherplatz Abb. -
Page 30: Cd-Wiedergabe
Es gibt 3 verschiedene Einstellmöglichkeiten für die DRC: n DRC HOCH n DRC NIEDRIG n DRC AUS Voraussetzung: Das Gerät ist im DAB-Modus. Drücken Sie die [MENU]-Taste. Abb. 41: Anzeige im CD‐Modus ð Das Display zeigt den Text [DAB Speicher] an. Abspielreihenfolge (Repeat, Shuffle, CD fort- setzen) CD-Modus... -
Page 31: Bluetooth-Wiedergabe
Wiederholung eines Titels Der aktuelle Titel wird wiederholt wiedergegeben. Diese Funktion wird beendet, wenn Sie den Modus Das sonoroSTEREO speichert bis zu 8 bluetoothfä‐ wechseln oder die CD auswerfen. hige Geräte und verbindet sich automatisch mit bereits eingestellten Geräten, wenn Bluetooth Wiederholung aller Titel aktiviert ist. -
Page 32: Aux-Wiedergabe
ð Das Display zeigt [Suchen] an. AUX-Wiedergabe Drücken Sie die [Play/Pause]-Taste, um die Wie- Über den AUX-1-Eingang lassen sich weitere Audioge- dergabe zu starten. räte mittels eines RCA-Kabels anschließen und abspielen. Über den AUX-2-Eingang können Sie über einen 3.5-mm-Klinkenstecker weitere Audiogeräte an das sonoroSTEREO anschließen und abspielen. -
Page 33: Demo Musik-Wiedergabe
Demo Musik-Wiedergabe Im Standby-Modus lässt sich Demo Musik wieder- geben, um das Gerät beispielsweise im Geschäft vor- zuführen. Demo Musik-Modus aktivieren Drücken und halten Sie den Bedienknopf für ca. 3 Sekunden. ð Der Demo Musik-Modus wird aktiviert. Drücken Sie die Speichertasten 1–6 auf der Fern- bedienung, um einen Demo Titel auszuwählen. -
Page 34: Fehlerbehebung
Fehlerbehebung Bei allen elektrischen Geräten können Störungen auftreten. Dabei muss es sich nicht immer um einen Defekt am Gerät handeln. Prüfen Sie deshalb anhand nachfolgender Tabelle, ob Sie die Störung selbst beseitigen können. Störung Mögliche Ursache Behebung Gerät schaltet nicht ein Netzkabel ist nicht richtig ange- Schließen Sie das Netzkabel richtig schlossen... -
Page 35: Reinigung
Störung Mögliche Ursache Behebung Fernbedienung funktioniert nicht Abstand ist zu groß Verringern Sie den Abstand zwi- oder nur fehlerhaft schen der Fernbedienung und dem Gerät. Batterie ist leer Tauschen Sie die Batterie der Fern- bedienung aus (siehe Ä Kapitel 7.5 „Fernbedienung vorbereiten“... -
Page 36: Technische Daten
Technische Daten Angabe Wert Abmessungen (BxTxH) ca. 450 x 262,5 x 153 mm Gewicht ca. 6,3 kg Empfangsbereich FM 87,5 MHz – 108 MHz Empfangsbereich DAB/DAB+ 174,928 MHz – 239,2 MHz Abstimmungsbereich (FM) 50 KHz Netzkabel, Power Input: 100 – 240 V ~50/60 Hz Bluetooth Version: 3.0 (EDR) Profil: AVRCP 1.0, A2DP 1.2... -
Page 37: Entsorgung
Garantie ebenfalls. Abb. 48: Bluetooth‐Kennzeichnung Die Bluetooth®-Wortmarke und -Logos sind Eigentum der Bluetooth SIG, Inc. und werden von der sonoro audio GmbH in Lizenz verwendet. Konformitätserklärung Konformitätserklärung Abb. 49: CE‐Kennzeichnung Hersteller: sonoro audio GmbH © 2013... - Page 38 © 2013...
- Page 39 sonoroSTEREO (SO-310) Stereo-Musik-System mit Bluetooth -Technologie ® Operating manual RADIO_CD_STEREO_BDA-Cover.indd 3 22.01.14 17:25...
- Page 40 50667 Cologne Germany Telephone: +49 221 167929-0 Fax: +49 221 167929-290 email: info@sonoro-audio.com Internet: www.sonoro-audio.com sonoro Service Center GB Computers Unlimited - Main Office The Technology Park Colindeep Lane London NW9 6BX United Kingdom Telephone: +44 20 82 00 82 82 Fax: +44 20 82 00 37 88 email: general@unlimited.com...
- Page 41 Table of contents Introduction............................43 For your own safety..........................43 Symbols in this manual........................43 Intended use..........................43 Children and persons with limited cognitive abilities..............43 Power supply..........................44 Batteries............................44 Laser............................... 44 Transport............................44 Ambient conditions........................44 Operation............................45 2.10 Headphone use..........................
- Page 42 Setting the alarm repeat frequency....................57 Switching the alarm function on/off....................58 Switching off the alarm clock after the alarm sounds..............58 Setting the Snooze function......................58 General audio playback functions......................58 10.1 Selecting a playback mode......................58 10.2 Setting the volume........................59 10.3 Setting playback to mute......................
-
Page 43: Introduction
Audio playback from external devices connected product! via AUX. Contact data n Audio playback from Bluetooth-enabled devices (e.g.mobile phones). Address sonoro Service Center GB n Charging of external devices that are connected via Computers Unlimited - USB. Main Office The Technology Park Colindeep Lane... -
Page 44: Power Supply
Power supply Laser The device is electric powered, so there is always a risk of electric shock. Therefore pay particular atten- tion to the following: n Never touch the power plug with wet hands. n When you want to pull the power plug from the wall outlet, always pull directly on the plug itself. -
Page 45: Operation
Operation 2.12 Cleaning n Only clean the outside of the device with a dry, soft cloth. Never use aggressive cleaning agents or solvents to clean the device, as these corrode its surface. n If the device is badly soiled, wipe it with a slightly moistened cloth and dry it immediately with a dry, soft cloth. -
Page 46: Controls And Ports
5 Controls and ports sonoroSTEREO front view Fig. 3: sonoroSTEREO front view Item Designation Function (Fig. 3) Loudspeaker Loudspeaker opening. Play/Pause CD/USB: start/pause playback. Stop CD/USB: stop playback. DAB and FM: info button. LC-Display Displays current time and date when the device is switched off. Displays mode- related information when the device is switched on. - Page 47 sonoroSTEREO rear view Fig. 4: sonoroSTEREO rear view Item Designation Function (Fig. 4) On/off switch Switch device on/off. DAB/FM Port for the included antenna or an external antenna. ANTENNA Battery com- The battery (CR2032 button cell, 3 V) ensures continued operation of the clock in partment case of power failure.
- Page 48 Remote control Fig. 5: Remote control Item Button Function (Fig. 5) Standby Switch device on/off. DIMMER Switch dimmer on/off. Adjust dimmer settings. MUTE n Press briefly (in playback mode): switch audio playback on/off (Mute). SNOOZE n Press briefly (in alarm mode): start snooze function (Snooze). n Press and hold for a while: call up menu [Snooze Setting] to set the snooze time.
- Page 49 Item Button Function (Fig. 5) OK, Play/Pause Confirm selected settings in the menu. Play or pause selected track. Alarm 2 n Press: switch alarm 2 on/off, stop alarm. n Press and hold: set alarm. Preset 1–6 n Station memory. n In USB playback mode (if MP3 folders are set up): –...
-
Page 50: Display
6 Display Fig. 6: Display Item Symbol Function (Fig. 6) Headphones Headphones are connected. Sleep Sleep Timer is active. Repeat CD: repeat all tracks on the CD. Relax Relax mode is active. Shuffle CD: shuffle the play order of individual tracks. FM/AM/CD/ Shows the selected operating mode. -
Page 51: Unpacking The Device And First Use
– Do not insert batteries the wrong way. Ensure Should you detect any damage, please con‐ that they have the correct polarity. tact your dealer or sonoro support ( Ä ‘Con‐ tact data’ on page 43) immediately. Place the device in a suitable location and remove the protective foil from the display. -
Page 52: Connecting The Antenna
L WARNING! Risk of injury if handled incorrectly! For good FM/DAB radio reception, the two ends of Risk of electric shock if the mains cable is handled the antenna should form a "T" (dipole) with the incorrectly. connecting cable (Fig. 8). –... -
Page 53: Switching On The Device For The First Time
Switching on the device for the first time After 10 seconds of inactivity, the device automat‐ ically switches to Standby mode without saving After you have switched the device on for the first the settings. time, the LC display shows the clock display and the [Tune to FM RDS station to set time &... - Page 54 You can set three different date formats (Fig. 14/A, B n Set the Sleep Timer. und C) as well as the current day. The configuration n Set display brightness. options are: n Set automatic time/date update function. n A: Current day, day, month, year. n Set display language.
-
Page 55: Setting The Sleep Timer
Restoring factory settings on the device ð The display shows the Sleep Timer (Fig. 20) and the [SLEEP] symbol flashes (Fig. 20/1). Turn the click wheel to select the desired length of the interval (Fig. 20/2). Fig. 18: Restoring factory settings The maximum interval is 120 minutes. -
Page 56: Adjusting The Sound
Turn the click wheel to select a default setting. Adjusting the sound You can select one of the following default set- 8.6.1 Setting bass and treble tings: When the device is switched on, the sound of the n Maximum bass audio playback can be adjusted via the bass and n Maximum voice treble controls. -
Page 57: Setting The Alarm Time
The alarm functions can also be set if the device is in Select an FM station preset from Standby mode. the station memory that you The Alarm Setup menu is structured as follows: want to use for the alarm. ‘Set alarm time è Set alarm source Select a DAB station preset from è... -
Page 58: Switching The Alarm Function On/Off
ð The remaining snooze time is displayed. The alarm will sound again after the set time expires. Setting the Snooze function Fig. 27: Setting the alarm repeat frequency Turn the click wheel to select the desired Snooze setting. You can choose one of the following set- tings: n once Fig. -
Page 59: Setting The Volume
10.2 Setting the volume RDS is only available for stations in the FM fre‐ quency range and only if the corresponding sta‐ tion transmits RDS data. If the station does not broadcast RDS text, then the frequency is displayed instead of the station name. 11.1 FM radio Fig. -
Page 60: Storing Fm Stations
Condition: Press the click wheel to save the station. The DAB/FM antenna is connected. 11.1.3 Accessing saved FM stations Briefly press one of the station preset buttons on the remote control. ð The selected station is played. Fig. 34: FM Preset List 11.2 DAB radio Press the [MENU] button. -
Page 61: Storing A Dab Station
Turn the click wheel until [DAB Manual Tune] is ð The selected station is played. displayed (Fig. 37). 11.2.4 Accessing DAB information Press the click wheel on the device or the [OK] button on the remote control to confirm the In DAB mode, you can access information about the selection. -
Page 62: Cd Playback
Press the click wheel or the [OK ]button on the n To fast forward through a track, press and hold remote control to confirm the selection. [Next]. n To switch to the previous track, press the Turn the click wheel to carry out the desired set- [Previous] button. -
Page 63: Connecting And Deleting Bluetooth Devices
13.2 Playing music via Bluetooth Starting playback Consult the manual of your mobile phone or your Press the click wheel or the [Play/Pause] button Bluetooth‐enabled device for help. on the front of the sonoroSTEREO or on the remote control to start playback. Pausing playback To pause playback, press the click wheel or the [Play/Pause] button again. -
Page 64: Relax Music Playback
Press one of the preset keys or the[Next] or [Previous] button to select music: n Ocean Surf n Whales n Birds Fig. 45: Setting USB playback n Rain Switch on the sonoroSTEREO. n Wind Chimes Press the [MODE] button until the display shows n Fireplace [USB Device] or press the [USB]-button on the remote control. -
Page 65: Troubleshooting
Troubleshooting Faults can occur on all electrical devices. This does not necessarily mean that the device is defective. Use the information in the following table to see if you can remedy the fault yourself. Malfunction Possible cause Elimination The device does not switch on Mains cable is not connected prop- Connect the mains cable properly erly... -
Page 66: Cleaning
Malfunction Possible cause Elimination The battery is empty Exchange the battery in the re- mote control (see Ä Chapter 7.5 ‘Preparing the remote control’ on page 52). Interference caused by other radio Increase the distance between the transmitters or devices source of interference and the sonoroSTEREO. -
Page 67: Technical Data
Technical Data Specification Value Dimensions (WxDxH) approx. 450 x 262.5 x 153 mm Weight approx. 6.3 kg FM reception range 87.5 MHz – 108 MHz DAB/DAB+ reception range 174.928 MHz – 239.2 MHz Tuning range (FM) 50 KHz Mains cable, power Input: 100 –... -
Page 68: Disposal
It is not permitted to dispose of devices marked with this symbol with the household waste. They must be n sonoro audio GmbH shall, at its own discretion, taken to a collection and recycling point for electrical repair or replace the device free of charge any and electronic devices. - Page 69 sonoroSTEREO (SO-310) Stereo-Musik-System mit Bluetooth -Technologie ® Mode d‘emploi RADIO_CD_STEREO_BDA-Cover.indd 3 22.01.14 17:26...
- Page 70 Sonoro audio GmbH Unter Goldschmied 6 50667 Köln Téléphone : +49 221 167929-0 Fax : +49 221 167929-290 Courriel : info@sonoro-audio.com Internet : www.sonoro-audio.com sonoro Service Center FR Téléphone : +49 18 05 27 67 66 Courriel : support@sonoro-audio.com © 2013...
- Page 71 Table des matières Introduction............................73 Pour votre sécurité..........................73 Symboles utilisés dans cette notice....................73 Utilisation conforme........................73 Enfants et personnes ayant une perception limitée..............74 Alimentation électrique......................... 74 Piles..............................74 Laser............................... 74 Transport............................74 Conditions ambiantes........................75 Utilisation............................75 2.10 Utilisation de casques audio......................
- Page 72 Réglage de la répétition de l'alarme....................89 Activation et désactivation du réveil..................... 89 Arrêt de l'alarme quand elle s'est déclenchée................90 Réglage de la fonction snooze....................... 90 Fonctions générales de la lecture audio....................90 10.1 Sélection du mode de lecture...................... 90 10.2 10.2 Réglage du volume.......................
-
Page 73: Introduction
Lecture audio depuis un périphérique USB externe Coordonnées n Lecture audio depuis des appareils externes rac- cordés sur le connecteur AUX Adresse sonoro audio GmbH n Lecture audio de périphériques Bluetooth (p.ex. Service Center FR des téléphones portables) Unter Goldschmied 6 n Chargement d'appareils externes raccordés sur le... -
Page 74: Enfants Et Personnes Ayant Une Perception Limitée
Enfants et personnes ayant une per- Piles ception limitée n Retirez les piles/batteries dès qu’elles sont usées ou si vous n’utilisez pas l’appareil pendant une n Ne laissez pas l'appareil sans surveillance et ne durée prolongée. l'utilisez pas lorsque des enfants ou des personnes n Ne jetez pas les piles/batteries au feu et ne les ne pouvant estimer les dangers de manière fiable exposez jamais à... -
Page 75: Conditions Ambiantes
Conditions ambiantes 2.10 Utilisation de casques audio L'utilisation en toute sécurité de l'appareil suppose le n Réduisez toujours le volume sonore de l'appareil respect de conditions ambiantes adaptées à l'appa- avant de mettre le casque audio. N'augmentez le reil. Pour cette raison, veillez à respecter les points volume sonore à... -
Page 76: Formats Pris En Charge
4 Formats pris en charge Formats de CD pris en charge L REMARQUE ! Risque de dommages si le format du CD est incorrect! L'insertion d'un Mini-Disc peut endommager l'ap- pareil. – Utilisez uniquement les formats de CD pris en charge. -
Page 77: Éléments De Commandes Et Connexions
5 Éléments de commandes et connexions Avant du sonoroSTEREO Fig. 3: Avant du sonoroSTEREO Pos. Désignation Fonction (Voir la Fig. 3) Haut-parleur Ouverture pour le haut-parleur. Play/Pause CD/USB : démarre/interrompt la lecture. Arrêt CD/USB : arrête la lecture. DAB et FM : touche d'informations. Écran à... - Page 78 Pos. Désignation Fonction (Voir la Fig. 3) Touche veille Allume/éteint l'appareil. Arrête l'alarme. Retour n Pression: navigue dans les options de menu; recherche les stations FM/DAB; piste précédente sur un CD, un périphérique USB, musique de relaxation, musique de démonstration. n Pression maintenue: retour rapide.
- Page 79 Télécommande Fig. 5: Télécommande Pos. Touche Fonction (Voir la Fig. 5) Touche veille Allume/éteint l'appareil. DIMMER Active/désactive le réglage de la luminosité. Configure les réglages de luminosité. MUTE n Brève pression (en mode lecture): active/désactive la lecture avec son (mise en sourdine). SNOOZE n Brève pression (en mode réveil): démarre la répétition de l'alarme (Snooze).
- Page 80 Pos. Touche Fonction (Voir la Fig. 5) Pour tous les modes de lecture: augmente le volume. Avance Recherche de stations et navigation dans les menus. OK, Play/Pause Valide les réglages sélectionnés dans le menu. Lit ou met en pause la piste sélectionnée.
-
Page 81: Affichage
6 Affichage Fig. 6: Affichage Pos. Indication Fonction (Voir la Fig. 6) Casque Un casque est branché. Sleep L'extinction automatique est active. Repeat CD: répétition de toutes les pistes du CD. Relax Le mode relaxation est actif. Shuffle CD: lecture aléatoire des différentes pistes. FM/AM/CD/DAB/ Affiche le mode de fonctionnement sélectionné. -
Page 82: Déballage Et Mise En Service De L'appareil
Une manipulation incorrecte des piles peut Si vous constatez un dommage, adressez‐ endommager l'appareil. vous immédiatement à votre revendeur ou à l'assistance technique de sonoro ( Ä « Coor‐ – N'insérez pas les piles dans le mauvais sens. données » à la page 73). -
Page 83: Raccordement De L'alimentation Électrique
Vissez l'antenne FM/DAB fournie à l'arrière de Raccordement de l'alimentation l'appareil pour la relier à la connexion DAB/FM- électrique Antenna. L'alimentation électrique de l'appareil se fait via le Déployez l'antenne et orientez-la de sorte à câble d'alimentation fourni. Le bloc d'alimentation est obtenir une réception optimale. -
Page 84: Réglage Des Fonctions De Base
Enfichez la fiche du casque au dos de l'appareil Tournez le bouton de commande pour régler les dans l'entrée réservée au casque. minutes. Tournez lentement le bouton de commande Appuyez sur le bouton de commande pour con- vers la droite pour augmenter le volume sonore. firmer le réglage. -
Page 85: Menu Des Réglages
Tournez le bouton de commande jusqu'à ce que Réglage du format de la date [Display Date] s'affiche. Appuyez sur le bouton de commande. ð Vous pouvez à présent choisir d'afficher ou de masquer la date. Menu des réglages En fonctionnement, le menu [Settings] permet d'ef- fectuer les configurations suivantes: n Réglage du format de l'heure. -
Page 86: Réglage De L'extinction Automatique
Vous pouvez régler la langue de menus et de l'affi- chage de la lecture (Voir la Fig. 16). Les langues sui- vantes sont disponibles: Quand l'appareil s'éteint par extinction automa‐ n anglais, et tique, il s'allume sur le mode utilisé en dernier lors‐ qu'il est remis en marche. -
Page 87: Réglage Du Son
Pour régler les graves, sélectionnez [Bass] (Voir la Fig. 22/A) et appuyez sur les touches [VOL +] et [VOL ‐]. Pour régler les aigus, sélectionnez [Treble] (Voir la Fig. 22/B) et appuyez sur les touches [VOL +] et [VOL ‐]. Fig. -
Page 88: Effet Audio
Euqalizer ausschalten « Réglage de l'heure de réveil è Réglage de la source audio de l'alarme Tournez le bouton de commande dans le sous- è Réglage du volume de l'alarme menu [Equalizer Effect] jusqu'à ce que è Réglage de la répétition de l'alarme è Fin » [Equalizer Off] s'affiche. -
Page 89: Réglage Du Volume De L'alarme
La lecture audio de l'alarme commence toujours avec un volume minimum et augmente progressi‐ vement jusqu'à atteindre le volume réglé. Fig. 25: Réglage de la source audio de l'alarme Réglage de la répétition de l'alarme Tournez le bouton de commande pour sélec- tionner la source souhaitée: Une fois le volume de l'alarme réglé... -
Page 90: Arrêt De L'alarme Quand Elle S'est Déclenchée
Arrêt de l'alarme quand elle s'est Fonctions générales de la lec- déclenchée ture audio Pour arrêter l'alarme, appuyez sur l'une des tou- 10.1 Sélection du mode de lecture ches suivantes: Sélectionnez le mode correspondant pour la lecture n [Alarm 1] audio des différents supports ou des appareils n [Alarm 2] externes. -
Page 91: Mise En Sourdine De La Lecture
10.3 Mise en sourdine de la lecture 11.1 Radio FM Mise en sourdine 11.1.1 Recherche de stations FM Recherche automatique de stations Condition préalable: L'antenne DAB/FM est raccordée. Fig. 31: Mise en sourdine En mode de lecture, appuyez brièvement sur la touche [MUTE] de la télécommande pour couper le son pendant la lecture. -
Page 92: Mémorisation De Stations Fm
Condition préalable: Tournez le bouton de commande pour sélec- tionner l'emplacement mémoire souhaité. L'antenne DAB/FM est raccordée. Appuyez sur le bouton de commande pour mémoriser la station. Écoute des stations FM mémori- 11.1.3 sées Fig. 34: Mémoire de stations FM Appuyez brièvement sur l'une des touches d'em- Appuyez sur la touche [MENU]. -
Page 93: Mémorisation De Stations Dab
Recherche manuelle de stations ð Les stations DAB inactives sont supprimées. Pendant cette opération, l'écran affiche Condition préalable: [Pruning] (Voir la Fig. 39). L'antenne DAB/FM est raccordée. 11.2.2 Mémorisation de stations DAB Maintenez appuyée l'une des touches d'empla- cement mémoire de station de la télécom- mande. -
Page 94: Réglage Drc
11.2.5 Réglage DRC Le réglage DRC (Dynamic Range Compression) permet Si l'appareil se trouve en un autre mode, il de réduire la différence de volume entre les passages passe automatiquement en mode CD. doux et les passages forts. DRC propose 3 réglages différents possibles : En mode CD, l'écran affiche les informations sui- vantes: n DRC High... -
Page 95: Lecture Via Bluetooth
Appuyez sur la touche [MENU] pour ouvrir le menu du CD. Ce menu contient les fonctions sui- vantes: n Répétition d'une piste n Répétition de toutes les pistes du CD Fig. 42: Réglage du mode Bluetooth n Lecture aléatoire Allumez le sonoroSTEREO. n Reprise de la lecture du CD Appuyez sur la touche [MODE] à... -
Page 96: Lecture De Musique Via Bluetooth
Lecture de musique via Blue- 13.2 tooth Les formats pouvant être lus sont MP3 et WMA. Démarrage de la lecture Appuyez sur le bouton de commande ou sur la touche [Play/Pause] à l'avant du sonoroSTEREO ou sur la télécommande pour lancer la lecture. Interruption de la lecture Fig. -
Page 97: Lecture De Musique De Relaxation
Lecture de musique de rela- xation Les touches suivantes sont actives: – Play/Pause – Mute – Arrêt – Avance – Retour – Volume Fig. 46: Configuration de la musique de relaxation Allumez le sonoroSTEREO. Sortie du mode de musique de démonstration Appuyez sur la touche [MODE] jusqu'à... -
Page 98: 18 Résolution Des Erreurs
Résolution des erreurs Des erreurs peuvent survenir sur tous les appareils électriques. Il ne s'agit pas toujours d'un défaut sur l'appa- reil. Le tableau suivant a pour fonction de vous aider à remédier vous-même à la panne. Problème Cause possible Solution L'appareil ne s'allume pas Le câble d'alimentation n'est pas... -
Page 99: Nettoyage
Problème Cause possible Solution La pile est vide Remplacez la pile dans la télécom- mande (voir Ä Chapitre 7.5 « Pré‐ paration de la télécommande » à la page 83). D'autres émetteurs ou appareils Augmentez la distance entre la radio perturbent la liaison source de perturbation et le sonoroSTEREO. -
Page 100: Fiche Technique
Fiche technique Donnée Valeur Dimensions (l x p x h) env. 450 x 262,5 x 153 mm Poids env. 6,3 kg Gamme de fréquences FM 87,5 MHz – 108 MHz Gamme de fréquences DAB/ 174,928 MHz – 239,2 MHz DAB+ Intervalle d'accord (FM) 50 KHz Câble d'alimentation, puissance Entrée: 100 –... -
Page 101: Élimination
également caduque. La marque et le logo Bluetooth® sont la propriété de la Bluetooth SIG, Inc. et sont utilisés sous licence par la société sonoro audio GmbH. Déclaration de conformité Déclaration de conformité Fig. 49: Marquage CE Fabricant: sonoro audio GmbH ©... - Page 102 © 2013...
- Page 103 sonoroSTEREO (SO-310) Stereo-Musik-System mit Bluetooth -Technologie ® Instrucciones de manejo RADIO_CD_STEREO_BDA-Cover.indd 3 22.01.14 17:26...
- Page 104 Sonoro audio GmbH Unter Goldschmied 6 50667 Köln Teléfono: +49 221 167929-0 Telefax: +49 221 167929-290 Correo electrónico: info@sonoro-audio.com Internet: www.sonoro-audio.com sonoro Service Center Correo electrónico: support@sonoro-audio.com © 2013...
- Page 105 Índice de contenido Introducción............................107 Para su seguridad..........................107 Símbolos utilizados........................107 Uso conforme a lo previsto......................107 Niños y personas con facultades limitadas.................. 108 Alimentación de corriente......................108 Pilas.............................. 108 Láser............................. 108 Transporte........................... 108 Condiciones ambientales......................109 Funcionamiento........................... 109 2.10 Utilización de auriculares......................
- Page 106 Ajuste de la frecuencia de repetición del despertador..............123 Activar y desactivar el despertador..................... 123 Parar el despertador después de sonar la alarma............... 124 Ajuste de la función de aplazamiento..................124 Funciones generales de reproducción de audio.................. 124 10.1 Seleccionar el modo de reproducción..................124 10.2 Ajuste del volumen........................
-
Page 107: Introducción
Esperamos que disfrute de su nuevo aparato! conectados a través de AUX. Información de contacto n Reproducción de audio desde dispositivos Blue- Dirección sonoro audio GmbH tooth (p.ej. teléfonos móviles). Unter Goldschmied 6 n Carga de dispositivos externos conectados a través del puerto USB. -
Page 108: Niños Y Personas Con Facultades Limitadas
Niños y personas con facultades Pilas limitadas n Quite las pilas/baterías del compartimiento para pilas en cuanto se hayan descargado o si no tiene n No deje el aparato sin vigilancia y no lo utilice en previsto utilizar el aparato durante un período de presencia de niños o personas que no puedan eva- tiempo prolongado. -
Page 109: Condiciones Ambientales
Condiciones ambientales 2.10 Utilización de auriculares Para que el aparato funcione de manera segura, es n Disminuya siempre el volumen del aparato antes necesario que las condiciones ambientales sean ade- de colocarse los auriculares. No aumente el cuadas. Preste atención a lo siguiente: volumen al nivel deseado hasta que no se haya colocado correctamente los auriculares. -
Page 110: Formatos Soportados
4 Formatos soportados Formatos de CD admitidos L ¡INDICACIÓN! Daños materiales debido a un CD de formato incorrecto! Si intenta introducir un MiniDisc, el aparato podría resultar dañado. – Utilice únicamente los formatos de CD admi- tidos. n Compact Disc Digital Audio CD-DA n CD-R n CD-RW Formatos de audio admitidos... -
Page 111: Elementos De Mando Y Conexiones
5 Elementos de mando y conexiones Vista frontal del sonoroSTEREO Fig. 3: Vista frontal del sonoroSTEREO Nº Nombre Función (Fig. 3) Altavoz Salida de los altavoces. Reproducción / CD/USB: iniciar y pausar la reproducción. pausa Parar CD/USB: finalizar la reproducción. DAB y FM: botón de información. - Page 112 Nº Nombre Función (Fig. 3) En espera Encender y apagar el aparato. Parar la alarma. Retroceso n Pulsar: navegar por las opciones del menú; buscar emisoras FM/DAB; ir a la pista anterior de un CD, USB, música relajante o música de muestra. n Mantener pulsado: retroceder rápidamente.
- Page 113 Mando a distancia Fig. 5: Mando a distancia Nº Botón Función (Fig. 5) En espera Encender y apagar el aparato. DIMMER Encender y apagar el atenuador. Configurar el atenuador. MUTE n Pulsar brevemente (en el modo de reproducción): activar y desactivar el sonido (silenciamiento).
- Page 114 Nº Botón Función (Fig. 5) En todos los modos de reproducción: subir el volumen. Avance Buscar emisoras y navegar por los menús. OK, reproduc- Confirmar los ajustes seleccionados en el menú. Iniciar y pausar la reproducción de ción/pausa la pista seleccionada. Alarma 2 n Pulsar: activar y desactivar la alarma 2, parar la alarma.
-
Page 115: Pantalla
6 Pantalla Fig. 6: Pantalla Nº Icono Función (Fig. 6) Auriculares Los auriculares están conectados. Sleep El temporizador de apagado está activado. Repetir CD: repetir todas las pistas del CD. Relax Está activado el modo de relajación. Aleatorio CD: mezclar el orden de reproducción de las pistas. FM/AM/CD/ Indica el modo de funcionamiento seleccionado. -
Page 116: Desembalaje Y Puesta En Marcha Del Aparato
– No introduzca las pilas del revés. Preste aten- sonoro (véase Ä »Información de contacto« ción a la polaridad. en la página 107). -
Page 117: Establecer La Alimentación Eléctrica
Enrosque la antena FM/DAB suministrada a la Establecer la alimentación eléctrica conexión para antena DAB/FM que hay en la El aparato recibe la alimentación eléctrica por medio parte trasera del aparato. del cable de alimentación suministrado. La fuente de Despliegue la antena y oriéntela hasta encontrar alimentación está... -
Page 118: Ajuste De Las Funciones Básicas
Conecte la clavija de los auriculares a la entrada Gire el botón de control para ajustar los de auriculares que hay en la parte trasera del minutos. aparato. Pulse el botón de control para confirmar el Gire el botón de control lentamente hacia la ajuste. -
Page 119: Menú De Ajustes
Activar y desactivar la visualización de la fecha Ajustar el formato de la hora Fig. 12: Activar y desactivar la visualización de la Fig. 13: Ajustar el formato de la hora fecha Se pueden seleccionar dos formatos: 12 horas y 24 horas. -
Page 120: Ajustar El Temporizador De Apagado
El submenú [Clock Update] permite seleccionar la ð En la pantalla aparecerá el icono [SLEEP] actualización automática. Cuando esta función está (Fig. 19/1). activada, la fecha y la hora se sincronizan automática- Desactivar el temporizador de apagado mente en los modos radio FM y radio DAB (Fig. 15). Para desactivar el temporizador de apagado, Ajustar el idioma de la pantalla vuelva a pulsar el botón [SLEEP]. -
Page 121: Ajuste Del Sonido
Para ajustar los graves, seleccione [Bass] (Fig. 22/A) y pulse el botón [VOL +] o [VOL ‐]. Para ajustar los agudos, seleccione [Treble] (Fig. 22/B) uy pulse el botón [VOL +] o [VOL ‐]. Pulse el botón [OK] o espere 10 segundos para Fig. -
Page 122: Efecto De Sonido
Desactivar el ecualizador »Ajustar la hora del despertador è Ajustar el tipo de alarma En el submenú [Equalizer Effect], gire el botón è Ajustar el volumen del despertador de control hasta que en la pantalla aparezca è Ajustar la frecuencia de repetición del despertador [Equalizer Off]. -
Page 123: Ajuste Del Volumen Del Despertador
La alarma empieza a sonar siempre con el volumen mínimo y lo incrementa gradualmente hasta alcanzar el volumen ajustado. Fig. 25: Ajuste del tipo de alarma Ajuste de la frecuencia de repeti- Gire el botón de control para seleccionar el ción del despertador soporte que quiera utilizar: Después de ajustar y confirmar el volumen del des-... -
Page 124: Parar El Despertador Después De Sonar La Alarma
Parar el despertador después de Funciones generales de sonar la alarma reproducción de audio Para parar la alarma, pulse uno de los botones Seleccionar el modo de repro- 10.1 que se indican a continuación: ducción n [Alarma 1] n [Alarma 2] Para reproducir el audio de un soporte o de un apa- rato externo, seleccione el modo correspondiente. -
Page 125: Silenciar La Reproducción
10.3 Silenciar la reproducción 11.1 Radio FM Silenciar 11.1.1 Búsqueda de emisoras FM Búsqueda automática de emisoras Requisito: La antena DAB/FM debe estar conectada. Fig. 31: Silenciar En el modo de reproducción, pulse brevemente el botón [MUTE] del mando a distancia para apagar el sonido de la reproducción. -
Page 126: Guardar Emisoras Fm
Requisito: Pulse el botón de control para guardar la emi- sora. La antena DAB/FM debe estar conectada. Abrir una emisora FM memori- 11.1.3 zada Pulse brevemente un botón de posición de memoria del mando a distancia. Fig. 34: FM Speicher ð... -
Page 127: Guardar Emisoras Dab
Búsqueda manual de emisoras ð Se borrarán las emisoras DAB inactivas. Durante esta operación, en la pantalla apare- Requisito: cerá [Pruning] (Fig. 39). La antena DAB/FM debe estar conectada. 11.2.2 Guardar emisoras DAB Mantenga pulsado un botón de posición de memoria del mando a distancia. -
Page 128: Opción Drc
11.2.5 Opción DRC La opción DRC (Dynamic Range Compression) permite Si el aparato se encuentra en otro modo, reducir la diferencia de volumen entre los pasajes que se activará automáticamente el modo de se oyen flojo y fuerte. DRC permite seleccionar 3 ajustes distintos: En el modo de CD, la pantalla contiene la siguiente n DRC High (DRC alto) información:... -
Page 129: Reproducción A Través De Bluetooth
Pulse el botón [MENU] para abrir el menú del CD. Contiene las siguientes funciones: n Repetir una pista n Repetir todas las pistas del CD n Reproducción aleatoria Fig. 42: Ajuste del modo Bluetooth n Reanudar la reproducción del CD Encienda el sonoroSTEREO. -
Page 130: Reproducción De Música A Través De Bluetooth
Reproducción de música a través 13.2 de Bluetooth Se pueden reproducir los formatos MP3 y WMA. Iniciar la reproducción Para iniciar la reproducción, pulse el botón de control o el botón [Reproducción/pausa] de la parte delantera del sonoroSTEREO o del mando a distancia. -
Page 131: Reproducción De Música Relajante
Reproducción de música rela- jante Pueden utilizarse los siguientes botones: – Reproducción/pausa – Silenciar – Parar – Avar – Retroceso – Volumen Fig. 46: Ajuste de la música relajante Encienda el sonoroSTEREO. Salir del modo de música de muestra Pulse el botón [MODE] hasta que en la pantalla Para salir del modo de música de muestra, pulse aparezca el modo [Relax]. -
Page 132: Solución De Problemas
Solución de problemas Todos los aparatos eléctricos pueden sufrir algún problema. No obstante, esto no siempre significa que el apa- rato esté averiado. Por este motivo, intente solucionar el problema usted mismo con ayuda de la siguiente tabla. Problema Causa posible Solución El aparato no se enciende El cable de alimentación no está... -
Page 133: Limpieza
Problema Causa posible Solución El mando a distancia no funciona o Está demasiado lejos Reduzca la distancia entre el mando funciona incorrectamente a distancia y el aparato. La pila está agotada Cambie la pila del mando a dis- tancia (véase el Ä... -
Page 134: Datos Técnicos
Datos técnicos Característica Valor Dimensiones (an x pr x al) Aprox. 450 x 262,5 x 153 mm Peso Aprox. 6,3 kg Gama de frecuencias FM 87,5 MHz – 108 MHz Gama de frecuencias DAB/DAB+ 174,928 MHz – 239,2 MHz Intervalo de sintonización (FM) 50 KHz Cable de alimentación Entrada: 100 –... -
Page 135: Eliminación De Residuos
El nombre Bluetooth® y sus logotipos son propiedad tros. de Bluetooth SIG, Inc. y son utilizados bajo licencia por sonoro audio GmbH. Declaración de conformidad Declaración de conformidad Fig. 49: Símbolo CE Fabricante: sonoro audio GmbH ©... - Page 136 © 2013...
- Page 137 sonoroSTEREO (SO-310) Stereo-Musik-System mit Bluetooth -Technologie ® Manuale operativo RADIO_CD_STEREO_BDA-Cover.indd 3 22.01.14 17:26...
- Page 138 Unter Goldschmied 6 50667 Köln Telefono: +49 221 167929-0 Fax: +49 221 167929-290 E-mail: info@sonoro-audio.com Internet: www.sonoro-audio.com sonoro Service Center IT Tecnostyle S.r.l. Via Rodi 6 25124 Brescia Italy Telefono: +39 30 24 52 475 Fax: +39 30 24 75 606 E-mail: f.tononi@tecnofuturo.it...
- Page 139 Indice Introduzione............................141 Per la vostra sicurezza.......................... 141 Simboli presenti in queste istruzioni.................... 141 Utilizzo conforme alla destinazione d'uso................... 141 Bambini e persone con capacità di percezione limitata.............. 142 Alimentazione..........................142 Batterie............................142 Laser............................. 142 Trasporto............................. 142 Condizioni ambientali........................142 Funzionamento..........................
- Page 140 Impostare la ripetizione della sveglia..................157 Attivazione/disattivazione della sveglia..................157 Spegnere la sveglia ........................158 Impostare la funzione Snooze...................... 158 Funzioni generali della riproduzione audio..................158 10.1 Selezionare la modalità di riproduzione..................158 10.2 Regolare il volume........................158 10.3 Disattivare l'audio........................159 Trasmissione dei programmi radio......................
-
Page 141: Introduzione
Riproduzione audio da dispositivo USB esterno. Contatti n Riproduzione audio da dispositivi esterni collegati Indirizzo sonoro Service Center IT tramite l'ingresso AUX. Tecnostyle S.r.l. n Riproduzione audio da dispositivi connessi via Blue- Via Rodi 6 tooth (ad es. telefoni cellulari). -
Page 142: Bambini E Persone Con Capacità Di Percezione Limitata
n Non cercare di ricaricare le batterie non ricaricabili. Bambini e persone con capacità di Non cercare di aprire o cortocircuitare le batterie o percezione limitata le batterie ricaricabili. Sussiste pericolo di esplo- sione. n Non lasciare l'apparecchio incustodito e non utiliz- n Il liquido che fuoriesce dalle batterie in caso di uti- zarlo in vicinanza di bambini o persone che non lizzo errato di queste ultime può... -
Page 143: Funzionamento
n Proteggere l'apparecchio dagli agenti atmosferici. 2.10 Utilizzo di cuffie Non utilizzare mai l'apparecchio all'aperto e non n Prima di indossare le cuffie abbassare sempre il esporlo mai ai raggi diretti del sole. volume dell’apparecchio. Solo dopo aver indossato n Non collocare mai l'apparecchio sopra o nelle correttamente le cuffie, alzare il volume fino a rag- immediate vicinanze di fuochi vivi e fonti di calore, giungere il livello desiderato. -
Page 144: Formati Supportati
4 Formati supportati Formati CD supportati L NOTA! Danni materiali in seguito a un formato errato del CD! L'inserimento di un mini-disc può comportare danni all'apparecchio. – Utilizzare solo i formati CD supportati. n Compact Disc Digital Audio CD-DA n CD-R n CD-RW Formati audio supportati n CD-DA... -
Page 145: Comandi E Collegamenti
5 Comandi e collegamenti Lato frontale di sonoroSTEREO Fig. 3: lato frontale di sonoroSTEREO Pos. Denomina- Funzione zione (Fig. 3) Altoparlante Griglia dell'altoparlante. Play/Pause CD/USB: avviare/interrompere la riproduzione. Stop CD/USB: terminare la riproduzione. Tasto info DAB e FM. Display LC Quando l'apparecchio è... - Page 146 Pos. Denomina- Funzione zione (Fig. 3) Standby Accendere/spegnere l’apparecchio. Spegnere l'allarme. Indietro n Premere: navigazione tra le voci del menu; cercare le emittenti FM/DAB; titolo precedente del CD, USB, musica relax e musica demo. n Premere e tenere premuto: riavvolgimento rapido. Lato posteriore di sonoroSTEREO Fig.
- Page 147 Telecomando Fig. 5: Telecomando Pos. Tasto Funzione (Fig. 5) Standby Accendere/spegnere l’apparecchio. DIMMER Attivare/disattivare la funzione dimmer. Definire le impostazioni della funzione dimmer. MUTE n Premere brevemente (in modalità Riproduzione): attivare/disattivare la riprodu- zione dei suoni (funzione Mute). SNOOZE n Premere brevemente (in modalità Sveglia): attivare la ripetizione della sveglia (Snooze).
- Page 148 Pos. Tasto Funzione (Fig. 5) Tutte le modalità di riproduzione: alzare il volume. Avanti Ricerca delle emittenti e navigazione attraverso i menu. OK, Play/Pause Confermare le impostazioni selezionate nel menu. Riprodurre o interrompere il titolo selezionato. Allarme 2 n Premere: attivare/disattivare l'allarme 2, spegnere l'allarme. n Premere e tenere premuto: impostare l'allarme.
-
Page 149: Display
6 Display Fig. 6: Display Pos. Icona Funzione (Fig. 6) Cuffie Le cuffie sono collegate. Sleep La funzione Sleep Timer è attiva. Repeat CD: Ripetizione di tutti i titoli del CD. Relax La modalità Relax è attiva. Shuffle CD: Riproduzione dei singoli titoli del CD in ordine casuale. FM/AM/CD/ Indica la modalità... -
Page 150: Apertura Della Confezione E Messa In Funzione
Se si dovesse riscontrare un danno, rivolgersi – Non inserire le batterie al contrario. Prestare subito al rivenditore oppure all'assistenza attenzione alla corretta polarità. clienti di sonoro ( Ä »Contatti« a pag. 141). Sistemare l'apparecchio in una posizione adatta e rimuovere la pellicola protettiva dal display. -
Page 151: Collegamento All'alimentazione Elettrica
L'antenna in dotazione è necessaria per la ricezione Collegamento all'alimentazione delle trasmissioni radio in gamma di frequenza FM e elettrica DAB. Avvitare l'antenna FM/DAB in dotazione nell'in- L'alimentazione elettrica dell'apparecchio avviene gresso dell'antenna DAB/FM situato sul retro mediante il cavo fornito in dotazione. L'alimentatore dell'apparecchio. -
Page 152: Impostazione Delle Funzioni Di Base
ð Il display visualizza il menu [Set Time] L AVVERTIMENTO! (Fig. 10). L'utilizzo improprio delle cuffie può comportare Premere la manopola per impostare le ore. pericolo di lesioni! L'utilizzo improprio delle cuffie può causare gravi ð L’indicazione delle ore lampeggia. incidenti e danni alla salute. -
Page 153: Menu Delle Impostazioni
Visualizza/nascondi data Impostare il formato orario Fig. 12: visualizza/nascondi data Fig. 13: impostare il formato orario È possibile scegliere il formato 24 ore o il formato 12 Premere in modalità Standby il tasto [MENU] ore. Nel formato 12 ore accanto all'ora si visualizza la dell'apparecchio o del telecomando. -
Page 154: Impostare La Funzione Sleep Timer
Nel sottomenu [Clock update] (Fig. 15) è possibile ð Il display visualizza la scritta [SLEEP] selezionare l'aggiornamento automatico. Una volta (Fig. 19/1). attivata questa funzione, in modalità di trasmissione Disattivare Sleep Timer radio FM e DAB avviene la sincronizzazione automa- Per disattivare la funzione Sleep Timer premere tica dell'ora e della data. -
Page 155: Impostare Il Dimmer
Impostazione mediante il telecomando Impostare il dimmer Con questa funzione si imposta la retroilluminazione del display. Fig. 22: regolare i suoni Premere il tasto [Bass] oppure [Treble] del tele- comando. Fig. 21: impostare il dimmer Premere per circa 2 secondi il tasto [DIMMER] Per regolare i bassi selezionare [Bass] (Fig. -
Page 156: Effetto Stereo
Ruotare la manopola per selezionare una delle 9 Funzione sveglia impostazioni predefinite. Con questo apparecchio è possibile programmare la È possibile selezionare una delle seguenti alter- sveglia su un'emittente radio FM/DAB, su un CD, sulla native: musica relax o su una suoneria. n Bass MAX Tutte le impostazioni si stabiliscono con una pres- sione prolungata sui tasti [Allarme 1] o [Allarme 2]... -
Page 157: Impostare Il Tipo Di Allarme Per La Sveglia
Impostare il tipo di allarme per la sveglia La sveglia suona inizialmente sempre a volume minimo. Il volume aumenta progressivamente fino Una volta impostata e confermata l'ora, è possibile al volume impostato. selezionare il tipo di allarme per la sveglia (Fig. 25). Impostare la ripetizione della sve- glia Una volta impostato e confermato il volume, è... -
Page 158: Spegnere La Sveglia
Funzioni generali della ripro- Spegnere la sveglia Per spegnere la sveglia premere uno dei duzione audio seguenti tasti: Selezionare la modalità di ripro- 10.1 n [Allarme 1] duzione n [Allarme 2] n Manopola Per la riproduzione audio dei vari supporti o di appa- n [Standby] recchi esterni selezionare la modalità... -
Page 159: Disattivare L'audio
10.3 Disattivare l'audio 11.1 Radio FM Funzione Mute 11.1.1 Cercare emittenti FM Ricerca automatica delle emittenti Premessa: L'antenna DAB/FM è connessa. Fig. 31: funzione Mute In modalità di riproduzione premere breve- mente il tasto [MUTE] del telecomando, per escludere l'audio durante la riproduzione. Fig. -
Page 160: Memorizzare Le Emittenti Fm
Premessa: Premere la manopola per salvare l'emittente. L'antenna DAB/FM è connessa. Richiamare le emittenti FM sal- 11.1.3 vate Premere brevemente sul telecomando uno dei tasti di memorizzazione delle emittenti. ð L'emittente selezionata viene riprodotta. Fig. 34: memoria FM Premere il tasto [MENU]. 11.2 Radio DAB ð... -
Page 161: Memorizzare Le Emittenti Dab
Ricerca manuale delle emittenti ð Le emittenti DAB non più attive vengono cancellate. Durante questa operazione sul Premessa: display si visualizza [Pruning] (Fig. 39). L'antenna DAB/FM è connessa. 11.2.2 Memorizzare le emittenti DAB Premere e tenere premuto sul telecomando uno dei tasti di memorizzazione delle emittenti. -
Page 162: Riproduzione Cd
Esistono 3 diverse possibilità di impostazione DRC: n DRC HIGH n DRC LOW n DRC OFF Premessa: L’apparecchio è in modalità DAB. Premere il tasto [MENU]. Fig. 41: display in modalità CD ð Sul display si visualizza il testo [DAB Preset List]. Sequenza di riproduzione (Repeat, Shuffle, Resume) Modalità... -
Page 163: Riproduzione Bluetooth
Ripetizione di un titolo Collegare e cancellare dispositivi 13.1 Il titolo attuale viene ripetuto all’infinito. Questa fun- Bluetooth zione termina se si cambia modalità o se si estrae il Collegare dispositivi con connettività Bluetooth Ripetizione di tutti i titoli Tutti i titoli del CD vengono ripetuti all'infinito. Questa funzione termina se si cambia modalità... -
Page 164: Riproduzione Usb
Premendo il tasto [USB] sul telecomando è possibile visualizzare i dati ID3, se presenti. La sequenza è la seguente: »Titolo è Interprete è Album Fig. 44: attivare la riproduzione AUX è Tempo trascorso« Accendere il sonoroSTEREO. Terminare la riproduzione USB Inserire il cavo RCA nell'ingresso AUX 1 o il con- Premere la manopola o il tasto [Stop] sul lato nettore jack da 3,5 mm nell'ingresso AUX 2 sul... - Page 165 Attivare la modalità Musica Demo Premere e tenere premuta la manopola per circa 3 secondi. ð Si attiva la modalità Musica Demo. Premere i tasti di memorizzazione 1–6 sul tele- comando per selezionare un titolo. ð Il display visualizza il titolo di musica demo selezionato.
-
Page 166: Risoluzione Dei Problemi
Risoluzione dei problemi Tutti gli apparecchi elettrici possono presentare dei problemi. Questo non vuol sempre dire che l'apparecchio sia difettoso. Controllare pertanto sulla base della seguente tabella se sia possibile eliminare autonomamente il problema. Problema Possibile causa Risoluzione L'apparecchio non si accende Il cavo elettrico non è... -
Page 167: Pulizia
Problema Possibile causa Risoluzione Il telecomando non funziona La distanza è troppo grande Ridurre la distanza tra il teleco- oppure non funziona corretta- mando e l'apparecchio. mente Batteria scarica Sostituire la batteria del teleco- mando (vedere il Ä Capi‐ tolo 7.5 »Preparare il teleco‐ mando«... -
Page 168: Dati Tecnici
Dati tecnici Dati Valore Dimensioni (LxPxA) circa 450 x 262,5 x 153 mm Peso circa 6,3 kg Gamma di ricezione FM 87,5 MHz – 108 MHz Gamma di ricezione DAB/DAB+ 174,928 MHz – 239,2 MHz Intervallo di sintonizzazione (FM) 50 KHz Cavo elettrico, potenza Input: 100 –... -
Page 169: Smaltimento
Bluetooth altresì decadere il diritto alla garanzia. Fig. 48: Contrassegno Bluetooth Il marchio e il logo Bluetooth® sono proprietà di Bluetooth SIG, Inc. e sono utilizzati da sonoro audio GmbH su licenza. Dichiarazione di conformità Dichiarazione di conformità Fig. 49: marcatura CE Produttore: sonoro audio GmbH ©... - Page 170 © 2013...
- Page 171 sonoroSTEREO (SO-310) Stereo-Musik-System mit Bluetooth -Technologie ® Betjeningsvejledning RADIO_CD_STEREO_BDA-Cover.indd 3 22.01.14 17:27...
- Page 172 Unter Goldschmied 6 50667 Köln Telefon: +49 221 167929-0 Telefax: +49 221 167929-290 e-mail: info@sonoro-audio.com Internet: www.sonoro-audio.com sonoro Service Center DK EET Danmark A/S Bregnerødvej 133 D DK- 3460 Birkerød Telefon: +45 45 82 19 19 Telefax: +45 45 82 16 09...
- Page 173 Indholdsfortegnelse Indledning............................. 175 Af hensyn til din sikkerhed........................175 Symboler in denne vejledning..................... 175 Formålsbestemt anvendelse......................175 Børn og personer med nedsat opfattelsesevne................175 Spændingsforsyning........................175 Batterier............................176 Laser............................. 176 Transport............................. 176 Omgivende betingelser........................ 176 Anvendelse..........................177 2.10 Anvendelse af hovedtelefoner....................177 2.11 Defekt............................
- Page 174 Indstilling af vækkegentagelse..................... 190 Aktivering/deaktivering af vækkefunktion.................. 190 Frakobling af vækkefunktion efter udløsning af alarmen............190 Indstilling af Snooze-funktionen....................191 Generelle funktioner i forbindelse med afspilning ................191 10.1 Valg af afspilningsfunktion......................191 10.2 Indstilling af lydstyrke........................ 191 10.3 Deaktivering af lyden......................... 191 Afspilning af radio..........................
-
Page 175: Indledning
Vi ønsker dig god fornøjelse med apparatet! rater (f.eks. mobiltelefoner). Kontaktoplysninger n Opladningsfunktion til eksterne apparater, som til- Adresse sonoro Service Center DK sluttes via USB-porten. EET Danmark A/S Bregnerødvej 133 D I forbindelse med opladningsfunktionen skal du DK- 3460 Birkerød læse specifikationerne i producentens betjenings‐... -
Page 176: Batterier
n Tag aldrig fat i netstikket med våde hænder. Laser n Hvis du vil trække netstikket ud af stikkontakten, skal du altid trække direkte i netstikket. Træk aldrig i kablet, da det derved kan blive beskadiget. n Sørg for, at der til enhver tid er uhindret adgang til den anvendte stikkontakt, så... -
Page 177: Anvendelse
Anvendelse 2.12 Rengøring n Rengør kun enheden udvendigt ved hjælp af en tør, blød klud. Anvend aldrig aggressive eller opløs- ningsmiddelholdige rengørningsmidler, da de kan angribe enhedens overflade. n Hvis enheden er blevet snavset, kan du tørre det af med en hårdt opvredet klud og tørre efter med en tør, blød klud. -
Page 178: Betjeningselementer Og Tilslutninger
5 Betjeningselementer og tilslutninger sonoroSTEREO set forfra Fig. 3: sonoroSTEREO set forfra Pos. Betegnelse Funktion (Fig. 3) Højttaler Højttaleråbning. Play/Pause CD/USB: Start/midlertidig standsning af afspilning. Stop CD/USB: Afslutning af afspilning. DAB og FM: Infoknap. LC-display Når apparatet er slukket, viser displayet det aktuelle klokkeslæt og datoen, og når apparatet er tændt, vises oplysninger om den valgte funktion MENU Åbning og lagring/lukning af menupunkter. - Page 179 Pos. Betegnelse Funktion (Fig. 3) Standby Gerät ein-/ausschalten. Alarm stoppen. Tilbage n Når der trykkes på knappen: Navigation gennem menupunkter; søgning af FM/ DAB-stationer, forrige nummer ved cd, USB, Relax Music, Demo Sound. n Når knappen holdes inde: hurtig tilbagespoling. sonoroSTEREO set bagfra Fig.
- Page 180 Fjernbetjening Fig. 5: Fjernbetjening Pos. Knap Funktion (Fig. 5) Standby Tænding/slukning af apparatet. DIMMER Aktivering/deaktivering af baggrundsbelysningen. Udfører indstillinger af bag- grundsbelysningen. MUTE n Kort tryk (ved afspilning): Aktivering/deaktivering af lyd (mute). SNOOZE n Kort tryk (ved indstillet alarm): Start af snooze. n Langt tryk: Åbning af menuen [Snooze Setting] til indstilling af snooze-tiden.
- Page 181 Pos. Knap Funktion (Fig. 5) OK, Play/Pause Bekræftelse af valgte indstillinger i menuen. Afspilning eller midlertidig standsning af valgt nummer. Alarm 2 n Når der trykkes på knappen: Aktivering/deaktivering af Alarm 2, slukning af alarm. n Hvis knappen holdes inde: Indstilling af alarm. Hukommelses- n Stationshukommelse.
-
Page 182: Display
6 Display Fig. 6: Display Pos. Symbol Funktion (Fig. 6) Hovedtele- Hovedtelefoner er tilsluttet. foner Sleep Sleep Timer er aktiv. Repeat Cd: Gentagelse af alle numre på cd'en. Relax Relax-funktionen er aktiv. Shuffle Cd: Vilkårlig afspilningsrækkefølge af de enkelte numre. FM/AM/CD/ Viser den valgte funktion. -
Page 183: Udpakning Og Ibrugtagning Af Apparatet
Hvis du konstaterer en skade, skal du omgå‐ Apparatet kan blive beskadiget på grund af forkert ende kontakte forhandleren eller supportaf‐ håndtering af batterier. delingen hos sonoro ( Ä »Kontaktoplys‐ ninger« på side 175). – Læg ikke batterier forkert i. Sørg for, at polerne vender rigtigt. -
Page 184: Spændingsforsyning
Fold antennen ud, og placer den, så du opnår en Spændingsforsyning optimal modtagelse. Apparatet forsynes med spænding via det medføl- gende netkabel. Netdelen er integreret i selve appa- ratet. For at opnå en god FM/DAB radiomodtagelse bør L ADVARSEL! antennens to ender sammen med tilslutningsled‐ ningen danne et "T"... -
Page 185: Indstilling Af Grundfunktioner
8 Indstilling af grundfunktioner I de forskellige menuer kan du vælge funktioner og Med knappen [Fremad] eller [Tilbage] foretage indstillinger af apparatet kan du skifte mellem visningen af timer og minutter. Første gang apparatet tændes Første gang du tænder apparatet, vises klokkeslættet og meddelelsen [Tune to FM RDS station to set time &... -
Page 186: Menuen Settings
Indstilling af datoformat Menuen Settings Når apparatet er tændt kan du i menuen [Settings] foretage følgende indstillinger: n Indstilling af klokkeslætsformat. n Indstilling af datoformat. n Indstilling af Sleep Timer. n Indstilling af displayets lysstyrke. n Indstilling af automatisk opdatering af klokkeslæt/ dato. -
Page 187: Indstilling Af Sleep Timer
Det er muligt at indstille sproget for menu og afspil- Indstilling af tidsinterval for Sleep Timer ningsvisning (Fig. 16). Du kan vælge mellem følgende sprog n engelsk og n tysk. Aktivering og deaktivering af Demo Sound Fig. 20: Indstilling af tidsinterval for Sleep Timer Tryk længe på... -
Page 188: Klangindstillinger
Indstil lysstyrken fra trin 8–15 ved at dreje på Vælg [Bass] for at indstille bassen og drej på betjeningsknappen. betjeningsknappen. Vælg [Treble] for at indstille diskanten og drej på betjeningsknappen. Bekræft indstillingen ved at trykke på betje- ningsknappen eller knappen [OK] på fjernbetj- Du bekræfter indstillingen ved at trykke på... -
Page 189: Vækkefunktion
Tryk på betjeningsknappen for at bekræfte dit Hold knappen [Alarm 1] eller [Alarm 2] nede. valg. ð På displayet vises menuen [Set Alarm 1 Time] Drej på betjeningsknappen, indtil displayet viser (Fig. 24) eller [Set Alarm 2 Time]. [Max. Stereo]. Drej på... -
Page 190: Indstilling Af Vækkelydstyrke
Bekræft dit valg ved at trykke på betjenings- Aktivering/deaktivering af vække- knappen eller knappen [OK] på fjernbetjeningen. funktion ð Alarmkilden er indstillet. Aktivering af vækkefunktion Du aktiverer vækkefunktionen ved at trykke kort Indstilling af vækkelydstyrke på knappen [Alarm 1] eller [Alarm 2] foran på apparatet eller på... -
Page 191: Indstilling Af Snooze-Funktionen
Indstilling af Snooze-funktionen 10.2 Indstilling af lydstyrke Fig. 28: Indstilling af Snooze‐funktionen Tryk kort på knappen [SNOOZE] på fjernbetj- Fig. 30: Indstilling af lydstyrke eningen i standby-tilstand. Mens apparatet er Drej på betjeningsknappen for at skrue op eller tændt, skal du trykke på knappen [SNOOZE] på ned for lyden (Fig. -
Page 192: Fm-Radio
Forudsætning: DAB/FM-antennen er tilsluttet. RDS er kun tilgængelig for stationer på FM fre‐ kvensområdet og kun, hvis den pågældende sta‐ tion sender RDS‐data. Hvis stationen ikke sender RDS-tekst, vises frekvensen i stedet for stationsnavnet. Fig. 34: FM Preset List 11.1 FM-radio Tryk på... -
Page 193: Hentning Af Lagrede Fm-Stationer
Tryk på betjeningsknappen for at gemme stati- Tryk på knappen [MENU] i DAB-afspilningsfunk- onen. tion. Hentning af lagrede FM-stati- ð På displayet vises teksten [DAB Preset List]. 11.1.3 oner Drej på betjeningsknappen, indtil displayet viser [DAB Manual Tune] (Fig. 37). Tryk kort på... -
Page 194: Hentning Af Lagrede Dab-Stationer
ð Displayet viser teksten [DAB Preset List]. Du kan lagre op til 6 DAB stationer med fjernbetj‐ eningen. Hentning af lagrede DAB-stati- 11.2.3 oner Fig. 40: DRC Setting Tryk kort på en af stationshukommelsesknap- Drej på betjeningsknappen, indtil displayet viser perne på... -
Page 195: Afspilning Via Bluetooth
Repeat One Det aktuelle nummer gentages. Denne funktion deak- tiveres, hvis du skifter funktion eller tager cd'en ud. Repeat Disc Alle numre på cd'en gentages. Denne funktion deakti- veres, hvis du skifter funktion eller tager cd'en ud. Shuffle Disc Numrene på cd'en afspilles i vilkårlig rækkefølge. Fig. -
Page 196: Forbindelse Og Sletning Af Bluetooth-Enheder
Forbindelse og sletning af Blue- 13.1 tooth-enheder Forbindelse af Bluetooth-kompatible enheder Fig. 44: Aktivering af afspilning via AUX Tænd sonoroSTEREO. Tilslut RCA-kablet til AUX 1-indgangen eller til- Fig. 43: Søgning efter Bluetooth enheder slut 3,5 mm jackstikket til AUX 2-indgangen på Aktiver Bluetooth-funktionen. -
Page 197: Afspilning Af Relax Music
Tryk på knappen [Play/Pause] for at starte afspil- Aktivering af funktionen Demo Sound ningen. Tryk på betjeningsknappen, og hold den nede i ca. 3 sekunder. ð Funktionen Demo Sound aktiveres. Hvis du trykker på knappen [USB] på fjern‐ betjeningen, kan du få vist ID3 tags, hvis Tryk på... -
Page 198: Fejlafhjælpning
Fejlafhjælpning Der kan forekomme fejl på alle elektriske apparater. Det betyder dog ikke, at der altid er tale om en defekt på apparatet. Prøv derfor, om du selv kan afhjælpe fejlen ved hjælp af følgende tabel. Fejl Mulig årsag Afhjælpning Apparatet tænder ikke Lysnetledningen er ikke tilsluttet Tilslut lysnetledningen rigtigt (se... -
Page 199: Rengøring
Fejl Mulig årsag Afhjælpning Fejl på grund af andre radiosendere Øg afstanden mellem støjkilden og eller apparater sonoroSTEREO. Tilslut apparatet til en anden stikkontakt, så støjkilden og sonoroSTEREO er tilsluttet for- skellige strømkredse. Alarmen fungerer ikke Alarmen er ikke aktiveret Aktiver alarmen (se Ä... -
Page 200: Tekniske Data
Tekniske data Element Værdi Mål (BxDxH) ca. 450 x 262,5 x 153 mm Vægt ca. 6,3 kg Modtageområde, FM 87,5 MHz – 108 MHz Modtageområde, DAB/DAB+ 174,928 MHz – 239,2 MHz Afstemningsområde (FM) 50 KHz Lysnetledning, power Input: 100 – 240 V ~50/60 Hz Bluetooth Version: 3.0 (EDR) Profil: AVRCP 1.0, A2DP 1.2... -
Page 201: Bortskaffelse
Bluetooth Fig. 48: Bluetooth‐mærkning Bluetooth®-ordmærket og -logoerne ejes af Blue- tooth SIG, Inc. og anvendes af sonoro audio GmbH i henhold til licens. Overensstemmelseserklæ- ring Overensstemmelseserklæring Fig. 49: CE‐mærkning Producent: sonoro audio GmbH ©... - Page 202 © 2013...
- Page 203 www.sonoro-audio.com...